AWS EKS 配置及相关操作
EKS 集群特性总结
- 节点的 IP 地址(EXTERNAL-IP 和 INTERNAL-IP)不固定,会变化。特别是在自治模式中,节点被视为 临时资源(Ephemeral) ,可能会频繁地进行节点池优化。
如果集群需要固定的出口 IP,最推荐,最标准的做法是 使用 NAT 网关 ,将 EKS 节点部署在私有子网中,所有访问外部网络的流量都会经过 NAT 网关
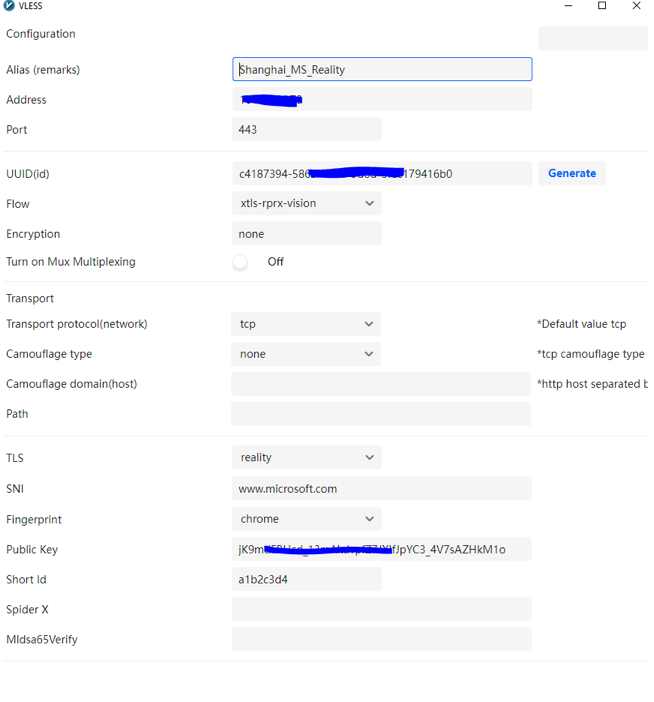
通过 AWS 管理控制台部署 EKS 集群
- Kubernetes 版本: v1.35
本示例中使用 EKS 自治模式(EKS Auto Mode)
EKS 自治模式 接管了原本需要手动管理的节点、存储和网络配置,因此它需要一组非常具体且强大的权限
EKS 自治模式 有额外的费用
EKS 自治模式 在集群创建完成后可修改(编辑)为非自治模式,但是不能通过 API 方式(如 Terraform)从普通模式切换到自治模式
EKS 自治模式 中的 Worker Nodes 配置 不能在控制台修改参数、不能自定义 ,具体的配置可以通过 API 接口查看
nodepool资源
Name: general-purpose
Namespace:
Labels: app.kubernetes.io/managed-by=eks
Annotations: karpenter.sh/nodepool-hash: 4012513481623584108
karpenter.sh/nodepool-hash-version: v3
API Version: karpenter.sh/v1
Kind: NodePool
Metadata:
Creation Timestamp: 2026-02-06T09:38:18Z
Generation: 1
Resource Version: 784637
UID: e85261b9-3a4b-41b0-ac5...
Spec:
Disruption:
Budgets:
Nodes: 10% # 这是一个安全阀。在同一时间内,由于缩容或更新导致的节点离线比例不能超过 10%。这保证了你的集群不会因为自动优化而导致业务大面积中断。
Consolidate After: 30s # 节点达到 Consolidation Policy 状态 30 秒后,EKS 就会考虑将其关闭,并把上面的 Pod 迁移到更划算的节点上。
Consolidation Policy: WhenEmptyOrUnderutilized # 当节点变为空闲(没有除 DaemonSet 外的其他 Pod)或者利用率较低(比如一个大节点只跑了一个小 Pod)时,EKS 会自动触发节点合并。
# 风险点:如果你的系统组件(如 CSI、ALB Controller)没有设置合理的 requests,EKS 会认为这些 Pod “不占地方”,从而选择一个极小的节点(如 4Gi 内存机型)来承载它们和一些大负载的 Workload,如 Confluence。
limits: # 资源限制
cpu: "1000"
memory: 1000Gi
Template:
Metadata:
Spec:
Expire After: 336h # 节点的最大“寿命”是 14 天(336 小时),强制节点定期更换,以确保所有节点都运行在最新的安全补丁和 Bottlerocket 镜像上,防止出现长期未重启的“僵尸节点”。
Node Class Ref: # nodeclass 信息,可通过 kubectl get nodeclass 查看
Group: eks.amazonaws.com
Kind: NodeClass
Name: default
Requirements: # 节点选择标准 (Requirements)
Key: karpenter.sh/capacity-type # 实例类型,on-demand 为 按需实例
Operator: In
Values:
on-demand
Key: eks.amazonaws.com/instance-category # 限定了实例系列 c: 计算优化型(适合高并发); m: 通用型(平衡 CPU 和内存); r: 内存优化型(适合数据库或缓存)。
Operator: In
Values:
c
m
r
Key: eks.amazonaws.com/instance-generation # 只使用 4 代以后的机型(如 c5, m6i 等)。这确保了节点拥有较新的硬件特性和性能。
Operator: Gt
Values:
4
Key: kubernetes.io/arch # CPU 架构。如果你想尝试性价比更高的 ARM 架构(Graviton),需要在这里添加 arm64
Operator: In
Values:
amd64
Key: kubernetes.io/os # 节点操作系统(OS)类型
Operator: In
Values:
linux
Termination Grace Period: 24h0m0sEKS 自治模式限制资源上限 编辑 NodePool,修改
spec.limits.cpu和spec.limits.memory。这决定了该池子最多能“烧”掉多少 EC2 资源。强制回收节点 : 如果你想让 EKS 重新平衡节点(例如你更改了实例限制),可以手动删除节点,Auto Mode 会自动根据 Pod 需求拉起符合新规的新节点
同时要关注
nodeclass资源,其中定义了 子网(Subnet)和安全组(Security Group)等信息
NAME ROLE READY AGE
default eksNodeRole True 44h
kubectl describe nodeclass default
Name: default
Namespace:
Labels: app.kubernetes.io/managed-by=eks
Annotations: eks.amazonaws.com/nodeclass-hash: 13740036326424352917
eks.amazonaws.com/nodeclass-hash-version: v2
API Version: eks.amazonaws.com/v1
Kind: NodeClass
Metadata:
Creation Timestamp: 2026-02-06T09:38:18Z
Finalizers:
eks.amazonaws.com/termination
Generation: 2
Resource Version: 827607
UID: 5065b0f3-3795-4347-893a-338ae6fa882d
Spec:
Ephemeral Storage:
Iops: 3000
Size: 80Gi
Throughput: 125
Network Policy: DefaultAllow
Network Policy Event Logs: Disabled
Role: eksNodeRole
Security Group Selector Terms:
Id: sg-058bd1ef...
Snat Policy: Random
Subnet Selector Terms:
Id: subnet-07963d9b...
Id: subnet-0e359aac...
Id: subnet-0e76c601...
AWS EKS Auto Mode 使用建议:
使用 PriorityClass 来管理 Pod 的优先级,确保高优先级 Pod 先被调度 。确保即便在资源极度紧张时,核心控制器(如 ALB Controller, CSI)也能优先获得资源,甚至通过驱逐业务 Pod 来“腾位子”。先创建不同的优先级对象。 优先级数值(Value)越高,重要程度越高 。
# 1. 系统级核心组件优先级 (非常高)
apiVersion: scheduling.k8s.io/v1
kind: PriorityClass
metadata:
  name: infrastructure-critical
value: 1000000
globalDefault: false
description: "用于核心控制器,如 ALB, CSI, Metrics-server"
---
# 2. 核心业务应用优先级 (中等)
apiVersion: scheduling.k8s.io/v1
kind: PriorityClass
metadata:
  name: business-critical
value: 10000
globalDefault: false
preemptionPolicy: Never      # 抢占策略. 可选值:PreemptLowerPriority(默认值,驱逐低优先级 Pod), Never(从不驱逐低优先级 Pod,只想让高优先级 Pod 在排队时优先进入节点)
description: "用于 Confluence 等核心生产应用"
---
# 3. 普通/低优先级任务 (默认)
apiVersion: scheduling.k8s.io/v1
kind: PriorityClass
metadata:
  name: low-priority
value: 100
globalDefault: true  # 如果不指定优先级,默认走这个
description: "用于开发测试、非核心后台任务"
系统通常已经存在 PriorityClass 对象
$ kubectl get priorityclass
NAME                      VALUE        GLOBAL-DEFAULT   AGE     PREEMPTIONPOLICY
rancher-critical          1000000000   false            2d18h   PreemptLowerPriority
system-cluster-critical   2000000000   false            3d3h    PreemptLowerPriority
system-node-critical      2000001000   false            3d3h    PreemptLowerPriority
不要将 globalDefault 设为高优先级。
给核心组件添加上 PriorityClass 对象,如 Deployment、DaemonSet 等spec:
template:
spec:
priorityClassName: infrastructure-critical # 关联高优先级
containers:
- name: aws-load-balancer-controller
resources:
requests:
cpu: 200m
memory: 256MiPriorityClass 的工作原理:
- 当一个 高优先级 的 Pod 处于 Pending 状态(因为节点资源满了)时
- 寻找牺牲者(Victims) : 调度器会在现有节点中寻找优先级比它低的 Pod。
- 触发抢占(Preemption) : 调度器会从节点中驱逐(Evict)优先级低的 Pod。
- 腾出空间 : 一旦低优先级 Pod 被停掉释放了 CPU/内存,高优先级的 Pod 立即调度上去。