vim
环境信息
- Centos 7
vim 配置
vim 启动时会读取 /etc/vimrc(全局配置) 和 ~/.vimrc (用户配置)
常用配置如下,使用 " 注释
" 自动缩进 |
vim 启动时会读取 /etc/vimrc(全局配置) 和 ~/.vimrc (用户配置)
常用配置如下,使用 " 注释
" 自动缩进 |
Linux 的 namespace 的作用是 隔离内核资 ,目前主要实现了以下 namespace
mount namespace - 文件系统挂载点UTS namespace - 主机名IPC namespace - POSIX 进程间通信消息队列PID namespace - 进程 pid 数字空间network namespace - networkuser namespace - user ID 数字空间cgroup - 资源使用控制time - 隔离时钟(Clock)其中,除了 network namespace,其他 namespace 的操作需要使用 C 语言调用系统 API 实现。network namespace 的增删改查功能已经集成到了 Linux 的 ip 工具集的 netns 子命令中
Linux 里面的 namespace 给处在其中的进程造成 2 个错觉:
默认情况下,Linux 里面的所有进程处在和宿主机相同的 namespace ,即初始 namespace 里,默认享有全局系统资源。
lsns 命令可以查看当前系统上存在哪些 Namespace
# lsns |
想要查看某个进程都在哪些 namespace 中,可以找到进程 ID (PID),通过查看以下内容或者 namespace 信息
$ ps -elf | grep nginx |
通过以上命令,可以看到 nginx 进程所属的 namespace,要查看系统初始 namespace ,可以查看 PID 为 1 的进程的 namespace 信息
$ ll /proc/1/ns/ |
链接文件的内容的格式为 ns 类型: [inode number]。这里的
inode number则用来标识一个 namespace,我们也可以把它理解为 namespace 的 ID。如果两个进程的某个 namespace 文件指向同一个链接文件,说明其相关资源在同一个 namespace 中。 [1]
在 systemd 管理的系统中,提供了工具 systemd-analyze 用于分析具体的启动过程,使用 systemd-analyze --help 查看使用帮助
使用 systemd-analyze 命令会显示系统启动所用的时间,等同于 systemd-analyze time
# systemd-analyze |
systemd-analyze blame 列出系统上各个 Unit 启动的时间
# systemd-analyze blame |
列出系统各个 Unit 启动消耗的时间
# systemd-analyze critical-chain |
内存相关概念说明:
top 命令中的 SHR 列展示的就是共享库按比例分配给进程的内存$ free -h |
例如查看使用内存排名前十的进程:
ps aux | sort -k4,4nr | head -n 10 |
比如检查 docker 使用的内存量,首先通过 ps 命令查询到 docker 的 PID 信息
$ ps -elf | grep docker |
例如此处的 docker 进程的 PID 为 1243
使用 top 命令动态查看 docker 使用的内存信息
$ top -p 1243 |
使用 ps aux 命令查看内存使用量
$ ps aux | grep 1243 |
输出结果中
4.5 4.6) 分别表示 cpu 使用率、内存使用率。4270108 1486460) 分别表示 虚拟内存使用量、物理内存使用量,单位为 k。通过进程的 status 文件查看内存使用
$ cat /proc/1243/status |
其中,VmRSS 为进程使用的物理内存
使用 pmap 命令查看进程使用的内存信息
pmap -x 1243 |
使用 pidstat 命令查看进程使用的内存信息
# pidstat -r -t -p 1424681 1 1 |
Playbooks 使用 YAML 语法定义(描述)。一个 playbook 由一个或多个 play 依序组成。每个 play 运行一个或多个 task,每个 task 也称为一个 module
每一个 play 中包含了一个 tasks 列表,tasks 列表中的每个 task 在其对应的 hosts 上 依次执行。即一个 task 执行完毕,下一个 task 才会执行。
在运行 playbook 的过程中,如果一个 host 执行 task 失败,这个 host 将从整个 playbook 中移除。如果发生执行失败的情况,需要修正 playbook 中的错误,重新执行。
Ansible playbook 示例:
--- |
一个 Ansible playbook 由一个或多个 plays 组成,每个 play 包含以下部分:
name : 描述性的名称hosts : 指定目标主机become : 提升权限(默认是使用 sudo 提升到 root 用户)remote_user : 用于连接到远程主机的账户。(如果 Inventory 中定义了远程连接的用户,会覆盖此处的配置)tasks : 要执行的一系列任务列表vars : 用于定义变量,便于管理和重用gather_facts : 收集 Facts, 默认值为 yestasks 是一个任务列表,每个任务执行特定的操作。任务包含以下元素:
name : 描述任务的目的。module_name : Ansible 模块名称,如 apt、service 等。module_options : 模块的参数,以键值对的形式提供。when : 条件语句,控制任务是否执行。loop : 循环执行任务执行以下命令运行 playbook.yml
ansible-playbook playbook.yml -f 10 |
常用选项说明
| 选项 | 说明 | 示例 |
|---|---|---|
-f--forks |
指定并发执行的数量,默认为 5 | |
-v--verbose -vvvvvv |
打印 debug 信息,详细程度从 -v 到 -vvvvvv |
|
-C--check |
Check mode,不执行任何实际操作,而是对要执行的操作进行验证 |
|
-D--diff |
- 只使用 --diff 会执行 play 定义的实际操作,并对所有受影响的文件或者模板显示其变更前后的具体差异- 和 --check 一起使用,不会执行 play 定义的实际操作,只显示变更前后的差异,可以在实际执行前,调试/预览将要进行的变更,防止意外配置变更或文件修改主要用于文件或者模板的变更,对于其他类型的任务(如包安装、服务管理、修改主机名等),不会显示具体的差异( 配合 --check 使用时,结果会显示为 skipping,实际执行时结果为 changed )。 |
|
--list-hosts |
不执行任何实际操作,只列出符合 pattern 的目标主机 |
|
--list-tasks |
不执行任何实际操作,只列出将要执行的 task |
|
--syntax-check |
不执行任何实际操作,只检查 playbook 文件是否有语法错误 |
环境信息
sudo 可以配置适当的权限授予普通用户,使普通用户执行 root 用户才能执行的操作
配置 sudo 权限的主要配置文件为 /etc/sudoers。/etc/sudoers是一个只读文件,不能直接使用 vim 等编辑器来编辑,要修改此文件,需要以 root 用户身份使用 visudo 命令来修改。
主要配置文件内容如下
## Allow root to run any commands anywhere |
各列值含义说明:
root 第一列为用户名,如 root、users;%wheel 以 % 开头表示这是一个组,而不是用户ALL=(ALL) 第二列等号左边的 ALL 表示允许从任何主机登录当前的用户账户;等号右边的 ALL 表示第一列的用户可以切换成系统中任何一个其它用户(如:su users);ALL 第三列表示第一列的用户能下达的命令,ALL 表示可以下达任何命令。NOPASSWD: ALL 意味着成员可以执行指定的命令而无需输入密码。当我们以普通用户身份(以 test 为例)登录,在使用 sudo 命令时报出如下信息:
test is not in the sudoers file. This incident will be reported.
则说明该用户没有在 /etc/sudoers 文件中进行配置,因此无法使用 sudo 命令
AWS 的 Centos 镜像部署后的虚拟机默认使用 centos 用户登陆,登陆后即可执行 sudo su - 切换到 root 用户,此配置由 /etc/sudoers.d/90-cloud-init-users 配置,内容如下:
# cat /etc/sudoers.d/90-cloud-init-users |
若要禁止此行为,删除此文件即可。
在 visudo 中,你可以使用 Cmnd_Alias 限制用户只能执行特定目录下的脚本。假设你想让用户 centos 只能执行 /usr/local/scripts/ 目录下的脚本,可以按照以下方式配置:
Cmnd_Alias ALLOWED_SCRIPTS = /usr/local/scripts/* |
含义 :
Cmnd_Alias ALLOWED_SCRIPTS = /usr/local/scripts/*
定义 ALLOWED_SCRIPTS ,表示 允许执行 /usr/local/scripts/ 目录下的所有脚本 。
qqc ALL=(ALL) NOPASSWD: ALLOWED_SCRIPTS
允许 centos 用户以 sudo 执行 ALLOWED_SCRIPTS 目录下的所有脚本,且无需输入密码。
切换到 centos 用户,并尝试执行:
sudo /usr/local/scripts/test.sh |
成功执行 ,说明规则生效。
但是,如果 centos 用户 试图运行 /bin/bash 或 /usr/bin/python ,或者访问其他路径 :
$ sudo /bin/bash |
如果希望 centos 用户可以查看自己可以运行的命令:
Cmnd_Alias ALLOWED_SCRIPTS = /usr/local/scripts/* |
这样,centos 用户可以运行:
sudo -l |
来查看自己被允许的 sudo 命令。
user nginx nginx; |
Main Memory - 也经常称为 Physical Memory,计算机上的 Fast Data Storage Area。Virtual Memory - Main Memory 的一个抽象层,他几乎有无限大的空间,Virtual Memory 不是 Main MemoryResident Memory - 驻留(Reside)在 Main Memory 中的内存,相当于实际使用的物理内存(Main Memory/Physical Memory),如 top 命令中的 RES、ps aux 命令中的 RSS 就是指 Resident Memory.Anonymous Memory - 未关联文件系统位置和路径的内存,通常指 Process Address Space 中的程序运行过程中的数据(Working Data),通常被称为 HeapAddress Space - 内存地址空间,内存地址相关的上下文(Context),包含程序(Processes)和内核(Kernel)使用的 Virtual Address SpaceSegment - 用于标识 Virtual Memory 中的有特殊作用的一个区域,如可执行程序(Executable)或可写(Writable)的 PageInstruction Text - CPU 指令(Instructions) 在内存中的引用地址,通常位于 Segment 中OOM - Out Of Memory,当内核检测到系统可用内存不足时采取的动作Page - OS 和 CPU 使用和分配内存的单位,早期大小一般为 4 或 8 Kbytes,现代化的 CPU 和 OS 通常支持 Multi Page SizesPage Fault - 通常在需要访问的内容不存在于 Virtual Memory 中时,系统产生一个中断,导致所需内容加载入内存Paging - 当内存中的内容不再使用或内存空间不足时进行的在内存和 Storage Devices 中的内容交换,主要是为了空出内存供需要内存的进程使用Swapping - Linux 中将不再使用或内存空间不足时,将部分内存中的内容 Paging 到 Swap DevicesSwap - Linux 中 Swapping 时,将内容转移到的目标,可能是 Storage Devices 上的一个区域,被称为 Physical Swap Device,或者是一个文件系统文件,称为 Swap File。Memory Management Unit(MMU) 负责虚拟内存地址(Virtual Memory Address)到物理内存地址(Physical Memory Address)的转换

当系统上可用内存低或不足时,系统会采用一系列的手段释放内存。主要包括下图所示方式
swappiness 的参数可以配置系统是使用 Page Cache 还是 Swapping 来释放内存kswapd 实现 Paging Out 到 Swap Device 或者 File System-Based Swap File,这只有在系统上有 Swap 时才有用。在 Linux 中,当系统可用内存低于阈值(vm.min_free_kbytes)时,Page Out Daemon(kswapd) 会启动 Page Scanning ,
进程的内存结构一般被分成多个 segment,包括
Executable Text segment - 存放程序代码(the executable CPU Instructions), 只读Executable Data section - 存放程序初始化全局变量(global variables),通常 可读写 ,写权限用于程序运行期间更新变量值。Heap section - 程序运行过程中动态分配的内存,属于 Anonymous MemoryStack section - 调用程序功能时的临时数据存储,如函数参数、返回地址、本地变量等。
下图展示了 C 程序(Program)在内存中的分层结构(layout of a C program in memory)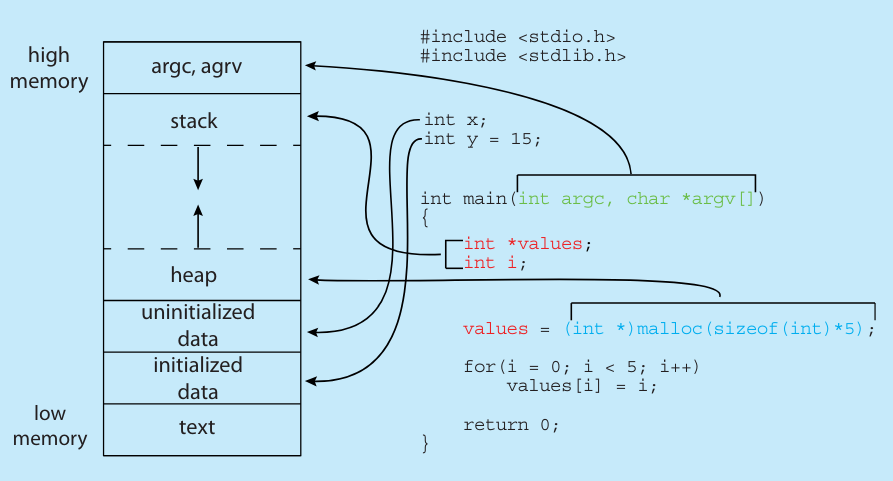
- 其中,
Data section被分成了 2 部分,包括(a) initialized data和(b) uninitialized data
使用 GNU 工具 size 可以检查 Projram 在磁盘上的 内存布局。这些值在程序编译时确定,并不会在程序运行时变化,因此它们是固定不变的。
# size /usr/sbin/sshd |
输出信息中:
text : 代表 Text section 的大小data : 初始化数据段(initialized data)的大小,包含已初始化的全局和静态变量。bss : 未初始化数据段的大小,包含未初始化的全局和静态变量。dec : 上述所有部分的总大小,以十进制表示。hex : 上述所有部分的总大小,以十六进制表示。Linux 中典型的文件系统模型(以接口形式)如下图: [1]
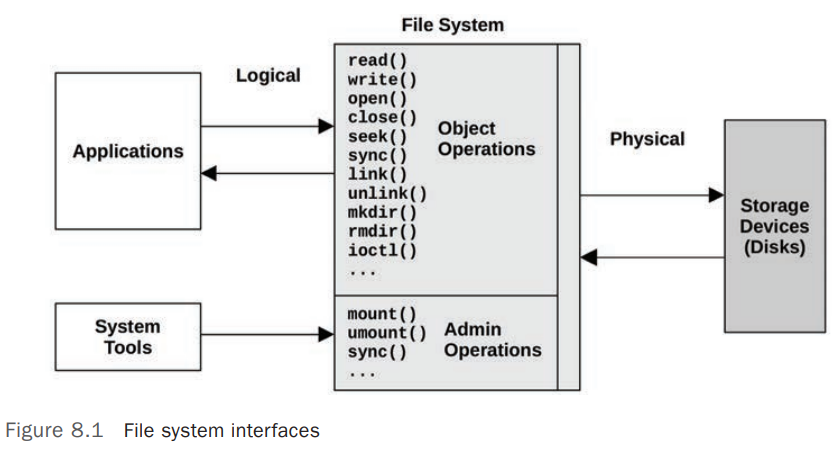
典型的 File System Cache 模型如下图:
因为文件系统缓存(File System Cache)的存在,在统计 Applications 的读写请求延迟(IO Latency)时,要注意区分分析的统计数据是 文件系统(File System)的延迟(Request Latency) 还是 物理存储设备(Physical Device)的延迟 。
OS 通常提供的 IO 统计数据是 存储设备级别(Disk Device-level) ,而不是 文件系统级别(File System Level) ,但是大多数情况下,影响 Application 性能的通常是 File System 级别的延迟(Latency),而不是物理存储设备(Physical Device)级别的延迟。比如 File System 对 Application 的写操作(Write Operations)会进行缓存(Buffers),缓存成功后立即向 Application 返回写成功的响应,文件系统会在后台定期的将 Buffer 里面的内容刷新(Write-back, 写回)回磁盘设备,这个写回操作会导致磁盘设备出现较高或者突发(Burstable)的 Disk IO Latency,从 Disk Device-level 统计数据来看,这可能是个问题,但是,Application 并不需要等待此时的写回操作,此时的 Disk Device-level IO Latency 对 Application 无任何的性能影响。
File System 通常使用 Main Memory(RAM)作为缓存(Cache)介质来提高性能 ,Cache 的处理过程对 Applications 来说是透明的。
OS 中 File System 涉及到的相关 Cache 如下表:
| Cache | Example |
|---|---|
Page cache |
Operating system page cache |
File system primary cache |
ZFS ARC |
File system secondary cache |
ZFS L2ARC |
Directory cache |
dentry cache |
inode cache |
inode cache |
Device cache |
ZFS vdev |
Block device cache |
Buffer cache |
文件系统预取(File System Prefetch) 是 Linux 内核的一种优化机制,用于 提前加载 可能会被访问的文件或数据到内存,以提高 读取性能 和 系统响应速度 。
当程序读取文件时,Linux 内核可能会:
Linux 文件系统预取主要依赖于以下几种机制:
/sys/class/bdi/ 目录下的参数进行 Read-Ahead 调优/sys/class/bdi/default/read_ahead_kb 这个值通常默认为 128 KB 或 256 KB,表示内核每次读取至少 128 KB 以优化性能。echo 1024 > /sys/class/bdi/default/read_ahead_kb 设置为 1024 KB(1MB),适用于 大文件顺序读取 。posix_fadvise() 和 madvise() ,让应用程序 主动提示内核 预取策略posix_fadvise(fd, offset, len, POSIX_FADV_WILLNEED) 提示内核: 这个文件很快会被读取,可以提前加载进 Page Cache 。posix_fadvise(fd, offset, len, POSIX_FADV_SEQUENTIAL) 告诉内核: 文件是顺序读取的,可以增大 Read-Ahead 。查看和设置当前 Read-Ahead 的值,单位为 Block,一般为 512B
# lsblk |
Write-Back Caching 通常用于文件系统 写缓存(Write Cache、Buffer) ,在 Application 需要写入内容时,文件系统将数据写入 Main Memory 就算成功,文件系统随后再将内容(Dirty Data)异步(Asynchronous)写入(Flushing)磁盘(Disk),通过此过程来 提高文件系统写入性能
在文件系统使用 Write-Back Caching 的情况下,假如应用程序发布(Issue)了写请求(Write Requests),Kernel 将内容写入 Main Memory 后便向 Application 返回了写入成功的响应,假设此时系统断电,因为缓存中的内容(Dirty Data)并未写入(Flushing)磁盘(Disk),会导致 RAM 中的内容丢失,出现文件不一致的情况,为了平衡 性能(Performance)和可靠性(Reliability),File System 会默认使用 Write-Back Caching,同时提供 同步写(Synchronous Write)选项来跳过 Write-Back Caching,直接将数据写入磁盘(Disk/Persistent Storage Device)
Synchronous Write(同步写入) 只有当数据完全写入 Persistent Storage Device(持久化存储设备)后才算写入完成,包括任何的 File System Metadata 的变更。它比 Asynchronous Writes(Write-Back Caching) 慢,因为需要额外的 Disk Device IO Latency 以及 File System Metadata 变更导致的 IO,Synchronous Write 通常应用在对数据一致性要求较高的应用中,如 Database Log Writers.
Raw IO 直接向存储设备发送请求,完全绕过了文件系统,通常在 Database 场景中较为常见,因为数据库软件可以比文件系统更好的管理和缓存他们的数据,缺点是其增加了软件的复杂度和管理的复杂度。
在计算机存储领域,SCSI、SAS、ATA、SATA、FC 和 NVMe 是常见的存储接口标准。以下是对这些接口的简要介绍和比较:
| 接口类型 | 传输方式 | 最大传输速率 | 特点说明 | 应用场景 |
|---|---|---|---|---|
ATA(Advanced Technology Attachment) 也称为 IDE、PATA |
并行 | 133 MB/s | 是一种并行接口标准,主要用于连接存储设备。由于传输速度和性能的限制,ATA 已逐渐被 SATA 所取代。 | 个人电脑(已被淘汰) |
SATA(Serial ATA) |
串行 | 6 Gbps | SATA 是 ATA 的串行版本,旨在提高传输速度和效率。它采用串行通信方式,具有更高的传输速率和更长的电缆长度。 传输速度高,支持热插拔,广泛应用于个人电脑和低端服务器。 |
个人电脑、低端服务器 |
SCSI(Small Computer System Interface) |
并行 | 320 MB/s | 最初用于连接计算机与硬盘、光驱等外部设备。它支持多设备连接,具有较高的传输速度和可靠性。 支持多任务处理,系统占用率低,适用于服务器等高端应用场景。 |
服务器、高端存储 |
SAS(Serial Attached SCSI) |
串行 | 12 Gbps | SAS 是 SCSI 的串行版本,旨在提高传输速度和扩展性。它采用串行通信方式,支持更高的传输速率,并向下兼容 SATA 设备。 传输速度高,支持热插拔,适用于企业级存储系统。SAS 控制器可以直接控制 SATA 硬盘,但 SATA 控制器无法控制 SAS 硬盘。 |
企业级存储 |
FC(Fibre Channel) |
串行 | 16 Gbps | FC 是一种高速网络技术,最初用于连接大型存储系统。它支持高带宽和低延迟,常用于存储区域网络(SAN)。传输速度高,可靠性强,适用于大型企业级存储环境。 | 存储区域网络 |
NVMe |
串行 | 32 Gbps(PCIe 4.0 x4) | NVMe 是为固态硬盘(SSD)设计的高速接口协议,旨在充分利用 NAND 闪存的性能优势。它通过 PCIe 总线直接与 CPU 通信,提供低延迟和高并发性。 传输速度极高,延迟低,适用于高性能存储需求。 |
高性能存储 |
在基于 Linux 的系统中,可以使用以下工具来观察存储设备(磁盘)I/O 的性能统计数据
| Tool | Description | Examples |
|---|---|---|
iostat |
存储设备(磁盘)上的 IO 统计数据及 CPU 使用率 | |
sar -b |
文件系统层(VFS)的 IO 统计数据 | sar 命令使用参考 |
sar -d |
物理磁盘(存储设备)层上的 IO 统计数据 | sar 命令使用参考 |
iostat 查看系统上的存储设备及分区的 IO 使用情况,常用选项及输出指标说明请参考 man iostat
# iostat -h -p -x 1 |
Systems Performance: Enterprise and the Cloud v2
下表列出一些常见的 Linux (Kernel 5.3)内存相关的调节参数,具体参数根据内核版本可能有所不同,其使用场景和含义需要查看对应内核版本的相关文档
| Option | Default Value | Description | Examples |
|---|---|---|---|
vm.dirty_background_bytes/proc/sys/vm/dirty_background_bytes |
0 bytes | 0 表示使用 vm.dirty_background_ratio 来决定将内存脏页(Memroy Dirty Pages)写回磁盘的阈值而不是使用 vm.dirty_background_bytes - 设置为相对较高的值,会使内存中的数据延迟写入磁盘,产生较小的 IOPS,但是可能会导致数据不一致或丢失 - 设置为相对较低的值,会使内存数据及时写入磁盘,导致 IOPS 较高,数据丢失或不一致的风险较低 |
|
vm.dirty_background_ratio/proc/sys/vm/dirty_background_ratio |
10 | 默认当内存脏页数据达到内存大小的 10% 时,在后台触发 per-bdi writeback(Linux 早期(Linux 内核 3.0 之前)由 pdflush 负责处理脏页(dirty pages)写回磁盘的机制)将脏页数据写回磁盘。回写(Write-Back)操作由统一的内核线程 kworker 或 flush-<设备名> 处理 |
|
vm.dirty_bytes/proc/sys/vm/dirty_bytes |
0 bytes | 定义强制写回的脏页阈值(以字节为单位)。 | |
vm.dirty_ratio/proc/sys/vm/dirty_ratio |
20 | 定义强制写回的脏页阈值(以总内存的百分比表示)。 | |
vm.dirty_writeback_centisecs/proc/sys/vm/dirty_writeback_centisecs |
500 | 定义写回线程的执行间隔(以百分之一秒为单位)。 | |
vm.dirty_expire_centisecs /proc/sys/vm/dirty_expire_centisecs |
3000 | 定义脏页的最大“年龄”(超过这个时间的脏页会被优先写回)。 如需手动执行写回操作,可以使用命令 sync |
|
vm.min_free_kbytes /proc/sys/vm/min_free_kbytes |
通常为 min_free_kbytes = sqrt(总内存 * 16) |
控制系统保留的最小空闲内存量(以 KB 为单位),确保系统在内存压力下仍有足够的内存用于关键操作,如处理中断、内核操作等。 如果设置过小 - 系统可能在内存紧张时无法及时回收内存,导致性能下降。 - 网络流量或 I/O 密集型任务可能因内存分配失败而中断。 - 可能增加系统触发 OOM(Out-Of-Memory)的风险。 如果设置过大 : - 系统可用内存减少,因为更多内存被预留。 - 可能导致用户空间任务频繁触发内存回收,降低整体性能。 |
|
vm.watermark_scale_factor/proc/sys/vm/watermark_scale_factor |
10 | 内核的内存水位标记( watermarks )机制 |
|
vm.watermark_boost_factor/proc/sys/vm/watermark_boost_factor |
15000 | 在内存压力下临时提升水位,保证一定的空闲内存。 | |
vm.percpu_pagelist_high_fraction/proc/sys/vm/percpu_pagelist_high_fraction |
0 | vm.percpu_pagelist_high_fraction | |
vm.overcommit_memory/proc/sys/vm/overcommit_memoryvm.overcommit_ratiovm.overcommit_kbytes |
Linux 内存 Overcommit 机制详解 | ||
vm.swappiness/proc/sys/vm/swappiness |
60 | 控制 内核在内存不足前主动使用 Swap 的程度 ,取值范围: 0 - 100 。- 0 : 尽可能 不使用 Swap ,只有在内存耗尽时才使用(适合数据库、低延迟应用)。- 100 : 尽可能 频繁使用 Swap(适合桌面系统) 。 |
|
vm.vfs_cache_pressure |
100 | vm.vfs_cache_pressure | |
vm.admin_reserve_kbytes/proc/sys/vm/admin_reserve_kbytes |
3% Free Pages | 为系统管理员保留一定量的内存,以防止在内存紧张时关键的管理任务(如登录、执行命令等)无法正常运行。这部分内存不会被普通用户进程占用,即使在系统内存紧张时也会保留。 | |
memory_failure_early_kill/proc/sys/vm/memory_failure_early_kill |
0 | 用于控制在发生内存故障时,系统是否立即将有问题的内存页标记为不可用,并杀死访问该内存的进程。 - 默认值是 0 ,表示不立即杀死进程。 - 启用后(值为 1) 当检测到内存错误时,系统会尽早杀死访问该内存的进程,以避免更多的系统崩溃或错误发生。 |
|
memory_failure_recovery/proc/sys/vm/memory_failure_recovery |
1 | 当检测到内存故障时,系统可以尝试 恢复错误的内存页 。 - 默认值是 1 ,表示启用内存恢复机制。 - 禁用后(值为 0) : 系统不尝试恢复内存错误,可能会更直接地采取 杀死进程 或 标记内存为不可用 的操作。 |
|
/proc/sys/vm/drop_caches |
默认值始终为 0 |
允许管理员手动清理 Linux 内存缓存,包括: - Page Cache(页面缓存) : 主要用于加速文件读取。- Dentry Cache(目录项缓存) : 记录文件路径信息,加快目录访问。- Inode Cache(索引节点缓存) : 记录文件元数据,如大小、权限等。drop_caches 不会影响进程已使用的内存,只是释放 内核缓存 。 适用于 测试、性能调优、观察内存使用情况 ,但不建议频繁使用。 可选值包括: - 1 : 清理 Page Cache ,释放文件数据缓存- 2 : 清理 Dentry 和 Inode Cache,释放目录路径和文件元数据缓存- 3 : 清理 Page Cache 、 Dentry 和 Inode Cache(全部) |
建议同步数据到磁盘(sync)后清理,防止数据丢失 |
/proc/sys/vm/compact_memory |
默认值始终为 0 |
compact_memory |
当使用 aws 的 cloudfront 或其他第三方 cdn (如 cdn77)为域名加速,资源是回源到 aws s3 的情况下,一般都需要配置 允许跨域,此种情况需要在 aws s3 存储桶中配置允许跨域 [1]
配置步骤如下:
定位到目标 s3 桶,进入 权限 管理页面
找到 CORS 配置,配置以下 JSON 格式内容,允许所有源的跨域
[ |
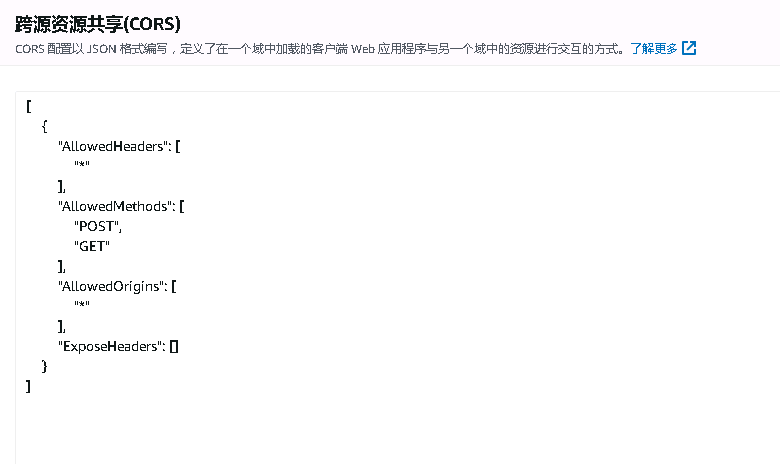
Cloudfront 中,回源到此 S3 的加速域名配置中,行为 按照下图配置,主要为开启 OPTIONS 缓存,并在响应标头策略中选择: CORS-with-preflight-and-SecurityHeadersPolicy [2]
此配置为可选配置,可以解决客户端偶尔会遇到的因跨域问题而导致的资源获取失败问题。
subprocess.check_output() 执行一个外部命令并以Python字符串的形式获取执行结果 [1]
import subprocess |
如果你需要文本形式返回,加一个解码步骤即可
out_text = out_bytes.decode('utf-8') |
如果被执行的命令以非零码返回,就会抛出异常。 下面的例子捕获到错误并获取返回码:
try: |
默认情况下,check_output() 仅仅返回输入到标准输出的值。 如果你需要同时收集标准输出和错误输出,使用 stderr 参数:
out_bytes = subprocess.check_output(['cmd','arg1','arg2'], |
环境信息说明
majiajue/jdk1.8以下示例记录实现获取百度云账户余额演示简单 Java 脚本在 Docker 容器中运行的过程和错误
运行 docker 容器
docker run -it majiajue/jdk1.8 bash |
在容器中下载 SDK 并将其放在 /app/ 目录下,如 /app/bce-java-sdk-0.10.351/lib/bce-java-sdk-0.10.351.jar,为了让 JAVA 能找到此 JAR 文件,在容器路径 ~/.bashrc 中添加自定义的 Jar 文件路径
export CLASSPATH=$CLASSPATH:/app/bce-java-sdk-0.10.351/lib/bce-java-sdk-0.10.351.jar:/app/bce-java-sdk-0.10.351/lib/guava-33.4.0-jre.jar:/app/bce-java-sdk-0.10.351/third-party/* |
获取余额的代码如下,容器中代码路径为 /app/BalanceQuery.java
import com.baidubce.auth.DefaultBceCredentials; |
在容器中(/app/)编译执行
如果未在容器环境变量中添加自定义的 JAR 路径(如
/app/bce-java-sdk-0.10.351/lib/bce-java-sdk-0.10.351.jar:/app/bce-java-sdk-0.10.351/lib/guava-33.4.0-jre.jar:/app/bce-java-sdk-0.10.351/third-party/*) 需要在编译(javac) 和执行 (java)时使用参数-cp "/app/bce-java-sdk-0.10.351/lib/bce-java-sdk-0.10.351.jar:/app/bce-java-sdk-0.10.351/lib/guava-33.4.0-jre.jar:/app/bce-java-sdk-0.10.351/third-party/*:."指定自定义文件路径,否则会导致某些类找不到需要注意
-cp选项中需要包含当前目录.,否则会导致找不到编译后的脚本文件,报错:Error: Could not find or load main class BalanceQuery
# cd /app/ |
如需在宿主机(容器外)执行脚本,参考以下命令:
# docker compose exec -it java_jdk_1.8 sh -c 'cd /app/;java -cp "./bce-java-sdk-0.10.351/lib/bce-java-sdk-0.10.351.jar:./bce-java-sdk-0.10.351/third-party/*:." BalanceQuery' |
本文档中未明确指定 Linux 系统版本信息时,默认为 Centos 7.
编译安装软件报错
error: require Automake 1.14, but have 1.13.4 |
Automake 版本不匹配,需要安装 Automake 1.14
$ rpm -qa | grep automake |
以下步骤安装 automake-1.14.1
wget http://ftp.gnu.org/gnu/automake/automake-1.14.1.tar.gz |
以上步骤执行完成后,会生成 configure 可执行文件
./configure |
安装完成后,执行以下命令验证版本
$ automake --version |
编译安装软件报错
makeinfo: command not found |
makeinfo 命令不存在,执行以下命令安装
yum install texinfo |
缺少 gcc 编译器,安装即可
yum install -y gcc |
编译安装软件时报错
configure: error: *** A compiler with support for C++11 language features is required. |
错误原因为 gcc 版本太低。查看当前 gcc 版本
$ gcc -v |
以下步骤演示安装 gcc-8.3.0 [1]
wget ftp://ftp.irisa.fr/pub/mirrors/gcc.gnu.org/gcc/releases/gcc-8.3.0/gcc-8.3.0.tar.gz |
GMP 4.2+, MPFR 2.4.0+ and MPC 0.8.0+,需要先按照顺序安装这 3 个依赖。依赖安装参考: 安装 GMP,安装 MPFR,安装 MPC $ ./configure --prefix=/usr/local/gcc-8.3.0 --disable-multilib |
libstdc++.so.6.0.19 $ ls /usr/lib64/libstdc++.so.6 |
libstdc++.so.6 到最新安装的版本 $ rm -rf /usr/lib64/libstdc++.so.6 |
wget ftp://gcc.gnu.org/pub/gcc/infrastructure/gmp-6.1.0.tar.bz2 |
wget ftp://gcc.gnu.org/pub/gcc/infrastructure/mpfr-3.1.4.tar.bz2 |
wget ftp://gcc.gnu.org/pub/gcc/infrastructure/mpc-1.0.3.tar.gz |
BPF(Berkeley Packet Filter) 是由 Berkeley 学院于 1992 年开发的一款,主要用于提高抓包工具的性能。并于 2014 年被重写进 Linux 内核中,可以用于网络、性能观测、安全等方面。 [1]
BPF 是一种灵活且高效的技术实现,主要由 指令集(Instruction Set) 、 存储对象(Storage Objects maps) 和 帮助函数(Helper Functions) 构成。因为其 虚拟指令集规范(Virtual Instruction Set Specification) ,可以认为 BPF 是一个虚拟机,BPF 运行于 内核模式(Kernel Mode) 。BPF 基于事件(Events)运行: Socket Events 、 Tracepoints 、 USDT Probes、kprobes、uprobes、perf_events.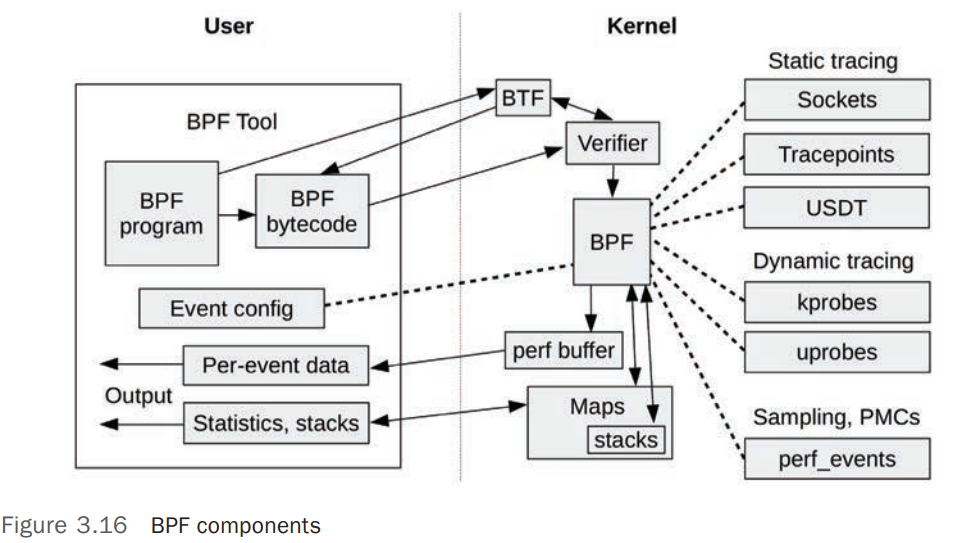
bpftrace 是一个基于 BPF 的追踪工具(Trace Tools),提供了高级别的编程能力,同时包含了命令行和脚本使用方式
bpftrace 命令详细帮助文档请查看 man bpftrace,下表列出常用选项和参数
| 选项 | 说明 | 示例 |
|---|---|---|
-l [SEARCH] |
列出匹配的事件(Event/Probe),没有 SEARCH 表达式则列出所有的 Event。SEARCH 支持通配符 |
筛选指定的事件
# bpftrace -l "tracepoint:*exec*" |
执行以下命令,可以追踪系统中新启动的进程及其参数
# bpftrace -e 'tracepoint:syscalls:sys_enter_execve { join(args->argv); }' |
Systems Performance: Enterprise and the Cloud v2
perf 是 Linux 中标准的 Profiler,常用于 CPU Profiling、CPU flame Graphs、Syscall Tracing 等。
perf 常用子命令,命令帮助及选项参数帮助文档可查看 man perf、man perf-record 、man perf-report 等
| 子命令 | 说明 | 示例 |
|---|---|---|
record |
进行 Profile 操作并将结果写入 perf.data |
|
report |
读取 perf.data (created by perf record)并展示 Profile 内容 |
|
script |
读取 perf.data (created by perf record)并展示堆栈内容 |
|
stat |
显示 PMC(Performance Monitor Counter) 统计数据 | |
list |
列出系统支持的事件(Event)列表 |
perf record 命令常用选项
| 选项 | 说明 | 示例 |
|---|---|---|
-F, --freq= |
指定 Profile 的频率,使用 max 以当前系统允许的最大频率(对应内核参数 kernel.perf_event_max_sample_rate)进行 Profile通常建议 99 Hz |
|
-a, --all-cpus |
采集所有 CPU 的全局数据,默认操作 | |
-g |
Kernel Space 和 User Space Stack Traces | |
-p, --pid= |
对指定 PIDs (comma separated list) 进行采样 | |
-e, --event= |
针对 Event 进行采样追踪 | perf record -F 99 -a -e sched:sched_process_exec |
perf report 命令常用选项
| 选项 | 说明 | 示例 |
|---|---|---|
-n, --show-nr-samples |
显示每个 Symbol 采样的数量 | |
-s, --sort= |
按照指定的(CSV)字段排序 |
通过监控系统调用事件,可以采样/追踪系统上符合条件的行为,比如以下命令追踪使用 exec 系统调用启动的进程
# perf record -F 99 -a -e sched:sched_process_exec |
添加 -g 选项追踪详细的堆栈信息
# perf record -F 99 -a -e sched:sched_process_exec -g |
使用以下命令可以读取系统中的 PMC 统计数据,其中包含了 CPU 使用时钟、CPU Context Switch、CPU Migrations、Page-Faults 等统计信息
# perf stat -a -- sleep 10 |
<not supported>可能包括以下原因:
- 缺乏硬件支持
- 某些处理器可能不支持所需的硬件性能计数器(如
cycles或instructions)- 这可能出现在虚拟机环境中,尤其是未启用硬件性能监控功能的虚拟机。
- 权限不足
- 性能计数器访问可能需要更高权限,通常是 root 权限
- 内核配置问题
perf依赖于 Linux 内核的性能监控功能。如果内核未启用某些性能计数器,可能会导致<not supported>。- 禁用了特定的事件源
- 某些环境中,特定性能监控功能可能被内核禁用(例如为了安全性)。
Systems Performance: Enterprise and the Cloud v2
ModuleNotFoundError: No module named ‘MySQLdb’
…
django.core.exceptions.ImproperlyConfigured: Error loading MySQLdb module.
解决方法
pip3 install pymysql |
编辑文件./python36/lib/python3.6/site-packages/django/db/backends/mysql/__init__.py, 输入以下内容
import pymysql |
在 Python 中,可以使用 Prometheus Python Client Library 来输出 Metrics,供 Prometheus 采集。
安装 Prometheus 客户端库
pip install prometheus-client |
以下是一个完整的示例,展示如何设置和暴露 Metrics:
from prometheus_client import start_http_server, Summary, Counter, Gauge, Histogram |
Metrics 类型说明(对应 Prometheus 中相关的数据类型)
Summary : 用于记录事件的持续时间或大小(例如请求处理时间)。Counter : 计数器,记录事件的总发生次数(例如请求总数)。Gauge : 测量当前值,可以增加或减少(例如当前活跃请求数)。Histogram : 创建直方图,记录数据分布(例如请求延迟分布)。向 Prometheus 暴露 Metrics
start_http_server(8000) 会启动一个 HTTP 服务器,在 /metrics 路径下暴露指标数据。Prometheus 将通过该路径采集数据。
装饰器
使用 @REQUEST_TIME.time() 装饰器自动记录函数执行时间。
标签
可以在指标中添加 标签(Labels) 来提供多维度的指标。
REQUEST_COUNT.labels(method='GET').inc() |
Program 是一个静态实体,只是存储在操作系统中的文件(集合)
Process 是操作系统上的活动(Active)实体,是 Program 由操作系统加载到内存并运行之后的实体。
Process 运行过程中需要操作系统为其分配各种资源,如 CPU、Memory、Files、IO 等来完成其运行。
如果一个 Program 被操作系统运行(启动)了多次,那么其产生的多个 Process 属于分割(单独)的实体。
Linux 系统中调度的进程/线程,通常被称为任务(Task)
Linux 中常见的进程状态如下表:
| 状态标识 | 状态名称 | 状态说明 | 示例 |
|---|---|---|---|
R |
task_running |
进程处于运行或就绪状态 | |
S |
task_interruptiblesleeping |
可中断的睡眠状态 | |
D |
task_uninterruptible |
不可中断的睡眠状态 1. 它是一种睡眠状态,意味着处于此状态的进程不会消耗 CPU 2. 睡眠的原因是等待某些资源(比如锁或者磁盘 IO),这也是非常多 D 状态的进程都处在处理 IO 操作的原因 3. 是它不能被中断,这个要区别于 硬件中断 的中断,是指不希望在其获取到资源或者超时前被终止。因此他不会被信号唤醒,也就不会响应 kill -9 这类信号。这也是它跟 S(可中断睡眠)状态的区别 |
|
T |
task_stopped task_tracedTraced |
暂停状态或跟踪状态 | |
Z |
task_dead exit_zombiezombie |
退出状态,进程成为僵尸进程 | |
X |
task_dead exit_dead |
退出状态,进程即将被销毁 | |
I |
idle |
空闲状态 | |
+ |
表示关联了前台操作(Foreground Operation),比如前台运行的进程 |
Linux 中任务(Task)调度算法默认使用 CFS(Completely Fair Scheduler,内核版本 >= 2.6.23).
CFS 调度算法没有使用固定的进程(此处的进程可能是进程或者线程,Linux 中统称为 Task)优先级(Priority),而是根据进程的 nice value 为进程分配一定比例的(Proportional) CPU 计算时间。 [1]
nice 的取值从 -20 - +19,值越小,优先级越高,默认值为 0 。优先级高的进程会被分配到更高比例的 CPU 处理时间。
在 Linux 内核中,优先级分为两种:静态优先级和动态优先级。CFS 使用的是动态优先级,它是根据 nice 值计算出来的。
CFS Scheduler 不会直接设定 Priorities,而是为每个 Task 维护变量 vruntime(virtual runtime)(可以检查系统 /proc/<PID>/sched),这个值记录了每个 task 使用了多少 CPU 时间。
CFS 通过将进程的虚拟运行时间(vruntime)与其他进程的虚拟运行时间进行比较来决定调度优先级。权重越大,vruntime 增长越慢,意味着进程的优先级越高,能够更频繁地被调度。
假入一个任务有默认的 Priority(nice=0),那么他的 vruntime 和实际使用的 CPU 时间相同。例如一个 nice=0 的进程使用了 CPU 200ms,那么他的 vruntime=200ms。低优先级(low priority,nice>0) 的任务在 CPU 上运行了 200ms,那么他的 vruntime>200ms,相反的,一个 高优先级(high priority,nice<0) 的任务在 CPU 上运行了 200ms,那么他的 vruntime<200ms。基于此,CFS Scheduler 在选择下一个要执行的任务时,会选择 vruntime 最小的任务来运行。如果有高优先级的任务就绪(可执行),它会抢占(preemptive)正在执行的低优先级的任务。
假如 Linux 中有 2 个优先级一样的任务(nice=0),一个进程为 I/O-bound,另一个为 CPU-bound。通常情况下,在一个 CPU 周期内,I/O-bound 的任务会使用很少的 CPU 时间就会因等待 IO 而中断在 CPU 上的执行并进入 CPU 的等待调度队列(schedule queue),而 CPU-bound 的任务会用尽分配给它的整个 CPU 周期。执行一段时间之后, I/O-bound 的任务的 vruntime 的值会显著的小于 CPU-bound 的任务的 vruntime,导致 I/O-bound 的任务拥有比 CPU-bound 的任务更高的优先级,当 I/O-bound 的任务就绪(IO 返回数据)时,它会立即抢占 CPU 开始执行。
nice只能针对单一的进程调整优先级,无法同时将优先级配置关联到相关进程,如 子进程或者同一个服务中的其他进程
在 Linux 中,nice 值用于调整进程的优先级,数值范围从 -20( 最高优先级 )到 19( 最低优先级 )。较低的 nice 值表示进程有更高的优先级,会更频繁地获得 CPU 时间,而较高的 nice 值表示进程有较低的优先级。
你可以使用 nice 和 renice 命令来修改进程的 nice 值
普通用户(
root之外的用户)启动应用程序时默认只能配置初始nice值0-19普通用户(
root之外的用户)修改正在运行的应用程序的nice值,只能改大,不能改小。比如进程启动时,其nice为10,拥有权限的普通用户只能将其nice值改为大于10的值。
nice 命令用于在启动进程时指定 nice 值 。如果不指定,默认 nice 值为 0。
nice -n 10 command |
renice 命令可以修改已经在运行的进程的 nice 值。需要提供进程 ID( PID )来指定要修改的进程。
renice <nice_value> -p <PID> |
如果想要一次修改多个进程的 nice 值,可以传递多个 PID:
sudo renice 10 -p 1234 2345 3456 |
cgroups 可以将一个任务(task)标识(绑定)到一个特殊的 控制组(Control Group) ,此任务启动的子进程可以继承父进程的 控制组(Control Group)
控制组(Control Group) 可以限制的资源类型如下:
| Type | Description |
|---|---|
blkio |
Storage 限制到存储设备(如 Hard Disk、USB Drivers等)的请求 |
cpu |
CPU 限制 CPU 调度 |
cpuacct |
Process Accounting 上报 CPU 使用状态,可以用于统计客户端使用的处理量并进行收费 |
cpuset |
CPU Assignment 在多处理器的系统上,将 Task 分配到特定的处理器以及关联的内存 |
devices |
Device Access 限制 控制组( Control Group) 中的 Task 对目标设备类型的使用 |
freezer |
Suspend/Resume 暂停/恢复 控制组( Control Group) 中的 Task |
memory |
Memory Usage 限制并报告 控制组( Control Group) 中的 Task 使用的内存 |
net_cls |
Network Bandwidth 制并报告 控制组( Control Group) 中的 Task 使用的网络流量,主要通过对网络流量打上 cgroups 相关标签实现 |
net_prio |
Network Traffic 控制 控制组( Control Group) 中的网络流量的优先级 |
ns |
Namespaces 将 cgroups 分配到不同的 Namespaces,如此同一个 cgroups 中的进程只能看到本 Namespace 中的进程 |
在系统中遇到以下进程:
# ps -elf | grep 18686 |
其中 PID 为 18686 的进程名为 /usr/sbin/CROND,其启动了另外两个子进程。但是在系统中检查,并不存在路径 /usr/sbin/CROND
# ls -l /usr/sbin/CROND |
出现此种现象,主要是因为 在启动时,进程的命令名是根据路径传递给 execve() 函数的参数决定的,而不是直接与系统中的文件进行匹配。
在 Linux 系统中,ps 命令显示的进程信息是从 /proc 文件系统中获取的,而 /proc 文件系统包含有关正在运行的进程的信息,包括每个进程的命令名。因此,即使实际上系统中不存在 /usr/sbin/CROND 文件,但如果进程的命令名是 /usr/sbin/CROND,那么 ps 命令仍然会显示进程的命令名为 /usr/sbin/CROND。
进程的命令名可以查看 /proc/<PID>/cmdline 文件,本示例中显示如下:
# cat /proc/18686/cmdline |
对应的系统上的可执行文件的名称可以查看 /proc/<PID>/stat、/proc/<PID>/comm、/proc/<PID>/status 等文件
# cat /proc/900/comm |
在本示例中,实际执行的命令为 crond
使用 top 命令可以查看系统负载、CPU 和 内存使用情况。也可以查看单个进程的具体信息。
htop 是 top 命令的一个变种,它提供了更多的交互性、定制性以及其他一些功能,但是它同时使用了相比 top 更多的资源(4 倍多的 syscalls)
top 命令常用选项
| 选项 | 说明 | 示例 |
|---|---|---|
-H |
Threads Mode,线程模式。默认情况 top 展示进程的简要信息,使用此选项显示进程中的线程状态。对应交互式命令 H |
top 常用交互命令
| 命令 | 说明 |
|---|---|
P |
CPU Utilization 排序,默认排序方式 |
M |
Memory Utilization 排序 |
I |
Irix/Solaris-Mode 切换。 默认为 Itrix Mode,在这种模式下,如果某个进程使用了系统中的 2 个 CPU 的所有计算资源,则其 CPU 使用率展示为 200%,依此类推。 在 Solaris Mode 下,进程的 CPU 使用率是整体 CPU 使用的资源除于 CPU 数。如在 4 CPU 的系统中,Itrix 模式下,进程 CPU 使用率为 200%,在 Solaris 模式下,则为 50% |
# top -H -p 1423 |
pidstat 命令用于检查 Linux 内核管理的进程的状态。帮助文档请查看 man pidstat。要查看特定的进程的信息,使用 -p [PID|ALL] 选项,查看子进程相关信息,参考 -T [TASK | CHILD | ALL] 选项
命令常用选项
| 选项 | 说明 | 示例 |
|---|---|---|
-d |
报告 I/O statistics | |
-C comm |
查看 command name 的详细信息, comm 可以是正则表达式 |
pidstat -C chrome -T CHILD 1 10 |
-p { pid[,...] / SELF / ALL } |
查看指定的 PID 或者所有(ALL) 进程的统计信息,不指定默认使用 -p ALL |
|
-e program args |
使用指定的 args 运行 program 并使用 pidstat 监控其统计数据 |
|
-l |
在统计输出中,包含详细的命令及其参数 | |
-r |
统计进程的 faults 和 Memory 使用情况 |
|
-T { TASK / CHILD / ALL } -t |
查看子进程相关统计信息 | |
-u |
CPU 使用率 | |
-w |
统计进程上下文切换(Context Switch)信息 |
查看指定的 PID 以及关联的子进程的统计信息
# pidstat -t -p 22737 1 1 |
查看进程使用的内存以及 faults 统计信息
# pidstat -r | more |
查看进程使用的 CPU 统计信息
# pidstat -u -l | more |
在使用
pidstat时如果未指定统计数据的采样间隔及采样次数,则 默认统计的是从系统启动以来的平均资源使用率,如果目标进程的运行时间相对于系统启动时间很短(例如仅几分钟),那么它的平均 CPU 使用率会趋近于 0 。比如以下示例:未指定采样间隔及采样次数 ,统计结果显示进程的 CPU 使用率为
0
01:37:06 PM 0 784 0.00 0.00 0.00 0.00 4 gzip以下命令指定采样间隔和采样次数 ,统计结果显示 CPU 使用率较高
01:37:14 PM 0 1974 15.69 1.96 0.00 87.65 7 gzip
Average: 0 1974 15.69 1.96 0.00 87.65 - gzip
Operating System Concepts v10 Online
Linux进程状态说明
假如需要下载的 urls 存在于给定的文件中(每行一个 url),本示例演示批量并发下载,假设 urls 存在于文件 urls.txt 中
import concurrent.futures |
假如需要下载的 urls 存在于给定的文件中(每行一个 url),本示例演示批量并发下载,假设 urls 存在于文件 urls.txt 中
本示例中的 urls.txt 内容示例如下:
http://cdn-log-customer-bj4.obs.cn-north-4.myhuaweicloud.com:80/oversea/20241202/09/2024120209-domain-ov.gz?AccessKeyId=WWHEIFLWKIMHHDKIPRWLJJ40CFS&Expires=1733208754&response-content-disposition=attachment%3Bfilename%3D%222024120209-domain-ov.gz%22&Signature=bGHy1CPncaXJladgG9NdIRwASsdgSIvs%3D |
简单的 串行下载命令 如下,从 url 中取出文件名作为下载文件名:
for i in `cat urls.txt`; do fn=`echo $i | cut -d'?' -f1 | cut -d'/' -f7` ; curl -o $fn "$i"; done |
使用以上命令,如果下载内容太多,会比较慢,以下代码示例使用 xargs 命令批量下载,xargs 会自动分配任务,确保多个下载任务同时运行 。:
cat log-url | xargs -P 10 -I {} sh -c 'fn=$(echo "{}" | cut -d"?" -f1 | cut -d"/" -f7); curl -o $fn "{}"' |
xargs 参数说明:
-P 10 : 指定并发进程数为 10,可以根据系统资源调整。-I {} : 替换(Pipe)输入中的每行(URL) 为 {} 。如果无需提取文件名,可以 使用 wget 命令的并行下载功能
wget -i urls.txt -P output-dir -nc --max-threads=10 |
参数说明如下:
-i urls.txt : 从文件中读取下载 URL。-P output-dir : 将下载文件存储到 output-dir。--max-threads=10 : 设置并发线程数为 10。-nc : 跳过已下载的文件,避免重复下载。下图展示了一个简单的 CPU 架构图,有一个物理 CPU(Physical Processor),包含 4 个 CPU Cores,每个 CPU Core 包含 2 个 Hardware Threads,总计 8 个 CPUs。右侧的图是这 8 个 CPUs 在操作系统(Operating System)中的视图(也被称为 Logical CPU/Virtual Processor/Virtual Core) [1]
Operating System 可能对于 CPU 的拓扑结构(Topology)有一定程度的了解,如知道哪些 Logical CPU 位于同一个 CPU Core 或者 CPU Cache 是如何被共享的(Shared),这有助于 CPU Scheduler 做出更优的调度决策。
下图展示了通用 2 Core 处理器的组成。具体的组成取决于具体的处理器。
Control Unit 是 CPU 处理器的核心组件,负责指令(Instruction)的 Fetch、Decoding、Execution 并负责保存执行结果(Storing Results)。Shared Floating-Points UnitShared Level-3 CacheMMU Memory Management Unit,负责将虚拟内存地址转换为物理内存地址(Virtual-to-Physical Address Translation)TLB Translation Lookaside Buffer,用于 Cache 内存地址转换(Virtual-to-Physical Address Translation),未缓存的地址转换需要去 Main Memory 中的 Page Tables 中查询,MMU 的基本构成如下图
Intel 处理器的 ACPI(Advanced Configuration and Power Interface)标准定义了 P-States (Processor Performance States) 和 S-States (Processor Power States) 。 [4]
idle states,用于节省电力(节能),下图列出了常见的 C-States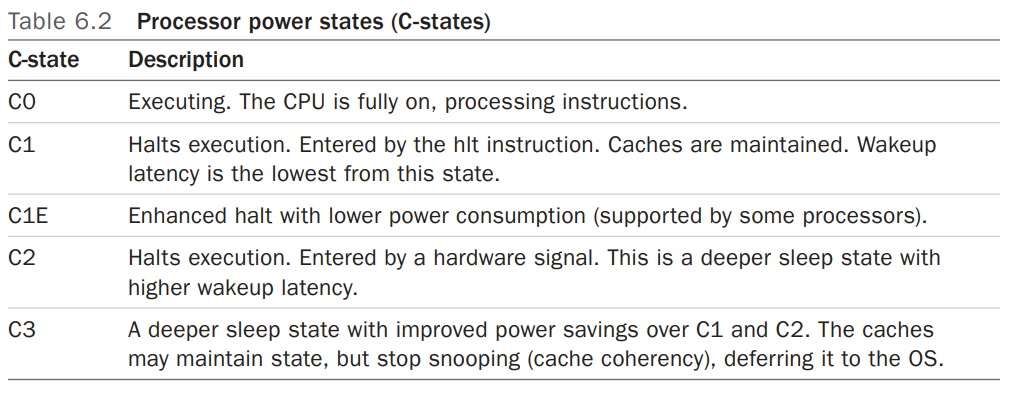
Linux 中可以配置和管理 CPU Status 的方式包括(是否支持取决于不同的 Processor、操作系统和内核版本):
/sys/devices/system/cpu/cpufreq/policy0/scaling_available_governors 可以查看可用的 CPU Scaling Governors,一般包括 performance、 powersave,通过配置 /sys/devices/system/cpu/cpufreq/policy0/scaling_governor 为对应值。 [6]cpupower 工具箱,其中包括 cpupower frequency-info、cpupower frequency-set 等一系列管理和查看 CPU 频率等信息的工具Processors(物理 CPU 处理器)提供了各种个样的硬件缓存(Hardware Caches)用于提高 CPU 读写 Memory I/O 的性能(CPU 的处理速度是 Memory I/O 处理速度的多个量级),下图展示了 Processor Caches 在大小(Sizes)和响应速度之间的关系, 离 Processor 越近,其响应速度越快,存储空间越小,成本越高(贵)
CPU 时钟频率(Clock Rate) 是指 Processor 每秒跳动(转换)的次数,每一个 Processor 的时钟变化也称为一个 Clock Cycle 。 Processor 通常是以特定的时钟频率运行,比如 4GHz 的 CPU 每秒会进行 4 Billion Clock Cycles。每个 CPU 指令(Instruction)都需要通过一个或者多个 Clock Cycles 来完成。 现代 CPU 通常会变频,即调整 Processor 的 Clock Rate,如果提高 CLock Rate 以提升性能,降低 Clock Rate 以节能 。变频操作通常是通过 OS 请求 Processor 变频或者是 Processor 自动进行变频,比如内核中的 idle 线程通常会要求 CPU 降低其 Clock Rate 以节能。
Clock Rate 是衡量 Processor 能力(Capacity)的一个主要指标。通常来说,较高 Clock Rate 的 Processor 会有更高的性能,但是在性能分析的场景中,提高 CPU 的 Clock Rate 不一定会提高 CPU 性能,这主要取决于 CPU 的 Clock Cycles 到底是在忙于什么,如果 Clock Cycles 主要忙于等待 Memory Access,那么换成更高频率的处理器,并不会提高整个系统的性能。
Simultaneous Multi-Threading(SMT) 是一种由 Processor 支持的硬件多线程(Hardware Multithreading)技术,用于实现同一个 Processor Core 上的并发(Parallelism),它允许一个 CPU Core 运行多个 Thread,每个 Hardware Thread 从 Operating System 层面来看都是一个 CPU。这种技术的典型应用包括 Intel 的 Hyper-Threading 技术,允许每个 Processor Core 运行 2 个 Threads,以及 POWER8,允许每个 Processor Core 运行 8 个 Threads。
SMT 的实现通常基于 Core 运行指令(Instructions)的过程中的 Stall Cycles,当某个指令处于 Stall Cycles 时,Core 会允许调度另一个指令来运行。基于 Hardware Thread 的 CPU,其性能和单独的 CPU Core 是有区别的,这个差别取决于其上的工作负载(Workload),Stall Cycles 严重的 Workloads 会比 Instruction Cycles 严重的 Workloads 性能更好,因为 Stall Cycles 会减少竞争(Core Contention)