Django 常见错误
环境信息
- centos7
- python3
- Django 4
ModuleNotFoundError: No module named ‘MySQLdb’
ModuleNotFoundError: No module named ‘MySQLdb’
…
django.core.exceptions.ImproperlyConfigured: Error loading MySQLdb module.
解决方法
pip3 install pymysql |
编辑文件./python36/lib/python3.6/site-packages/django/db/backends/mysql/__init__.py, 输入以下内容
import pymysql |
django.core.exceptions.ImproperlyConfigured
使用以下命令启动服务时报错
django-admin runserver |
django.core.exceptions.ImproperlyConfigured: Requested setting DEBUG, but settings are not configured. You must either define the environment variable DJANGO_SETTINGS_MODULE or call settings.configure() before accessing settings
解决方法
使用命令python3 manage.py runserver
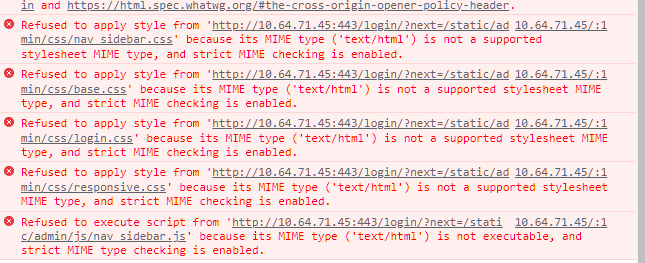
because its MIME type (‘text/html’) is not a supported stylesheet MIME type
css 文件路径配置错误,访问文件 404
环境信息
- centos7
- python3.10
- uwsgi 2.0.20
- venv
ModuleNotFoundError: No module named ‘django’
uwsgi 启动后报错(查看 uwsgi 日志输出)
from django.core.wsgi import get_wsgi_application |
解决方法
uwsgi 配置文件(uwsgi.ini )中添加 python 路径, 在配置文件中添加如下配置:
pythonpath = /env/lib/python3.10/site-packages/ |
完整 uwsgi 配置文件示例(使用 python venv 模块创建虚拟环境情况下):
[uwsgi] |
unable to load app 0
uwsgi 启动后报错(查看 uwsgi 日志输出)
unable to load app 0 (mountpoint='|') (callable not found or import error) |
解决方法
uwsgi 配置文件(uwsgi.ini )中添加 wsgi.py 路径, 在配置文件中添加如下配置:
wsgi-file = ./project/wsgi.py |
django.db.utils.OperationalError
项目根目录执行 python manage.py migrate 时报错 django.db.utils.OperationalError: (1366, "Incorrect string value: '\\xE6\\x9C\\x8D\\xE5\\x8A\\xA1...' for column 'name' at row 1")
排查步骤
查看数据库编码设置
show variables like "%char%";
+--------------------------+----------------------------+
| Variable_name | Value |
+--------------------------+----------------------------+
| character_set_client | utf8 |
| character_set_connection | utf8 |
| character_set_database | latin1 |
| character_set_filesystem | binary |
| character_set_results | utf8 |
| character_set_server | latin1 |
| character_set_system | utf8 |
| character_sets_dir | /usr/share/mysql/charsets/ |
+--------------------------+----------------------------+
8 rows in set (0.01 sec)修改数据库编码为
utf8修改数据库配置文件
my.cnf,添加以下配置[mysqld]
character-set-server = utf8
collation-server=utf8_general_ci重启数据库,检查编码设置
show variables like "%char%";
+--------------------------+----------------------------+
| Variable_name | Value |
+--------------------------+----------------------------+
| character_set_client | utf8 |
| character_set_connection | utf8 |
| character_set_database | utf8 |
| character_set_filesystem | binary |
| character_set_results | utf8 |
| character_set_server | utf8 |
| character_set_system | utf8 |
| character_sets_dir | /usr/share/mysql/charsets/ |
+--------------------------+----------------------------+
8 rows in set (0.05 sec)重新执行
python manage.py migrate依旧返回同样的报错,检查之前创建的数据库编码show create database mydb;
+-----------------+----------------------------------------------------------------------------+
| Database | Create Database |
+-----------------+----------------------------------------------------------------------------+
| mydb | CREATE DATABASE `mydb` /*!40100 DEFAULT CHARACTER SET latin1 */ |
+-----------------+----------------------------------------------------------------------------+
1 row in set (0.00 sec)编码显示为
latin1,删除数据库重新创建drop database mydb;
Query OK, 12 rows affected (0.10 sec)
create database mydb;
Query OK, 1 row affected (0.00 sec)
show create database mydb;
+-----------------+--------------------------------------------------------------------------+
| Database | Create Database |
+-----------------+--------------------------------------------------------------------------+
| mydb | CREATE DATABASE `mydb` /*!40100 DEFAULT CHARACTER SET utf8 */ |
+-----------------+--------------------------------------------------------------------------+
1 row in set (0.00 sec)新建的数据库编码为
utf8,重新执行python manage.py makemigrations,python manage.py migrate,执行成功。删除数据库重建后,如若使用后台,需要为后台重新生成 superuser。
环境信息
- Python 3.11.2
- Django==4.1.7
- mysqlclient==2.1.1
django.db.utils.NotSupportedError: MariaDB 10.3 or later is required (found 5.5.68)
解决方法:
在 /usr/local/lib/python3.11/site-packages/django/db/backends/base/base.py 中搜索 self.check_database_version_supported,然后把这一行注释掉。
sed -i 's/self.check_database_version_supported/#self.check_database_version_supported/' /usr/local/lib/python3.11/site-packages/django/db/backends/base/base.py |
Raised by: django.contrib.admin.sites.catch_all_view
在项目的入口 urls.py 文件中按照以下配置,应用 cloud_client 对应的 url (/cloud_client/)无法匹配到,抛出异常信息: Raised by: django.contrib.admin.sites.catch_all_view
from django.contrib import admin |
参考文章说明,修改为以下配置后,应用相关的 url 访问正常,自定义的 URls 需要在 admin 的 URLs 之前。 [1]
from django.contrib import admin |
Key ‘id’ not found in ‘xxx’. Choices are: xxx
Django admin 后台中点击报错,错误原因为模型注册到后台时,fields 配置中包含了 id 字段,因为字段 id 设置的自增 ID 键,在数据库中对应的是 AUTO_INCREMENT,所以这个字段是不允许编辑的,而 fields 这个配置设置是可编辑字段,导致冲突,所以会报错。 [2]
Refused to execute script from ‘‘ because its MIME type (‘text/html’) is not executable, and strict MIME type checking is enabled
Django 配置 DEBUG = False 后,页面访问异常
Django admin 静态资源 404
请求中,admin 页面的所有资源显示 404
"GET /static/admin/js/core.js HTTP/1.1" 404 179 |
原因是因为关闭了 DEBUG 模式(通过配置 DEBUG = False),所以导致找不到静态资源。生产环境中需要关闭 DEBUG,需要给 Django 的静态资源配置路由来解决。 [3]
The Cross-Origin-Opener-Policy header has been ignored
浏览器加载页面报错
The Cross-Origin-Opener-Policy header has been ignored, because the URL's origin was untrustworthy. It was defined either in the final response or a redirect. Please deliver the response using the HTTPS protocol. You can also use the 'localhost' origin instead. See https://www.w3.org/TR/powerful-features/#potentially-trustworthy-origin and https://html.spec.whatwg.org/#the-cross-origin-opener-policy-header. |

Django 4 的安全机制。调试环境在配置文件 settings.py 中配置以下参数即可解决
SECURE_CROSS_ORIGIN_OPENER_POLICY = 'None' |
read of closed file
Django 中用户从 Web 页面中点击下载文件,Django 对文件压缩并返回给客户端。前端页面代码如下:
<a href="{% url 'client:download_certificate' certificate_name=domain.Certificate_Name %}">Download Certificate</a> |
其中的
domain.Certificate_Name是要传送给下载 url 的证书名称变量。
url 如下:
from django.urls import path |
视图函数(views.py) 关键代码如下:
from django.shortcuts import render, HttpResponse |
使用以上代码后,用户在 Web 页面中点击 Download Certificate 进行证书下载,Web 页面显示 A server error occurred. Please contact the administrator., 检查下载链接响应码为 500。
检查代码输出的日志信息,最后包含 response info: <FileResponse status_code=200, "application/zip">,说明代码处理到此处无异常。
检查 Django 的终端输出日志,看到以下错误:
response info: <FileResponse status_code=200, "application/zip"> |
根据错误信息 ValueError: read of closed file,问题很可能出在文件处理逻辑上。错误发生在尝试从一个已经关闭的文件中读取数据,这通常发生在使用 with 语句打开文件后,文件自动关闭,但 Django 的 FileResponse 对象仍尝试从这个文件流中读取数据。
在 Django 中使用 FileResponse 返回一个文件给客户端时,需要确保文件在响应对象完成发送数据后再关闭。在上面的代码中,文件通过 with 语句打开,因此在 with 代码块结束时自动关闭了文件。这导致 FileResponse 在尝试访问已关闭的文件时失败。
为解决这个问题,可以修改文件打开的方式,确保文件在整个请求处理过程中保持开放。下面是修正后的代码:
def ssl_download_certificate(request, certificate_name): |
修改为以上代码后,文件下载正常。
环境信息
- Centos 7 3.10.0-1160
- Python 3.6
- Django 3.2.25
启动 Django Server 时报错,关键信息 django.core.exceptions.ImproperlyConfigured: SQLite 3.9.0 or later is required (found 3.7.17).:
File "/opt/python3_web/lib64/python3.6/site-packages/django/db/utils.py", line 111, in load_backend |
根据错误信息可知是系统上安装的 SQLite 版本不满足。参考以下命令安装最新版本 SQLite
wget https://www.sqlite.org/2024/sqlite-autoconf-3460100.tar.gz |
将最新版本的 SQLite 库文件添加到系统库中:
# echo "/usr/local/lib/" >> /etc/ld.so.conf |
如果不需要使用 SQLite,可以不用安装升级 ,可以根据提示修改文件 python3.6/site-packages/django/db/backends/sqlite3/base.py 中的函数 check_sqlite_version,使其跳过版本检查。
def check_sqlite_version(): |