iptables 服务使用说明
iptables 的底层实现是 netfilter,netfilter 的架构是在整个网络流程(TCP/IP 协议栈)的若干位置放置一些钩子,并在每个钩子上挂载一些处理函数进行处理。
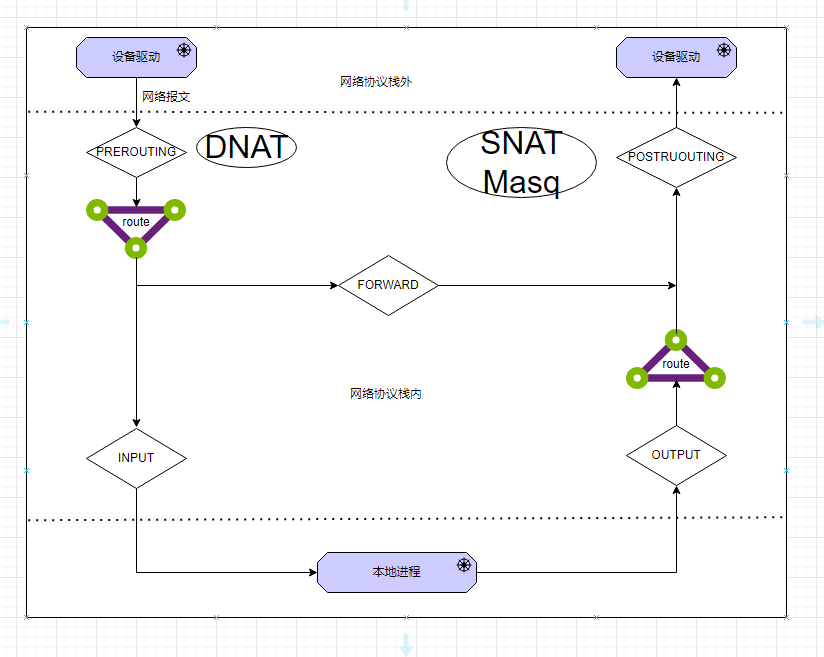
IP 层的 5 个钩子点的位置,对应就是 iptables 的 5 条内置链,分别是
PREROUTINGFORWARDINPUTOUTPUTPOSTROUTING

当网卡收到一个网络报文送达协议栈时,最先经过的 netfilter 钩子是 PREROUTING,此处常见的钩子函数是 目的地址转换 (DNAT)。无论 PREROUTING 是否存在钩子处理网络数据包,下一步内核都会通过 查询本地路由表 决定这个数据包的流向
- 如果是发送给本地进程,则进入
INPUT链传给本地进程 - 如果是发送给其他机器(或者其他
network namespace),则经过netfilter的FORWARD钩子传送出去,相当于将本地机器当作路由器
所有马上要发送到网络协议栈之外的数据包,都会经过 POSTROUTING 钩子,这里常见的处理函数是 源地址转换(SNAT) 或者 源地址伪装(Masquerade, 简称 Masq)
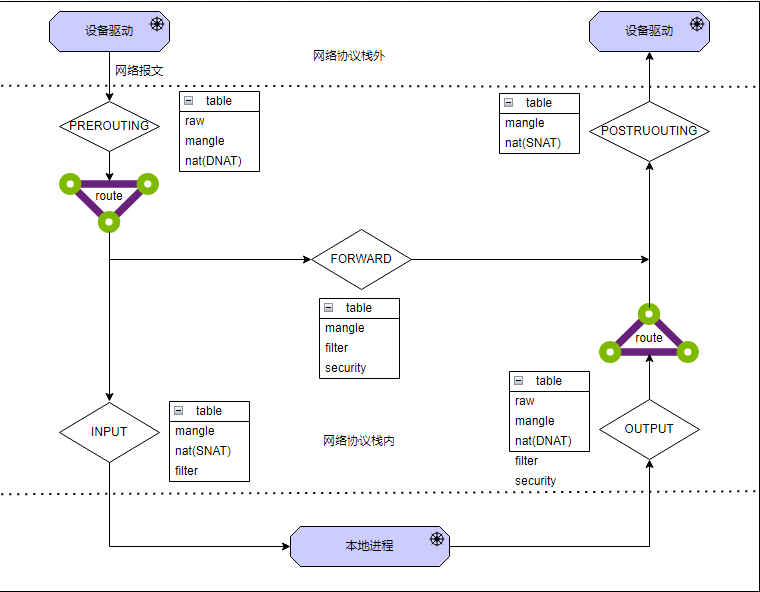
除了 5 条内置的链,iptables 还有 5 张表,这 5 张表主要是用来给 iptables 中的规则(rule)分类,系统中所有的 iptables 规则都被划分到不同的表集合中。5 张表分别为
raw-iptables是有状态的,即iptables对数据包有连接追踪 (connection trackong) 机制,而raw可以用来去除这种追踪机制mangle- 用于修改数据包的 IP 头信息nat- 用于修改数据包的源或者目的地址filter- 用于控制到达某条链上面的数据包是继续放行、直接丢弃(drop)、或拒绝(reject)security- 用于在数据包上面应用 SELinux
表是有优先级的,5 张表的优先级从高到低是: raw、mangle、nat、filter、security,iptables 不支持自定义表。不是每个链上都能挂表,iptables 表与链的对应关系如下图
| - | PREROUTING | FORWARD | INPUT | OUTPUT | POSTROUTING |
|---|---|---|---|---|---|
raw |
Y | N | N | Y | N |
mangle |
Y | Y | Y | Y | Y |
nat (SNAT) |
N | N | Y | N | Y |
nat (DNAT) |
Y | N | N | Y | N |
filter |
N | Y | Y | Y | N |
security |
N | Y | Y | Y | N |
iptables 表和链的工作流程图如下

iptables 命令
常用选项说明
| 选项 | 说明 | 示例 |
|---|---|---|
-F ,--flush |
清除所有规则,默认规则除外 | |
-P ,--policy |
设置默认规则 | |
-t ,--table |
指定要操作的表,默认为 filter 表 |
iptables -t nat -P INPUT ACCEPT |
--list ,-L [chain [rulenum]] |
列出(指定的链或所有链)的规则 | iptables -t nat -L -v -n --line-numbers |
--verbose ,-v |
verbose mode | |
--numeric ,-n |
不解析协议和端口号,以数字的形式显示 | |
--line-numbers |
显示规则的行号,可以根据行号对具体的规则进行操作 | |
--jump ,-j |
匹配的规则的处理 target | iptables -A INPUT -j LOG |
--append ,-A chain |
像指定的链中追加规则 | -A INPUT -i lo -j ACCEPT |
--insert ,-I chain [rulenum] |
向指定的链中指定的位置插入规则 | iptables -I INPUT 10 -p tcp --dport 80 -j ACCEPT |
--delete ,-D chain rulenum |
删除指定链中的指定位置的规则 | iptables -D INPUT 10 |
--replace ,-R chain rulenum |
更新指定链中的指定位置的规则 | |
-S, --list-rules [chain] |
按照类似 iptables-save 的输出打印规则 |
删除指定规则
查看规则及行号
iptables -L -v -n --line-number |
删除指定行号的规则
iptables -D INPUT 7 |
记录 iptables 日志
可以通过以下 2 种方式之一查看 iptables 记录的日志
rsyslog 服务记录日志
使用
rsyslog服务记录日志在
rsyslog.conf中添加配置kern.* /var/log/iptables.log重启
rsyslog服务systemctl restart rsyslog.service
journalctl -k命令查看journalctl -f -k | grep iptables
配置 iptables 记录日志
iptables 配置日志选项:
记录所有通过防火墙的日志,之后可以在 /var/log/messages 中查看日志 |
iptables 中日志相关的选项:
| 选项 | 说明 | 示例 |
|---|---|---|
--log-prefix |
记录的日志的内容前缀 | -A INPUT -j LOG --log-prefix "iptables" |
--log-level |
日志级别 由高到低 emerg、alert、crit、error、warning、notice、info、debug |
-A INPUT -s 192.168.10.0/24 -j LOG --log-level 4 |
使用 LOG 动作,可以将符合条件的报文的相关信息记录到日志中,但当前报文具体是被“接受”,还是被“拒绝”,都由后面的规则控制,换句话说,LOG 动作只负责记录匹配到的报文的相关信息,不负责对报文的其他处理,如果想要对报文进行进一步的处理,可以在之后设置具体规则,进行进一步的处理。
端口转发
以下示例实现,将目标端口为 80 的流量转发到目标端口 8080
iptables -t nat -A PREROUTING -s 192.168.10.0/24 -p tcp --dport 80 -i eth0 -j REDIRECT --to-port 8080 |
NAT
DNAT
DNAT 根据指定条件修改数据包的目标 ip 地址和目标端口,DNAT 的原理和端口转发的原理差不多,区别是端口转发不修改 ip 地址。需要注意的是,当转发的 ip 地址不是本机时,需要确保启用 ip froward 功能(echo 1 > /proc/sys/net/ipv4/ip_forward),即把 Linux 当做交换机使用
iptables -t nat -A PREROUTING -d 192.168.10.10 -p tcp --dport 80 -j DNAT --to-destination 192.168.10.20:8080 |
SNAT 和 Maskuerade
Maskuerade 本质上是 SNAT 的一种。SNAT 根据指定的条件修改数据包的源 IP 地址,SNAT 策略只能发生在 nat 表的 POSTROUTING 链
iptables -t nat -A POSTROUTING -s 192.168.10.10 -j SNAT --to-source 192.168.10.20 |
Maskuerade 是一种特殊的 SNAT,数据包从那个网卡发出,就使用该网卡的 IP 做 SNAT,具体使用哪个 IP 由内核决定
iptables -t nat -A POSTROUTING -s 192.168.10.0/24 -j MASQUERADE |
iptables 配合 ipset 实现批量 IP 控制
ipset 是 Linux 内核中的一个工具,根据创建 ipset 时指定的类型,它可以存储多个 IP 地址、IP 网络(network)、TCP/UDP 端口、MAC 地址等,并且支持动态更新其中的内容。比如配合 iptables 使用时,可以将多个目标 IP 地址或者网络存储于其中并可以动态更新 iptables 规则(更新 ipset 后无需重启 iptables 即可生效)
创建
ipset并指定ipset类型为hash:ip,更多支持的类型可以通过ipset -h查看ipset create allowed_ips hash:ip
添加目标 IP 到
ipset,可以多次添加ipset add allowed_ips 2.9.1.171
在
iptables中使用ipsetipset 作为源 IP 允许访问
iptables -A INPUT -m set --match-set allowed_ips src -j ACCEPT
源 IP 不在 ipset 中则不允许访问
iptables -A INPUT -m set ! --match-set allowed_ips src -j DROP默认情况下,
ipset属于临时配置,没有持久化,系统重启后内容会丢失。要配置ipset持久化,可以参考以下步骤保存 ipset 配置
ipset save > /etc/ipset.conf
恢复 ipset 配置
ipset restore < /etc/ipset.conf
docker compose 场景下使用 iptables 进行白名单限制
假设有以下 docker-compose.yml 文件
version: "3" |
在 docker compose up 正常启动后, Docker 会根据 docker-compose.yml 中的定义配置 iptables 防火墙规则,以下为上面 docker-compose.yml 定义的数据端口在 iptables 规则中的数据流向分析
- 数据报文首先经过
iptables的PREROUTING链,在PREROUTING链中会进行DNAT,位于nat表中,查看其具体规则iptables -t nat -L -v -n
Chain PREROUTING (policy ACCEPT 4376 packets, 255K bytes)
pkts bytes target prot opt in out source destination
80051 4690K DOCKER all -- * * 0.0.0.0/0 0.0.0.0/0 ADDRTYPE match dst-type LOCAL
Chain INPUT (policy ACCEPT 3891 packets, 233K bytes)
pkts bytes target prot opt in out source destination
Chain OUTPUT (policy ACCEPT 12629 packets, 1082K bytes)
pkts bytes target prot opt in out source destination
0 0 DOCKER all -- * * 0.0.0.0/0 !127.0.0.0/8 ADDRTYPE match dst-type LOCAL
Chain POSTROUTING (policy ACCEPT 12637 packets, 1083K bytes)
pkts bytes target prot opt in out source destination
3 200 MASQUERADE all -- * !br-43e659324492 172.21.0.0/16 0.0.0.0/0
0 0 MASQUERADE all -- * !docker0 172.17.0.0/16 0.0.0.0/0
0 0 MASQUERADE tcp -- * * 172.21.0.2 172.21.0.2 tcp dpt:8443
0 0 MASQUERADE tcp -- * * 172.21.0.2 172.21.0.2 tcp dpt:8080
0 0 MASQUERADE tcp -- * * 172.21.0.2 172.21.0.2 tcp dpt:80
Chain DOCKER (2 references)
pkts bytes target prot opt in out source destination
0 0 RETURN all -- br-43e659324492 * 0.0.0.0/0 0.0.0.0/0
0 0 RETURN all -- docker0 * 0.0.0.0/0 0.0.0.0/0
3 128 DNAT tcp -- !br-43e659324492 * 0.0.0.0/0 0.0.0.0/0 tcp dpt:8443 to:172.21.0.2:8443
3 128 DNAT tcp -- !br-43e659324492 * 0.0.0.0/0 0.0.0.0/0 tcp dpt:8080 to:172.21.0.2:8080
2 100 DNAT tcp -- !br-43e659324492 * 0.0.0.0/0 0.0.0.0/0 tcp dpt:8000 to:172.21.0.2:80DOCKER all -- * * 0.0.0.0/0 0.0.0.0/0 ADDRTYPE match dst-type LOCAL: 所有的报文会被跳转到DOCKER链进行处理DNAT tcp -- !br-43e659324492 * 0.0.0.0/0 0.0.0.0/0 tcp dpt:8443 to:172.21.0.2:8443: 只要不是从br-43e659324492网卡(本示例中的docker-compose.yml使用的网络)进入的数据包,不论目标网卡/源 IP/目标 IP 为何,只有其目标端口为8443,则对其进行 DNAT,将其目标 IP 和端口修改为172.21.0.2:8443(本示例中的容器)。其他 2 条 DNAT 同理。
- 在
iptables的PREROUTING链处理完成后,数据流入iptables的FORWARD链。规则定义位于filter表中。查看其具体规则iptables -L -v -n --line-numbers
Chain INPUT (policy DROP 0 packets, 0 bytes)
num pkts bytes target prot opt in out source destination
1 605K 585M ACCEPT all -- * * 0.0.0.0/0 0.0.0.0/0 state RELATED,ESTABLISHED
2 0 0 ACCEPT all -- lo * 0.0.0.0/0 0.0.0.0/0
...
9 461 33197 ACCEPT icmp -- * * 0.0.0.0/0 0.0.0.0/0 icmptype 8
10 178 4984 ACCEPT icmp -- * * 0.0.0.0/0 0.0.0.0/0 icmptype 0
11 10055 481K REJECT all -- * * 0.0.0.0/0 0.0.0.0/0 reject-with icmp-host-prohibited
Chain FORWARD (policy DROP 0 packets, 0 bytes)
num pkts bytes target prot opt in out source destination
1 259 186K DOCKER-USER all -- * * 0.0.0.0/0 0.0.0.0/0
2 259 186K DOCKER-ISOLATION-STAGE-1 all -- * * 0.0.0.0/0 0.0.0.0/0
3 128 179K ACCEPT all -- * br-43e659324492 0.0.0.0/0 0.0.0.0/0 ctstate RELATED,ESTABLISHED
4 8 356 DOCKER all -- * br-43e659324492 0.0.0.0/0 0.0.0.0/0
5 123 7065 ACCEPT all -- br-43e659324492 !br-43e659324492 0.0.0.0/0 0.0.0.0/0
6 0 0 ACCEPT all -- br-43e659324492 br-43e659324492 0.0.0.0/0 0.0.0.0/0
7 0 0 ACCEPT all -- * docker0 0.0.0.0/0 0.0.0.0/0 ctstate RELATED,ESTABLISHED
8 0 0 DOCKER all -- * docker0 0.0.0.0/0 0.0.0.0/0
9 0 0 ACCEPT all -- docker0 !docker0 0.0.0.0/0 0.0.0.0/0
10 0 0 ACCEPT all -- docker0 docker0 0.0.0.0/0 0.0.0.0/0
11 0 0 REJECT all -- * * 0.0.0.0/0 0.0.0.0/0 reject-with icmp-host-prohibited
Chain OUTPUT (policy ACCEPT 42129 packets, 7533K bytes)
num pkts bytes target prot opt in out source destination
Chain DOCKER (2 references)
num pkts bytes target prot opt in out source destination
1 3 128 ACCEPT tcp -- !br-43e659324492 br-43e659324492 0.0.0.0/0 172.21.0.2 tcp dpt:8443
2 3 128 ACCEPT tcp -- !br-43e659324492 br-43e659324492 0.0.0.0/0 172.21.0.2 tcp dpt:8080
3 2 100 ACCEPT tcp -- !br-43e659324492 br-43e659324492 0.0.0.0/0 172.21.0.2 tcp dpt:80
Chain DOCKER-ISOLATION-STAGE-1 (1 references)
num pkts bytes target prot opt in out source destination
1 123 7065 DOCKER-ISOLATION-STAGE-2 all -- br-43e659324492 !br-43e659324492 0.0.0.0/0 0.0.0.0/0
2 0 0 DOCKER-ISOLATION-STAGE-2 all -- docker0 !docker0 0.0.0.0/0 0.0.0.0/0
3 259 186K RETURN all -- * * 0.0.0.0/0 0.0.0.0/0
Chain DOCKER-ISOLATION-STAGE-2 (2 references)
num pkts bytes target prot opt in out source destination
1 0 0 DROP all -- * br-43e659324492 0.0.0.0/0 0.0.0.0/0
2 0 0 DROP all -- * docker0 0.0.0.0/0 0.0.0.0/0
3 123 7065 RETURN all -- * * 0.0.0.0/0 0.0.0.0/0
Chain DOCKER-USER (1 references)
num pkts bytes target prot opt in out source destination
1 259 186K RETURN all -- * * 0.0.0.0/0 0.0.0.0/0- 数据流进入
iptables的FORWARD链。 DOCKER-USER all -- * * 0.0.0.0/0 0.0.0.0/0: 首先会被全部跳转到DOCKER-USER链进行处理。RETURN all -- * * 0.0.0.0/0 0.0.0.0/0: 默认情况下,DOCKER-USER链未作任何处理,数据流跳转回FORWARD链中的原位置,继续进入下一个链DOCKER-ISOLATION-STAGE-1ACCEPT all -- * br-43e659324492 0.0.0.0/0 0.0.0.0/0: 数据流到了此处,表示目标网络为本示例中的容器的网络,对数据全部放行接收。数据进入容器。
- 数据流进入
根据以上对数据流向的分析,如果要对进入容器的数据进行源 IP 限制,建议将其放置在 DOCKER-USER 链中。具体实现参考如下:
配置
ipset,用于对多个源 IP 设置白名单ipset create allowed_ips hash:ip
ipset add allowed_ips 2.9.1.171配置
iptables,如果源 IP 不在白名单中,则禁止访问特定的端口iptables -t filter -I DOCKER-USER 1 -m set ! --match-set allowed_ips src -m multiport -p tcp --dports 8000,8080,8443 -j DROP -m comment --comment "for Nextcloud"
docker 场景下的自定义 iptables 规则的持久化问题
在使用 Docker 或者 Docker Compose 部署应用的场景下,假如需要在 Docker 的基础上对 iptables 防火墙做自定义配置,如示例 docker compose 场景下使用 iptables 进行白名单限制,此种情况下,要对自定义的防火墙规则做 持久化 ( iptables 或者 docker 重启后规则自动加载),可以参考以下几种方法:
将配置写入
iptables默认配置文件,iptables重启后自动加载自定义规则,针对 示例 docker compose 场景下使用 iptables 进行白名单限制,可以在iptables配置中写入配置/etc/sysconfig/iptables *filter
:INPUT ACCEPT [0:0]
:FORWARD ACCEPT [0:0]
:OUTPUT ACCEPT [0:0]
# 提前定义链 'DOCKER-USER',否则加载配置会报错: iptables-restore: line 24 failed
:DOCKER-USER - [0:0]
-A INPUT -m state --state RELATED,ESTABLISHED -j ACCEPT
-A INPUT -p icmp -j ACCEPT
-A INPUT -i lo -j ACCEPT
... 其他规则
-A INPUT -j REJECT --reject-with icmp-host-prohibited
# 添加 Docker 自定义规则
-A DOCKER-USER -m set ! --match-set allowed_ips src -m multiport -p tcp --dports 3000,8080 -j REJECT
COMMIT以 Docker Compose 场景为例。可以创建一个容器,专门用来运行配置
iptables命令。创建一个自定义
iptables容器,此容器主要执行修改iptables自定义规则Dockerfile FROM alpine:latest
RUN apk --no-cache add iptables
COPY setup-iptables.sh /usr/local/bin/
RUN chmod +x /usr/local/bin/setup-iptables.sh
ENTRYPOINT ["setup-iptables.sh"]编写
setup-iptables.sh脚本:setup-iptables.sh !/bin/sh
iptables -A DOCKER-USER -m set ! --match-set allowed_ips src -p tcp --dport 3000 -j REJECT配置
docker-compose.yml,在docker-compose.yml中添加上面配置的容器docker-compose.yml
services:
  iptables:
    build: .
    network_mode: "host"
    restart: "no"
    deploy:
      restart_policy:
        condition: none
  your_service:
    image: your_image
    ports:
      - "3000:3000"
    # Other configuration options for your service
当运行
docker-compose up时,iptables服务(容器)会启动并执行setup-iptables.sh脚本,将自定义规则添加到DOCKER-USER链中。根据实际需求谨慎编写
setup-iptables.sh脚本内容,防止iptables规则混乱
要在 Docker Compose 中自定义防火墙规则,可以使用 Docker Compose 的
post-up脚本功能。创建
docker-compose.yml文件docker-compose.yml
services:
  myservice:
    image: myimage
    ports:
      - "3000:3000"
    networks:
      - mynetwork

networks:
  mynetwork:
    driver: bridge
创建
docker-compose.override.yml文件docker-compose.override.yml
services:
  myservice:
    entrypoint: ["sh", "-c", "iptables -A DOCKER-USER -m set ! --match-set allowed_ips src -p tcp --dport 3000 -j REJECT && exec myservice"]
启动 Docker Compose。 这样, 每次启动服务时,都会在
DOCKER-USER链中添加指定的防火墙规则。确保myservice的入口点脚本正确无误,以防止启动失败。docker-compose up会时同时加载docker-compose.yml和docker-compose.override.yml。Docker Compose 会将
docker-compose.override.yml中的配置与docker-compose.yml中的配置合并。覆盖相同配置项,新增不同配置项。
以上 2 个
compose配置文件也可以合并成一个docker-compose.yml:
docker-compose.yml
services:
  myservice:
    image: myimage
    ports:
      - "3000:3000"
    networks:
      - mynetwork
    entrypoint: /path/to/setup-firewall.sh myservice-command

networks:
  mynetwork:
driver: bridge这样,每次启动服务时,都会先执行防火墙规则,然后启动实际服务。
Ubuntu 22.04 安装 iptables
Ubuntu 22.04 (Jammy Jellyfish) 默认使用 UFW (Uncomplicated Firewall) 作为防火墙管理工具。UFW 是一个用户友好的前端工具,旨在简化 iptables 的配置。它默认是未激活的,但安装在系统中,用户可以根据需要启用和配置它。
检查 UFW 状态
systemctl status ufw |
卸载 UFW 软件包
sudo systemctl stop ufw |
在 Ubuntu 22.04 (Jammy Jellyfish) 中,iptables 仍然是管理防火墙规则的重要工具,不过 Ubuntu 22.04 默认使用 nftables 作为防火墙框架,iptables 已经被 nftables 取代。在这种情况下,iptables 实际上是通过 nftables 的兼容层 (iptables-nft) 实现的。这意味着你在使用 iptables 命令时,实际上是在通过 nftables 管理规则。
nftables防火墙框架的默认客户端工具是nft.
检查 iptables 可执行文件路径会发现 iptables 实际上是 iptables-nft 命令的软链接
which iptables |
安装 iptables 后可以使用 iptables 命令管理防火墙规则,但是没有 iptables 服务存在。为了方便 iptables 服务的管理,可以参考以下配置将 iptables 添加为系统服务
[Unit] |
防火墙规则配置文件 /etc/sysconfig/iptables(可以自定义路径)
使用以上方式的
iptables服务,其本质上(底层框架)还是使用的nftables防火墙,此方式只是对还不熟悉nft而熟悉iptables的管理员提供了一种熟悉的管理防火墙(nftables)的方式(通过iptables-nft实现)
常见问题
ssh 无法连接
iptables 配置文件内容如下,关闭防火墙后,ssh 可以从客户端 192.168.1.2 进行连接。重启防火墙后,则无法连接。说明问题是因为防火墙导致。
*filter |
针对 sshd 的防火墙规则添加日志,配置文件修改如下
*filter |
主要添加日志规则: -A INPUT -p tcp -m state --state NEW -m tcp -s 192.168.1.2 --dport 22 -j LOG --log-prefix 'iptables-sshd' 日志规则配置参考
ssh 连接失败后查看日志
Feb 17 13:32:02 ip-172-31-2-4 kernel: iptables-sshdIN=eth0 OUT= MAC=02:d4:c1:a7:73:bb:02:69:00:94:63:ed:08:00 SRC=192.168.1.2 DST=172.31.2.4 LEN=60 TOS=0x00 PREC=0x00 TTL=42 ID=61621 DF PROTO=TCP SPT=53576 DPT=22 WINDOW=26883 RES=0x00 SYN URGP=0 |
根据日志可知,规则 INPUT -p tcp -s 192.168.1.2 --dport 22 可以匹配到 ssh 的流量,说明 filter 表的 INPUT 链配置无误,根据 -j ACCEPT,filter 表的 INPUT 链会 ACCEPT 此连接请求。连接无法建立,应该是因为其他防火墙规则导致。
检查 filter 表之外的其他表的 INPUT 链,看是否存在拒绝的规则,发现 NAT 表中,INPUT 链的规则默认为 DROP
iptables -t nat -L -v -n --line-numbers |
将其默认规则改为 ACCEPT
iptables -t nat -P INPUT ACCEPT |
重新使用 ssh 登陆,连接正常。