linux fail2ban 详解

环境信息

  • Centos 7
  • iptables

Fail2ban 是 Linux 上的一个著名的入侵保护的开源框架。它通过监视相应服务的日志记录文件,匹配日志记录中的错误信息(正则式匹配),然后与系统的 iptables 联动执行相应的屏蔽动作(一般情况下是调用防火墙屏蔽),比如:当有人在试探你的 HTTPSSHSMTPFTP 密码,只要达到你预设的次数,Fail2ban 就会调用防火墙屏蔽这个 IP,并且可以发送 e-mail 通知系统管理员。

由于 Fail2ban 需要与系统的 iptablesfirewalld 等联动来达到封禁 IP 的目的, iptables 使用与 firewalld 有少许不同。

本文以 iptables 为例

安装

yum install epel-release
yum install -y fail2ban
systemctl enable fail2ban

相关命令

# 查看 Fail2ban 的状态
fail2ban-client status

# 查看 Fai2ban 的版本
fail2ban-client version

# 检查 Fail2ban 是否正常运行(正常将显示 pong)
fail2ban-client ping

# 启动 Fail2ban
systemctl start fail2ban

# 停止 Fail2ban
systemctl stop fail2ban

# 重启 Fail2ban
systemctl restart fail2ban

# 打开 Fail2ban 的日志监控
tail -f /var/log/fail2ban.log

主要文件说明

文件 说明
/etc/fail2ban/jail.d/ 配置文件夹。用于定义错误次数、封禁时长、封禁动作等
/etc/fail2ban/filter.d/ 条件文件夹。内含默认文件,用于定义日志文件内容的过滤规则
/etc/fail2ban/action.d 动作文件夹。内含默认文件,用于 iptables 以及 mail 等动作配置
/etc/fail2ban/fail2ban.conf
/etc/fail2ban/jail.conf
*.conf 是主要(默认)配置文件,不要直接更改 .conf 文件 ,升级后会被覆盖
应该手动创建 fail2ban.local ,jail.local(或者分离 .conf 文件到 jail.d/ 目录)

fail2ban 配置文件说明

/etc/fail2ban/fail2ban.conf 是主配置文件,定义了 fai2ban 默认的日志级别、日志位置及 sock 文件位置。不要更改此文件,要更改默认配置,可以复制 fail2ban.conf/etc/fail2ban/fail2ban.local ,更改此 local 文件

/etc/fail2ban/fail2ban.local
[DEFAULT]

loglevel = INFO

logtarget = /var/log/fail2ban.log

syslogsocket = auto

socket = /var/run/fail2ban/fail2ban.sock

pidfile = /var/run/fail2ban/fail2ban.pid

dbfile = /var/lib/fail2ban/fail2ban.sqlite3

dbpurgeage = 1d

dbmaxmatches = 10

[Definition]


[Thread]

jail 配置文件说明

/etc/fail2ban/jail.conf 主要设置启用 ban 动作的服务及动作阀值。不要更改此文件,要更改此处的默认配置,可以复制 jail.conf/etc/fail2ban/jail.local,更改此文件中的默认配置

/etc/fail2ban/jail.local
[DEFAULT]
ignorecommand =

# 屏蔽时间,默认单位:秒
bantime = 10m

# 这个时间段内超过 maxretry 定义的次数会被 ban 掉
findtime = 10m
maxretry = 5

maxmatches = %(maxretry)s

# 日志修改检测机制(gamin、polling和auto这三种)
backend = auto

usedns = warn
logencoding = auto
enabled = false
mode = normal
filter = %(__name__)s[mode=%(mode)s]
destemail = root@localhost
sender = root@<fq-hostname>
mta = sendmail
protocol = tcp
chain = <known/chain>
port = 0:65535
fail2ban_agent = Fail2Ban/%(fail2ban_version)s
banaction = iptables-multiport
banaction_allports = iptables-allports
action_ = %(banaction)s[port="%(port)s", protocol="%(protocol)s", chain="%(chain)s"]
action_mw = %(action_)s
%(mta)s-whois[sender="%(sender)s", dest="%(destemail)s", protocol="%(protocol)s", chain="%(chain)s"]
action_mwl = %(action_)s
%(mta)s-whois-lines[sender="%(sender)s", dest="%(destemail)s", logpath="%(logpath)s", chain="%(chain)s"]
action_xarf = %(action_)s
xarf-login-attack[service=%(__name__)s, sender="%(sender)s", logpath="%(logpath)s", port="%(port)s"]
action_cf_mwl = cloudflare[cfuser="%(cfemail)s", cftoken="%(cfapikey)s"]
%(mta)s-whois-lines[sender="%(sender)s", dest="%(destemail)s", logpath="%(logpath)s", chain="%(chain)s"]
action_blocklist_de = blocklist_de[email="%(sender)s", service="%(__name__)s", apikey="%(blocklist_de_apikey)s", agent="%(fail2ban_agent)s"]
action_badips = badips.py[category="%(__name__)s", banaction="%(banaction)s", agent="%(fail2ban_agent)s"]
action_badips_report = badips[category="%(__name__)s", agent="%(fail2ban_agent)s"]
action_abuseipdb = abuseipdb
action = %(action_)s

其中 [DEFAULT] 块定义了默认的配置,具体的服务配置中 (如 /etc/fail2ban/jail.d/ssh.local),可以覆盖默认值。

针对具体服务配置防护,以 sshd 为例,手动创建配置 /etc/fail2ban/jail.d/sshd.local

/etc/fail2ban/jail.d/sshd.local
[sshd]
enabled = true
port = 22
filter = sshd
action = iptables[name=SSH, port=ssh, protocol=tcp]
logpath = /var/log/secure
maxretry = 3
bantime = 43200
findtime = 3600

参数说明:

  • [sshd] : 名称,可以随便填写
  • enabled =true : 启用此配置
  • port = 22 : 服务端口
  • filter = sshd : 应用的 filter 名称,对应的 filter 配置 位于 /etc/fail2ban/filter.d/sshd.conf
  • action = iptables[name=SSH, port=ssh, protocol=tcp] : 执行的动作,对应 /etc/fail2ban/action.d/iptables.conf ,并传入 name=SSH, port=ssh, protocol=tcp,此处传入的端口 ssh 默认为 22 ,如果端口不为 22 ,需要更改为对应端口,传入的 name 会在定义防火墙链时被当做链名的一部分
  • logpath = /var/log/secure : 要过滤的日志记录文件路径
  • maxretry = 3 : 执行封禁动作前允许的错误记录数
  • bantime = 43200 : 执行封禁的时长(秒)
  • findtime = 3600 :此时长(秒)内达到 maxretry 次就执行封禁动作

配置好之后,重启 fail2ban 使配置生效

systemctl restart fail2ban

或者执行以下命令,在不重启 fail2ban 的情况下重新分析并加载配置

fail2ban-client reload

执行以下命令查看 fail2ban 的状态

$ fail2ban-client status
Status
|- Number of jail: 1
`- Jail list: sshd

可以看到当前只启动了 sshd 这一个 jail

执行以下命令查看 sshd 的防护情况,可以看到目前有哪些 ip 被封锁,以及过去总共多少 ip 被封锁

$ fail2ban-client status sshd
Status for the jail: sshd
|- Filter
| |- Currently failed: 0
| |- Total failed: 0
| `- Journal matches: _SYSTEMD_UNIT=sshd.service + _COMM=sshd
`- Actions
|- Currently banned: 1
|- Total banned: 1
`- Banned IP list: 54.193.188.141

filter 配置说明

fail2ban 使用的各个 filter 位于 /etc/fail2ban/filter.d/ 下。其中主要配置了日志的过滤规则

以创建防护 VNCfilter 来说明。VNC 的日志中,如果有恶意登录,经常会出现以下日志记录:

/home/USER1/.vnc/USER1\:1.log
Sat Aug 20 10:35:27 2022
Connections: blacklisted: 185.170.144.226

Sat Aug 20 10:35:28 2022
Connections: blacklisted: 185.170.144.226

Sat Aug 20 10:35:29 2022
Connections: blacklisted: 185.170.144.226

filter 的匹配规则里面,行的开头一定要先匹配到时间,时间格式可以试试系统可以识别的格式,如果开头不能匹配到时间,规则会匹配失败,因此,如果日志开头不是时间格式,需要修改日志格式,本例中,处理 vnc 日志时,会先在行首添加时间

可以根据此日志记录,创建针对 VNC 服务的日志过滤规则,手动创建文件 /etc/fail2ban/filter.d/vnc.local

/etc/fail2ban/filter.d/vnc.local
[Definition]
failregex = .*Connections: blacklisted: <HOST>
ignoreregex =

创建好配置文件,使配置生效前,一定要对 filter 配置文件的有效性进行测试,fail2ban 提供了命令 fail2ban-regex 用来测试 filter 的正则表达式,使用方法如下:

$ fail2ban-regex /home/USER1/.vnc/USER1\:1.log vnc

Running tests
=============

Use failregex filter file : vnc, basedir: /etc/fail2ban
Use log file : /home/USER1/.vnc/USER1\:1.log
Use encoding : UTF-8


Results
=======

Failregex: 171210 total
|- #) [# of hits] regular expression
| 1) [171210] .*Connections: blacklisted: <HOST>
`-

Ignoreregex: 0 total

Date template hits:
|- [# of hits] date format
| [377319] {^LN-BEG}(?:DAY )?MON Day %k:Minute:Second(?:\.Microseconds)?(?: ExYear)?
`-

Lines: 377319 lines, 0 ignored, 171210 matched, 206109 missed
[processed in 23.67 sec]

以上命令使用规则 vnc,匹配日志文件 /home/USER1/.vnc/USER1\:1.log,结果中显示:Lines: 377319 lines, 0 ignored, 171210 matched, 206109 missed,可以说明匹配到了需要的内容

也可以通过以下命令,验证具体的正则表达式是否能匹配到指定的日志

$ fail2ban-regex ' Connections: blacklisted: 185.170.144.226' '.*Connections: blacklisted: <HOST>'

Running tests
=============

Use failregex line : .*Connections: blacklisted: <HOST>
Use single line : Connections: blacklisted: 185.170.144.226


Results
=======

Failregex: 1 total
|- #) [# of hits] regular expression
| 1) [1] .*Connections: blacklisted: <HOST>
`-

Ignoreregex: 0 total

Date template hits:

Lines: 1 lines, 0 ignored, 1 matched, 0 missed
[processed in 0.03 sec]

以上结果显示 Lines: 1 lines, 0 ignored, 1 matched, 0 missed , 说明日志被正则表达式匹配到了

以上命令中,隐含了日志开始匹配到了时间格式

创建 ban 配置,手动创建配置文件 /etc/fail2ban/jail.d/vnc.local

/etc/fail2ban/jail.d/vnc.local
[vnc]
enabled = true
port = 5901
filter = vnc
action = iptables[name=VNC, port=5901, protocol=tcp]
logpath = /home/cosmos/.vnc/cosmos:1.log
maxretry = 3
bantime = 43200
findtime = 3600

配置更改完后,重启 fail2ban 使配置生效

systemctl restart fail2ban

重启后,使用以下命令查看 fail2ban 状态:

$ fail2ban-client status
Status
|- Number of jail: 2
`- Jail list: sshd, vnc

如果输出显示 : ERROR Failed to access socket path: /var/run/fail2ban/fail2ban.sock. Is fail2ban running? ,说明 fail2ban 启动失败,可能是配置文件存在问题,比如 fail2ban 服务状态如下:

$ systemctl status fail2ban -l
fail2ban.service - Fail2Ban Service
Loaded: loaded (/usr/lib/systemd/system/fail2ban.service; enabled; vendor preset: disabled)
Active: failed (Result: exit-code) since Sat 2022-08-20 13:33:48 CST; 24s ago
Docs: man:fail2ban(1)
Process: 2520 ExecStop=/usr/bin/fail2ban-client stop (code=exited, status=0/SUCCESS)
Process: 2536 ExecStart=/usr/bin/fail2ban-server -xf start (code=exited, status=255)
Process: 2533 ExecStartPre=/bin/mkdir -p /run/fail2ban (code=exited, status=0/SUCCESS)
Main PID: 2536 (code=exited, status=255)

Aug 20 13:33:47 myserver-cn systemd[1]: Starting Fail2Ban Service...
Aug 20 13:33:47 myserver-cn systemd[1]: Started Fail2Ban Service.
Aug 20 13:33:48 myserver-cn fail2ban-server[2536]: 2022-08-20 13:33:48,058 fail2ban
[2536]: ERROR Failed during configuration: Have not found any log file for vnc jail
Aug 20 13:33:48 myserver-cn fail2ban-server[2536]: 2022-08-20 13:33:48,060 fail2ban
[2536]: ERROR Async configuration of server failed
Aug 20 13:33:48 myserver-cn systemd[1]: fail2ban.service: main process exited, code=exited, status=255/n/a
Aug 20 13:33:48 myserver-cn systemd[1]: Unit fail2ban.service entered failed state.
Aug 20 13:33:48 myserver-cn systemd[1]: fail2ban.service failed.

输出中显示 Failed during configuration: Have not found any log file for vnc jail,说明 jail.d/vnc.local 中配置的日志路径或者是权限有问题,需要检查此处配置。

此处报错是因为 jail.d/vnc.local 中配置的日志路径如下:

jail.d/vnc.local
logpath = /home/cosmos/.vnc/cosmos\:1.log

配置文件中不需要对 : 进行转义。

配置无误,重启服务生效后,可以检查 vnc 对应的 ban 的状态:

$ fail2ban-client status vnc
Status for the jail: vnc
|- Filter
| |- Currently failed: 22
| |- Total failed: 52632
| `- File list: /home/cosmos/.vnc/cosmos:1.log.bak
`- Actions
|- Currently banned: 18
|- Total banned: 18
`- Banned IP list: 212.80.219.226 212.80.219.175 175.211.155.52 ...

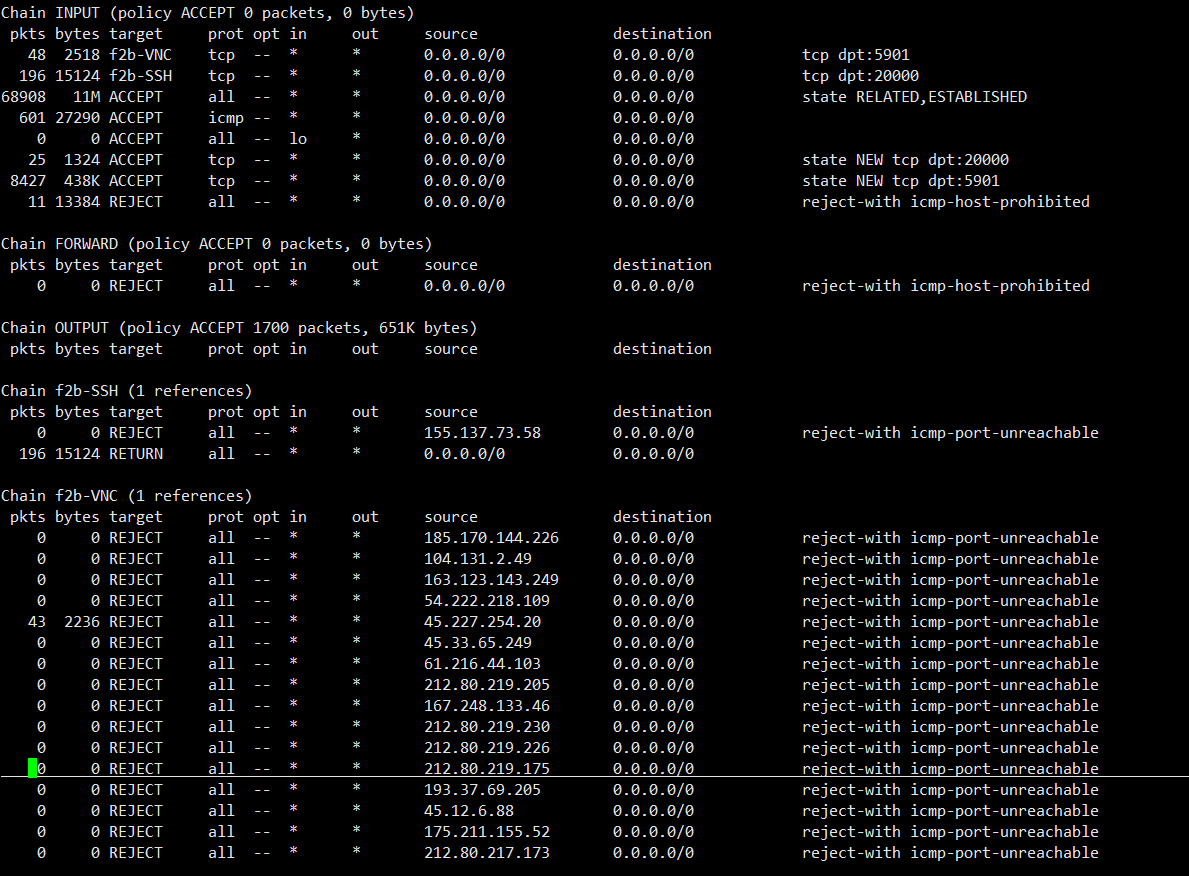
查看防火墙状态,可以看到被封的 ip :

iptables -L -v -n

如果被封禁的 ip 中有被误伤的,需要解禁,使用以下命令:

fail2ban-client set vnc  unbanip 45.33.65.249

命令中的 vncban 配置文件 /etc/fail2ban/jail.d/vnc.local 中的 [vnc] 名称

相关链接

fail2ban 官网
fail2ban 配置官网说明