环境信息
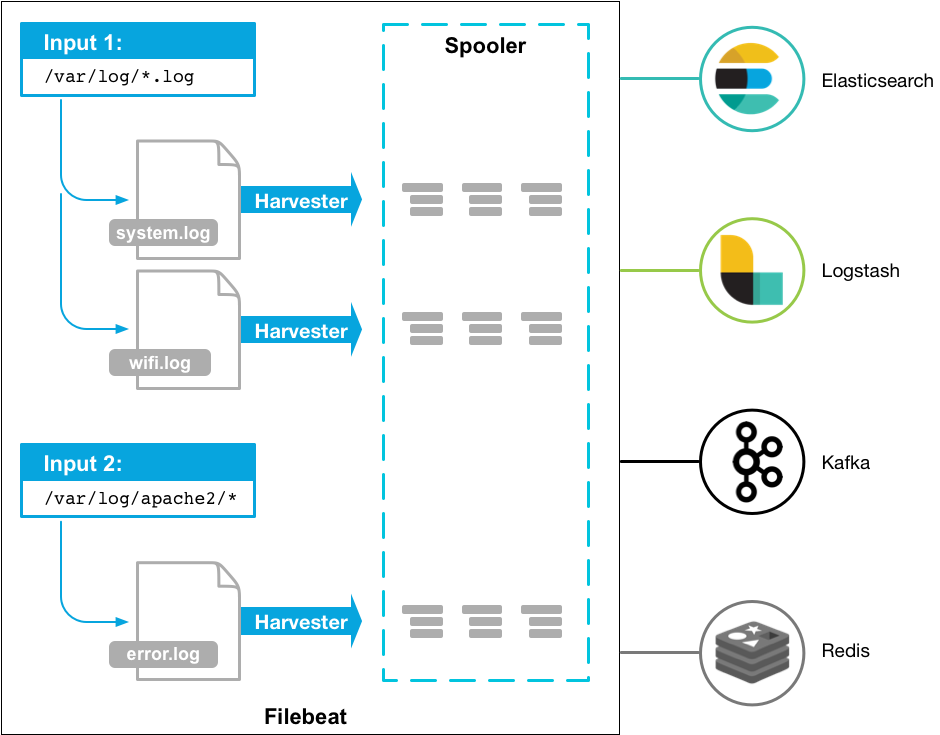
Filebeat 启动之后,会根据配置文件中配置的数据收集路径启动 1 个或者多个 inputs。针对匹配到的每个文件,Filebeat 都会启动一个对应的 harvester,每个 harvester 读取一个单独的文件内容,并将其中的新内容发送到 libbeat,libbeat 会整合数据并将其发送到配置的 output [1]
如果 input 类型为 log,input 会负责找到配置中匹配到的文件,并为每个文件启动一个 harvester。每个 input 都运行在自己独立的 Go routine (例程) 中。 [4]
Filebeat 工作原理
Filebeat 会将收割(harvest) 的每个文件的状态存储到 registry。因此如果要让 Filebeat 从头开始收集数据,只需要删除 registry 文件即可。可以使用命令 filebeat export config 找到 data 目录,registry 位于其中。
安装 Filebeat 官方安装文档
curl -L -O https://artifacts.elastic.co/downloads/beats/filebeat/filebeat-8.8.2-x86_64.rpm
rpm -vi filebeat-8.8.2-x86_64.rpm

systemctl enable --now filebeat
filebeat command-line interface filebeat 命令常用功能 [3]
子命令
说明
示例
help查看命令帮助信息filebeat help COMMAND_NAME [FLAGS]
export导出 配置 等信息
export 使用
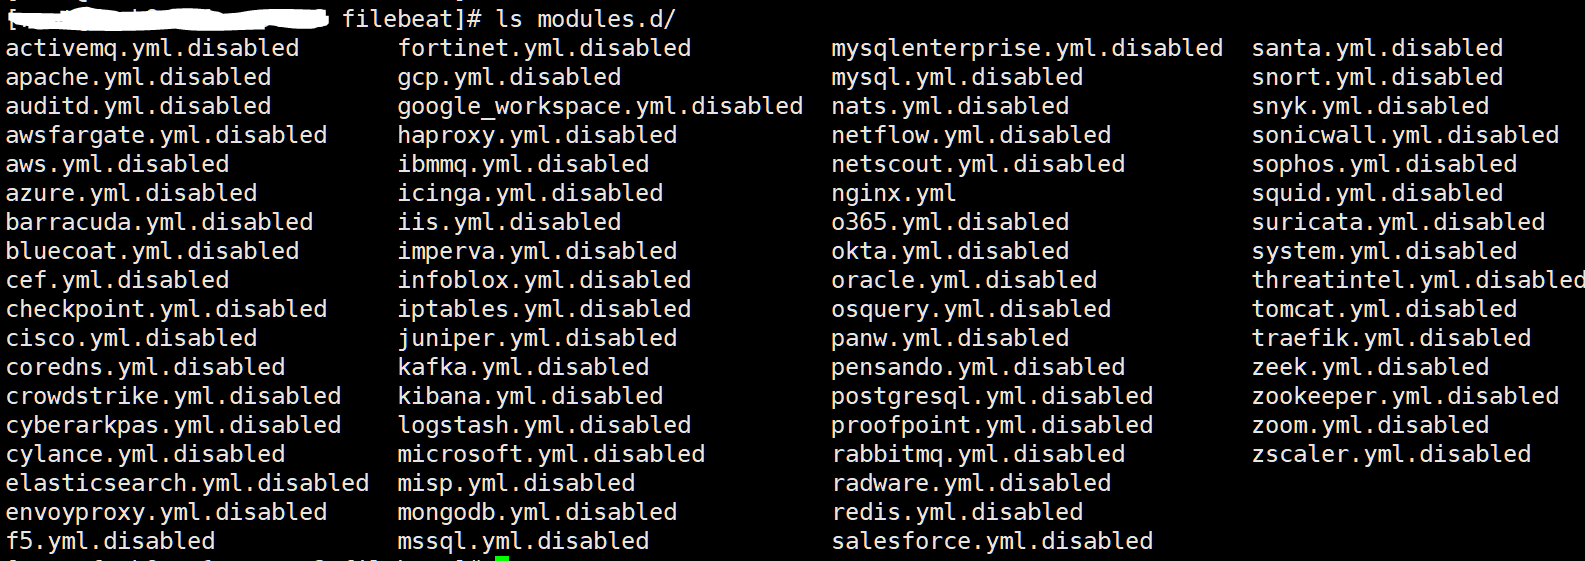
modules模块管理命令。用来 enable 或者 disable 位于 modules.d 中的 模块 filebeat modules disable MODULEfilebeat modules enable MODULEfilebeat modules list
Data collection modules
run启动 filebeat
test测试配置文件 或者到 output 的连接filebeat test configfilebeat test output
version显示当前版本信息
export 查看 filebeat 加载的配置 要查看 filebeat 当前使用的配置,信息,可以使用以下命令
$ filebeat export config
filebeat:
  config:
    modules:
      path: /etc/filebeat/modules.d/*.yml
      reload:
        enabled: false
  inputs:
  - enabled: false
    id: my-filestream-id
    paths:
    - /var/log/*.log
    type: filestream
output:
  elasticsearch:
    hosts:
    - localhost:9200
path:
  config: /etc/filebeat
  data: /var/lib/filebeat
  home: /usr/share/filebeat
  logs: /var/log/filebeat
processors:
- add_host_metadata:
    when:
      not:
        contains:
          tags: forwarded
- add_cloud_metadata: null
- add_docker_metadata: null
- add_kubernetes_metadata: null
setup:
  kibana: null
  template:
    settings:
      index:
        number_of_shards: 1
收集数据 Filebeat 有多种收集数据的方式 [2]
Data collection modules ECS loggersManual Filebeat configuration
Data collection modules 要使用 Filebeat 提供的模块,首先要启用对应的模块
查看 modules,命令会列出 Enabled 的模块,以及 Disabled 的模块
$ filebeat modules list
Enabled:

Disabled:
activemq
apache
auditd
aws
awsfargate
azure
要启用对应模块,使用以下命令
$ filebeat modules enable nginx
Enabled nginx

$ filebeat modules list
Enabled:
nginx

Disabled:
activemq
apache
auditd
aws
awsfargate
azure
barracuda
模块启用后,在 Filebeat 的配置文件目录中(/etc/filebeat/modules.d/)生成以对应模块命名的配置文件,未启用的 modules 以 .disabled 结尾
根据需求修改对应模块 (如/etc/filebeat/modules.d/nginx.yml) 的配置文件
使用以下命令测试 Filebeat 配置
$ filebeat test config
Config OK
Filebeat 配置详解 Filebeat 配置文件为 filebeat.yml,配置使用 YAML 格式。
filebeat.yml filebeat.inputs: - type: filestream id: my-filestream-id paths: - /var/log/system.log - /var/log/wifi.log - type: filestream id: apache-filestream-id paths: - "/var/log/apache2/*" fields: apache: true fields_under_root: true
配置文件说明
可以在 filebeat.inputs 中配置多个 input
同一个 type 的 input 可以配置多个
log 类型将要废弃,使用 filestream
Filebeat 支持的 input 的 type 列表
Global 配置 全局配置在 filebeat namespace 中 [5]
filebeat.registry.flush - 控制 filebeat 将 registry entries 写入磁盘的间隔。默认为 1s
日志级别 参考以下配置,修改 Filebeat 日志级别为 debug
filebeat.yml inputs 配置官方参考文档
filestream filestream input 是 log input 的升级版本,log input 将会被弃用。 [8]
filebeat.yml filebeat.inputs: - type: filestream id: my-filestream-id paths: - /var/log/system.log - /var/log/wifi.log - type: filestream id: apache-filestream-id paths: - "/var/log/apache2/*" fields: apache: true fields_under_root: true # prospector.scanner.recursive_glob # prospector.scanner.exclude_files: ['\.gz$' ] # prospector.scanner.include_files: ['^/var/log/.*' ] # exclude_lines: ['^DBG' ] # include_lines: ['^ERR' , '^WARN' ]
Filebeat 默认不支持读取网络共享数据或者 cloud providers 数据 原因说明
常用参数说明:
参数
说明
示例
id每个 filestream 类型的 input 都必须有个独一无二的 ID,用来追踪文件状态修改 id 会导致数据重新采集并发送
paths要采集的数据路径
/var/log/*/*.log
prospector.scanner.recursive_glob默认为 true。在匹配文件路径时可以将路径右侧的 ** 扩展到最多 8 层的 *。例如: /foo/** 可以匹配路径 /foo, /foo/*, /foo/*/* 等等
prospector.scanner.exclude_files列表类型,使用正则表达式排除要采集的数据文件,默认不排除
prospector.scanner.exclude_files: ['\.gz$']
prospector.scanner.include_files列表类型,使用正则表达式包含要采集的数据文件
prospector.scanner.include_files: ['^/var/log/.*']
prospector.scanner.check_intervalFilebeat 检查指定路径下新文件的周期,默认 10s
exclude_lines列表类型。使用正则表达式过滤要排除采集的行,drop 掉匹配到的行。
include_lines如果同时定义了 exclude_lines 和 include_lines,Filebeat 先处理 include_lines,然后处理 exclude_lines,和它们的配置顺序无关
buffer_size每个 harvester 使用的 buffer(单位为 bytes)。默认为 16384
message_max_bytes单行 message 的最大大小,超过的数据会被忽略。默认为 10MB (10485760)
fields添加额外的字段(field)到事件(event)fields 参数可以在 Filebeat 配置文件的不同级别进行定义,包括 全局级别、输入级别和输出级别。在不同级别定义的 fields 参数会被合并,并最终成为事件的一部分。
使用说明
fields_under_root如果为 true,自定义添加的字段将会位于顶层。默认自定义添加的字段位于 fields 下。如果自定义字段已存在,会覆盖已有字段
fields 参数使用说明 在 Filebeat 中,fields 参数用于添加额外的字段(field)到事件(event)。这些字段将作为事件的一部分存储在 Elasticsearch 或者其他输出目的地中,从而使你可以在后续的数据处理或分析中使用这些字段。
fields 参数可以在 Filebeat 配置文件的不同级别进行定义,包括 全局级别 、输入级别 和 输出级别 。在不同级别定义的 fields 参数会被合并,并最终成为事件的一部分。
全局级别 全局级别的 fields 配置示例如下
filebeat.yml filebeat.config: modules: path: ${path.config}/modules.d/*.yml fields: environment: production application: my_app
在全局级别定义的 fields 参数将会应用到所有的输入和输出中,这里定义了两个字段 environment 和 application,并且所有的事件都会包含这两个字段。
输入级别 输入级别的 fields 配置示例如下
filebeat.yml filebeat.inputs: - type: filestream paths: - /var/log/system.log fields: log_type: system
在输入级别定义的 fields 参数将仅应用于该输入所产生的事件,这里定义了一个字段 log_type,并且仅应用于 system.log 日志文件的事件。
输出级别 输出级别的 fields 配置示例如下
filebeat.yml output.elasticsearch: hosts: ["http://localhost:9200"] fields: data_center: us-east-1
在输出级别定义的 fields 参数将仅应用于发送到 Elasticsearch 的事件,这里定义了一个字段 data_center,并且所有发送到 Elasticsearch 的事件都会包含这个字段。
outputs 配置 outputs 配置了 Filebeat 发送数据的目标,只能配置一个同一类型的 output
Filebeat 支持的 output 如下 [6]
Elasticsearch Service
Elasticsearch
Logstash
Kafka
Redis
File
Console
Console Console output 输出数据到 stdout
filebeat.yml output.console: pretty: true
pretty: true - 数据输出使用易读的格式,默认值为 false
Elasticsearch Filebeat 可以直接将数据直接写入 Elasticsarch,如果无需对数据进行复杂的格式化处理或者转换,可以使用 Filebeat 直接将数据写入 Elasticsearch
filebeat.yml filebeat.inputs: - type: filestream paths: - /root/temp/*.log output.elasticsearch: hosts: ["http://localhost:9200", "http://172.31.19.164:9200", "http://172.31.21.3:9200"] username: "newadmin" password: "password" # index: "my_test_log" # setup.template.name: "my_test_log" # setup.template.pattern: "my_test_log-*"
Filebeat 上传到 Elasticsearch 的数据,保存到 Elasticsearch 的索引默认为类似 .ds-filebeat-8.8.2-2023.07.28-000001 的格式。如果要自定义发送到 Elasticsearch 的索引,可以使用 index 参数配置,如以上配置中的 index: "my-log-data-%{+yyyy.MM.dd}",会将每天的数据写入一个索引中。
常用参数说明:
参数
说明
示例
enabled默认为 true。是否启用此 output
hostsES 节点列表。数据使用 RR(round robin)发送到各个节点,如果有节点不可以,自动将数据发送到其他节点,相当于负载均衡及高可用
protocol如果节点列表中未指定连接 ES 使用的协议,需要使用此参数指定(http、https)
compression_level压缩级别,取值范围 1 (best speed) to 9 (best compression)。默认为 0,表示关闭压缩。启用后会节省网络带宽,但是会增加 CPU 负载
loadbalance默认为 true。Filebeat 会并发连接所有的 ES 节点发送数据。配置为 false,Filebeat 同一时间只发送数据到一个随机节点
usernamepasswordElasitcsearch 用户信息。建议单独创建只拥有上传权限的用户给 Filebeat 使用
权限配置参考
index发送到 ES 的索引名称 。自定义了 index 后,必须同时定义索引模板,使用参数 setup.template.name 和 setup.template.pattern
setup.template.name自定义索引名,使用了 output.elasticsearch.index 后必须配置,定义索引名称,其值必须和 output.elasticsearch.index 相同
setup.template.pattern使用了 output.elasticsearch.index 后必须配置,定义动态生成的索引名称,必须使用通配符 * 来支持动态生成的索引名称
使用示例
indices根据条件动态定义要发送到 Elasticsearch 的 index 名称。
使用示例
在 Elasticsearch 中创建仅能创建索引及索引数据权限的用户 为了安全,建议 Filebeat 中配置的 Elasticsearch 认证用户仅具有创建索引及索引数据的权限 role 和 user 分别为 beats_uploadonly_role 和 beats_uploadonly_user
PUT /_security/role/beats_uploadonly_role
{
  "cluster": ["manage_index_templates", "monitor", "read_ilm"],
  "indices": [
    {
      "names": ["*"],   // 替换为允许的索引模式
      "privileges": ["write", "create_index"]
    }
  ]
}
然后将用户 beats_uploadonly_user 绑定到 role beats_uploadonly_role。否则权限不足,Filebeat 启动后会报错:
{"log.level":"error","@timestamp":"2023-07-31T14:23:18.114+0800","log.logger":"publisher_pipeline_output","log.origin":{"file.name":"pipeline/client_worker.go","file.line":148},"message":"Failed to connect to backoff(elasticsearch(http://172.31.21.3:9200)): 403 Forbidden: {\"error\":{\"root_cause\":[{\"type\":\"security_exception\",\"reason\":\"action [cluster:monitor/main] is unauthorized for user [beats_uploadonly_user] with effective roles [beats_uploadonly_role], this action is granted by the cluster privileges [monitor,manage,all]\"}],\"type\":\"security_exception\",\"reason\":\"action [cluster:monitor/main] is unauthorized for user [beats_uploadonly_user] with effective roles [beats_uploadonly_role], this action is granted by the cluster privileges [monitor,manage,all]\"},\"status\":403}","service.name":"filebeat","ecs.version":"1.6.0"}

{"file.name":"pipeline/client_worker.go","file.line":148},"message":"Failed to connect to backoff(elasticsearch(http://localhost:9200)): Connection marked as failed because the onConnect callback failed: failed to check for policy name 'filebeat': (status=403) {\"error\":{\"root_cause\":[{\"type\":\"security_exception\",\"reason\":\"action [cluster:admin/ilm/get] is unauthorized for user [beats_uploadonly_user] with effective roles [beats_uploadonly_role], this action is granted by the cluster privileges [read_ilm,manage_ilm,manage,all]\"}],\"type\":\"security_exception\",\"reason\":\"action [cluster:admin/ilm/get] is unauthorized for user [beats_uploadonly_user] with effective roles [beats_uploadonly_role], this action is granted by the cluster privileges [read_ilm,manage_ilm,manage,all]\"}],\"type\":\"security_exception\",\"reason\":\"action [cluster:admin/ilm/get] is unauthorized for user [beats_uploadonly_user] with effective roles [beats_uploadonly_role], this action is granted by the cluster privileges [read_ilm,manage_ilm,manage,all]\"},\"status\":403}","service.name":"filebeat","ecs.version":"1.6.0"}
以上角色和用户创建成功后,只能在 Elasticsearch 中创建索引和索引数据,无其他权限,可以参考以下测试
# curl -s --user beats_uploadonly_user:password123 http://localhost:9200/_cat/indices?pretty
{
  "error" : {
    "root_cause" : [
      {
        "type" : "security_exception",
        "reason" : "action [indices:monitor/settings/get] is unauthorized for user [beats_uploadonly_user] with effective roles [beats_uploadonly_role], this action is granted by the index privileges [monitor,view_index_metadata,manage,all]",
        "suppressed" : [
          {
            "type" : "security_exception",
            "reason" : "action [indices:monitor/stats] is unauthorized for user [beats_uploadonly_user] with effective roles [beats_uploadonly_role], this action is granted by the index privileges [monitor,manage,all]"
          }
        ]
      }
    ],
    "type" : "security_exception",
    "reason" : "action [indices:monitor/settings/get] is unauthorized for user [beats_uploadonly_user] with effective roles [beats_uploadonly_role], this action is granted by the index privileges [monitor,view_index_metadata,manage,all]",
    "suppressed" : [
      {
        "type" : "security_exception",
        "reason" : "action [indices:monitor/stats] is unauthorized for user [beats_uploadonly_user] with effective roles [beats_uploadonly_role], this action is granted by the index privileges [monitor,manage,all]"
      }
    ]
  },
  "status" : 403
}

# curl -XDELETE -s --user beats_uploadonly_user:password123 http://localhost:9200/project-app2-message?pretty{
  "error" : {
    "root_cause" : [
      {
        "type" : "security_exception",
        "reason" : "action [indices:admin/delete] is unauthorized for user [beats_uploadonly_user] with effective roles [beats_uploadonly_role] on indices [project-app2-message], this action is granted by the index privileges [delete_index,manage,all]"
      }
    ],
    "type" : "security_exception",
    "reason" : "action [indices:admin/delete] is unauthorized for user [beats_uploadonly_user] with effective roles [beats_uploadonly_role] on indices [project-app2-message], this action is granted by the index privileges [delete_index,manage,all]"
  },
  "status" : 403
}
自定义索引 Filebeat 默认上传到 Elasticsearch 的数据,保存在名称类似 .ds-filebeat-8.8.2-2023.07.28-000001 的 data stream 中。要自定义上传数据到 Elasticsearch 时所使用的索引,可以参考以下配置
filebeat.yml filebeat.inputs: - type: filestream paths: - /root/temp/*.log output.elasticsearch: hosts: ["http://localhost:9200", "http://172.31.19.164:9200", "http://172.31.21.3:9200"] username: "newadmin" password: "password" index: "my_test_log" setup.template.name: "my_test_log" setup.template.pattern: "my_test_log-*"
使用以上配置,数据在 Elasticsearch 中保存在名为 my_test_log 的索引中。不再保存在 data stream 中。
# GET /_cat/indices
green open .fleet-file-data-endpoint-000001                             HvLnz66ATPu3y-V7_LWiGw 1 1   0 0  494b 247b
green open my_test_log                                                  A_OBdhPXTJeZoeYP6pskYg 1 1 100 0 118kb 59kb
green open .internal.alerts-observability.logs.alerts-default-000001    qLVSX-3jTNSEJ5TUei8xeg 1 1   0 0  494b 247b
green open .internal.alerts-observability.metrics.alerts-default-000001 No3BDeiPSS-Fc9VLC1_Bmw 1 1   0 0  494b 247b

# GET /_data_stream?pretty
{
  "data_streams": []
}

# GET /my_test_log/_search
{
  "took": 1,
  "timed_out": false,
  "_shards": {
    "total": 1,
    "successful": 1,
    "skipped": 0,
    "failed": 0
  },
  "hits": {
    "total": {
      "value": 100,
      "relation": "eq"
    },
    "max_score": 1,
    "hits": [
      {
        "_index": "my_test_log",
        "_id": "qdl6m4kB7C7xGiVKZyIT",
        "_score": 1,
        "_ignored": [
          "message.keyword"
        ],
        "_source": {
          "@timestamp": "2023-07-28T07:50:33.457Z",
          "log": {
            "offset": 0,
            "file": {
              "path": "/root/temp/logstash-tutorial.log"
            }
          },
          "message": "83.149.9.216 - - [04/Jan/2015:05:13:42 +0000] \"GET /presentations/logstash-monitorama-2013/images/kibana-search.png HTTP/1.1\" 200 203023 \"http://semicomplete.com/presentations/logstash-monitorama-2013/\" \"Mozilla/5.0 (Macintosh; Intel Mac OS X 10_9_1) AppleWebKit/537.36 (KHTML, like Gecko) Chrome/32.0.1700.77 Safari/537.36\"",
          "input": {
            "type": "filestream"
          },
          "ecs": {
            "version": "8.0.0"
          },
          "host": {
            "name": "fm-k8s-c1-master1"
          },
          "agent": {
            "name": "fm-k8s-c1-master1",
            "type": "filebeat",
            "version": "8.8.2",
            "ephemeral_id": "b791d062-b92f-4196-9844-0f34bf66c9e9",
            "id": "c30f5b44-bc21-41d3-ba20-df97120c0be9"
          }
        }
      },


    ]
  }
}
如果要将数据保存到基于日期的 index 中,可以参考以下配置
filebeat.yml filebeat.inputs: - type: filestream paths: - /root/temp/*.log output.elasticsearch: hosts: ["http://localhost:9200", "http://172.31.19.164:9200", "http://172.31.21.3:9200"] username: "newadmin" password: "password" index: "my_test_log" setup.template.name: "my_test_log" setup.template.pattern: "my_test_log-*"
需求背景说明 :
Filebeat 直接将数据输出到 Elasticsearch
同一个主机上(一个 filebeat 实例)有多个 input,分别属于不同的项目和日志类型
使用一个 output 配置将分属不同项目和日志类型的数据发送到 Elasticsearch 中的不同的索引中
假设示例日志路径如下,有项目 project-app1 和 project-app2,日志类型定义为 system-message、web、app
# tree
.
├── project-app1
│ ├── messages.log
│ └── web.log
└── project-app2
  ├── app.log
  └── messages.log

2 directories, 4 files
可以参考以下配置实现将不同项目、不同类型的日志保存到不同的 Elasticsearch index 中
filebeat.yml filebeat.inputs: - type: filestream id: project-app1-message paths: - /root/temp/project-app1/messages.log fields: project: project-app1 log_type: system-message fields_under_root: true - type: filestream id: project-app1-web paths: - /root/temp/project-app1/web.log fields: project: project-app1 log_type: web fields_under_root: true - type: filestream id: project-app2-message paths: - /root/temp/project-app2/messages.log fields: project: project-app2 log_type: system-message fields_under_root: true - type: filestream id: project-app2-app paths: - /root/temp/project-app2/app.log fields: project: project-app2 log_type: app fields_under_root: true output.elasticsearch: hosts: ["http://localhost:9200", "http://172.31.19.164:9200", "http://172.31.21.3:9200"] username: "newadmin" password: "password" indices: - index: "%{[project]}-%{[log_type]}-%{[agent.version]}-%{+yyyy.MM.dd}" when.contains: project: project-app1 log_type: system-message - index: "project-app1-web" when.contains: project: project-app1 log_type: web - index: "project-app2-message" when.contains: project: project-app2 log_type: system-message - index: "project-app2-app" when.contains: project: project-app2 log_type: app index: undified setup.template.name: "undified" setup.template.pattern: "undified-*"
以上示例使用 fields 为 event 添加了自定义字段 project 和 log_type,分别定义 项目 及 日志类型 。在 output.elasticsearch 中使用参数 indices,根据不同的条件将数据输出到了不同的 index 中
类似 %{[project]}-%{[log_type]}-%{[agent.version]}-%{+yyyy.MM.dd},index 命名中可以引用字段的值。 条件表达式可以使用:
when.containswhen.equalswhen.regexpwhen.not.contains
查看 Elasticsearch 上的 index
# GET /_cat/indices
green open project-app1-web                                             jPZ31teoQe2gzdxAHOyJgQ 1 1  104 0 155.3kb  77.6kb
green open project-app2-app                                             TNgNT58RSRe5Z945biJl7w 1 1  100 0  90.1kb    45kb
green open project-app2-message                                         bEGR3Of0ROyC-wWy1Q6jgg 1 1  101 0 120.8kb  60.4kb
green open project-app1-system-message-8.8.2-2023.07.29                 nNVyV9vxQMGxTVGnvPt7Bw 1 1 1050 0 742.8kb 354.5kb
如果 indices 中的条件配置错误,或者条件未匹配到的 event,数据会默认被输出到命名格式类似 .ds-filebeat-8.8.2-2023.07.29-000001 的 data stream 中。如果配置了 index 参数,则未匹配到的数据被输出到 index 定义的索引中 indices 后,Elasticsearch 的对应的 index 中没有数据,可以检查数据是否发送到了默认的 data stream 或者自定义配置的 index 中,如果发送到了 data stream 或者自定义配置的 index 中,需要检查 indices 中的条件,可能存在错误的条件导致未匹配到相应的 event。
Logstash 如果要对数据进行复杂的格式化处理或者转换,可以通过 Filebeat 将数据输出到 Logstash 进行处理后输出到 Elasticsearch
filebeat.yml filebeat.inputs: - type: filestream paths: - /root/temp/*.log output.logstash: hosts: ["172.31.16.124:5044"]
processors 如果要在发送数据到 output 之前对数据做出筛选或添加元数据,可以为目标 input 配置额外的 processors。libbeat 提供了如下的 processors
减少导出的数据的字段
为收集的数据添加 metadata
处理附件的过程和对数据进行解码操作
Processors 可以配置在 Filebeat 配置文件的最顶层,processor 将会应用到 Filebeat 采集的所有数据。也可以配置到各个 input 下面,只对此 input 采集到的 event 生效 。
Drop event 示例 下面的示例 Drop 所有的 DEBUG 消息
filebeat.yml processors: - drop_event: when: regexp: message: "^DBG:"
drop 来自指定文件的数据
filebeat.yml processors: - drop_event: when: contains: source: "test"
Drop fields drop_fields 处理器可以丢弃指定的字段。***@timestamp 和 type 字段不能被 Drop*** [9]
filebeat.yml processors: - drop_fields: when: condition fields: ["field1", "field2", ...] ignore_missing: false
参数说明
参数
说明
示例
fields要 Drop 的字段组成的列表,字段名可以使用 /reg_exp/ 的格式使用正则表达式来匹配
使用示例
ignore_missing默认为 false。如果为 true,processor 将会在字段不存在时不报错fields 和 ignore_missing 不能同时存在,否则报错: each processor must have exactly one action, but found 2 actions (ignore_missing,drop_fields)
when条件不存在时,指定的字段会一直被删除
dissect dissect 基于位置 正则表达式 Filebeat 不支持 Grok 处理器(过滤器)
dissect 根据提供的 模式字符串 ,对输入的 event 基于位置进行字段提取。例如以下日志
2023-08-01 12:34:56 INFO "This is a sample log message."
可以使用以下 模式字符串 对其进行字段格式化
filebeat.yml processors: - dissect: tokenizer: '%{data} %{time} %{loglevel} "%{message}"' field: "message" target_prefix: "dissect_"
格式化后,可以提取到以下字段:
data - 匹配到 2023-08-01time - 匹配到 12:34:56loglevel - 匹配到 INFOmessage - 匹配到 This is a sample log message.
以上示例中实际使用了 空格 和 " 作为了分隔符,基于此对数据进行了位置分割。
dissect 常用参数说明
参数
说明
使用示例
tokenizer对 event 进行字段提取的 模式字符串
field要匹配的目标字段。默认为 message
target_prefix可以配置提取出来的字段放置的位置。dissect""),字段将被放置在 event 的根下面。如果提取出来的新字段名称已经存在,processor 不会替换它,而是记录错误。要正确使用 dissect,必须 drop 或者 rename key。或者使用参数 overwrite_keys
overwrite_keys默认为 false,如果新提取的字段和已有字段冲突,dissect 会格式化失败。true 时,processor 将会覆盖在 event 中已经存在的 keys。
使用 dissect 对 Ingress-Nginx-Controller 的 access 日志进行格式化 Ingress-Nginx-Controller 的默认 access 日志示例如下:
2023-08-01T15:28:03.884140739+08:00 stdout F 172.31.14.59 - - [01/Aug/2023:07:28:03 +0000] \"POST /v1/addHistory HTTP/1.0\" 200 498 \"\" \"okhttp/4.9.1\" 1362 0.048 [agmjys-agmjys-api-service-10302] [] 10.244.4.207:10302 498 0.047 200 caf7ad95851d8f9b21a320d21ba6b1ec
要实现此需求,可以参考以下 dissect 配置
filebeat.yml processors: - dissect: tokenizer: '%{timestamp} stdout F %{client_ip} - - [%{http_timestamp} +0000] "%{http_method} %{http_path} HTTP/%{http_version}" %{http_status} %{response_size} "%{http_referer}" "%{http_user_agent}" %{request_process_time_ms} %{response_trans_time} [%{upstream_service}] [] %{upstream_server} %{upstream_response_size} %{upstream_trans_time} %{upstream_status} %{request_id}' field: "message" target_prefix: "dissect_"
应用此 processor 后,输出内容如下,在 dissect_ 字段中包含了格式化后的字段:
{
  "@timestamp": "2023-08-01T09:03:38.393Z",
  "@metadata": {
    "beat": "filebeat",
    "type": "_doc",
    "version": "8.8.2"
  },
  "log": {
    "offset": 4347060,
    "file": {
      "path": "/var/log/pods/ingress-nginx_ingress-nginx-controller-pjk7v_2be52934-9900-4b32-ac64-70c78cfd01d6/controller/1.log"
    }
  },
  "message": "2023-08-01T17:01:09.062716851+08:00 stdout F 13.56.120.120 - - [01/Aug/2023:09:01:09 +0000] \"GET /play?&id=7866 HTTP/1.0\" 200 58614 \"-\" \"Mozilla/5.0 (Linux; Android 6.0.1; Nexus 5X Build/MMB29P) AppleWebKit/537.36 (KHTML, like Gecko) Chrome/114.0.5735.179 Mobile Safari/537.36 (compatible; Googlebot/2.1; +http://www.google.com/bot.html)\" 850 0.178 [test-test-front-service-20205] [] 10.244.3.190:20205 58614 0.178 200 154bae6847b0dc2bcc280cb995d00737",
  "input": {
    "type": "filestream"
  },
  "project": "k8s",
  "application": "ingress-nginx-controller",
  "agent": {
    "ephemeral_id": "dd393210-3904-4c2b-a133-f11f5ef44319",
    "id": "a52985d8-08ed-4ea1-a60b-c1a8e3c16ca1",
    "name": "k8s-c1-worker2",
    "type": "filebeat",
    "version": "8.8.2"
  },
  "host": {
    "name": "k8s-c1-worker2"
  },
  "data-type": "access-log",
  "department": "US",
  "environment": "PRO",
  "ecs": {
    "version": "8.0.0"
  },
  "dissect_": {
    "http_user_agent": "Mozilla/5.0 (Linux; Android 6.0.1; Nexus 5X Build/MMB29P) AppleWebKit/537.36 (KHTML, like Gecko) Chrome/114.0.5735.179 Mobile Safari/537.36 (compatible; Googlebot/2.1; +http://www.google.com/bot.html)",
    "http_version": "1.0",
    "response_trans_time": "0.178",
    "upstream_status": "200",
    "http_referer": "-",
    "http_timestamp": "01/Aug/2023:09:01:09",
    "response_size": "58614",
    "client_ip": "13.56.120.120",
    "timestamp": "2023-08-01T17:01:09.062716851+08:00",
    "upstream_service": "test-test-front-service-20205",
    "http_path": "/play?&id=7866",
    "upstream_response_size": "58614",
    "upstream_server": "10.244.3.190:20205",
    "request_id": "154bae6847b0dc2bcc280cb995d00737",
    "http_status": "200",
    "request_process_time_ms": "850",
    "http_method": "GET",
    "upstream_trans_time": "0.178"
  }
}
replace replace 可以在指定的字段中使用正则表达式匹配内容,将其替换为新的内容 [10]
replace 语法格式:
- replace:
    fields:
      - field: "file.path"
        pattern: "/usr/"
        replacement: "/usr/local/"
    ignore_missing: false
    fail_on_error: true
参数
说明
示例
fields一个或者多个替换项组成的列表,每个项保护参数:field、pattern、replacement
fields.field指定要匹配替换的字段
fields.pattern要匹配值的正则表达式。其中的元字符需要使用 \ 转义 found unknown escape character
replace 使用示例
fields.replacement要替换的新值。可以在 pattern 中使用正则表达式的捕获组 () 来引用($n)匹配到的内容
replace 使用示例
replace 使用示例 假如有以下内核日志,其中 时间字段的长度不一样 Jun 21 14:22:28 使用 一个空格 分割,而 Dec 6 09:54:55 使用了 两个空格 分割。如果对这种格式的日志直接使用 dissect 模式字符串匹配,不能同时匹配到这两种格式的日志。
Jun 21 14:22:28 ip-172-31-26-116 kernel: ip_set: protocol 7
Dec  6 09:54:55 ip-172-31-26-116 kernel: cni0: port 1(veth44bbfb78) entered blocking state
要解决这种问题,可以使用 Filebeat 的 replace processor 进行处理,将 event 中的空格改为一个。然后再使用 dissect 进行字段格式化提取。
参考配置文件如下:
filebeat.yml logging: level: debug filebeat.inputs: - type: filestream id: k8s-c1-pro-master1-kernel-log paths: - /tmp/messages include_lines: [".*kernel:.*"] fields: department: US project: k8s environment: PRO application: system data-type: message-log fields_under_root: true processors: - replace: fields: - field: "message" pattern: "^(\\w{3})\\s\\s(\\d)" replacement: "$1 $2" fail_on_error: true - dissect: tokenizer: '%{M} %{D} %{time} %{hostname} %{message}' # output.console: pretty: true
格式化后的 dissect 字段内容如下:
{
  ...
  "dissect": {
    "time": "09:59:49",
    "hostname": "ip-172-31-19-164",
    "message": "kernel: IPVS: [sh] scheduler registered.",
    "M": "Dec",
    "D": "6"
  }
}
{
  ...
  "dissect": {
    "message": "kernel: cni0: port 1(vethb13b7f14) entered blocking state",
    "M": "May",
    "D": "27",
    "time": "07:14:06",
    "hostname": "ip-172-31-19-164"
  }
}
输出中包含的字段 "dissect.M","dissect.D","dissect.time" 如果不需要,可以 Drop 掉无用字段,参考以下配置
filebeat.yml logging: level: debug filebeat.inputs: - type: filestream id: k8s-c1-pro-master1-kernel-log paths: - /var/log/messages include_lines: [".*kernel:.*"] fields: department: US project: k8s environment: PRO application: system data-type: message-log fields_under_root: true processors: - replace: fields: - field: "message" pattern: "^(\\w{3})\\s\\s(\\d)" replacement: "$1 $2" fail_on_error: true - dissect: tokenizer: '%{M} %{D} %{time} %{hostname} %{message}' - drop_fields: fields: ["dissect.M","dissect.D","dissect.time"] #ignore_missing: false output.console: pretty: true
格式化输出字段如下,只包含 hostname 和 message
{
  "@timestamp": "2023-08-02T03:43:25.911Z",
  "@metadata": {
    "beat": "filebeat",
    "type": "_doc",
    "version": "8.8.2"
  },
  "application": "system",
  "data-type": "message-log",
  "agent": {
    "type": "filebeat",
    "version": "8.8.2",
    "ephemeral_id": "58ce1563-4eee-4a9d-98b8-575d16bfc0ce",
    "id": "c30f5b44-bc21-41d3-ba20-df97120c0be9",
    "name": "k8s-c1-master1"
  },
  "host": {
    "name": "k8s-c1-master1"
  },
  "log": {
    "offset": 9948561,
    "file": {
      "path": "/var/log/messages"
    }
  },
  "input": {
    "type": "filestream"
  },
  "dissect": {
    "hostname": "ip-172-31-26-116",
    "message": "kernel: IPv6: ADDRCONF(NETDEV_CHANGE): veth1ab5d2d1: link becomes ready"
  },
  "ecs": {
    "version": "8.0.0"
  },
  "message": "Dec 6 09:54:55 ip-172-31-26-116 kernel: IPv6: ADDRCONF(NETDEV_CHANGE): veth1ab5d2d1: link becomes ready"
}
配置示例 同一主机上将不同路径的日志上传到 ES 的不同的索引中
环境信息
filebeat version 7.5.2 (amd64), libbeat 7.5.2
需求描述
将日志数据 /home/www/project1/logs/*.log 上传到 ES 的索引 logstash-project1-api-%{+yyyy.MM.dd} 中
将日志数据 /home/www/project2/logs/*.log 上传到 ES 的索引 logstash-project2-api-%{+yyyy.MM.dd} 中
由于 Filebeat 的配置不直接支持基于输入标签或路径动态更改输出索引名,需要对每个日志路径配置单独的输入,可以通过在每个输入中添加一个字段来区分它们
filebeat.yml filebeat.inputs: - type: log paths: - /home/www/project1/logs/*.log tags: ["project1-api-log"] fields: log_type: "project1-api" fields_under_root: true close_timeout: 3h clean_inactive: 72h ignore_older: 70h close_inactive: 5m - type: log paths: - /home/www/project2/logs/*.log tags: ["project2-api-log"] fields: log_type: "project2-api" fields_under_root: true close_timeout: 3h clean_inactive: 72h ignore_older: 70h close_inactive: 5m output.elasticsearch: hosts: ["13.5.4.5:9200"] username: "elastic" password: "password" index: "logstash-%{[log_type]}-%{+yyyy.MM.dd}" setup.ilm.enabled: false setup.template.enabled: true setup.template.name: "project" setup.template.pattern: "logstash-*"
在这个配置中,每个 input 部分都添加了 fields 配置,其中包含一个 log_type 的自定义字段,用于标识日志类型。然后在 output.elasticsearch 部分,index 配置使用了这个字段来动态构建索引名。这样,基于每个日志文件的 log_type,Filebeat 将数据发送到正确的 Elasticsearch 索引中。
常见错误 Failed to start crawler filebeat 服务启动失败,手动启动 filebeat ,报错如下
# filebeat run -c /etc/filebeat/filebeat.yml
Exiting: Failed to start crawler: starting input failed: error while initializing input: no path is configured accessing 'filebeat.inputs.2' (source:'/etc/filebeat/filebeat.yml')
根据输出提示,input 中的第 3 个位置的路径配置有问题,查看配置文件如下,第三个 input 中 pathes 书写错误,修改为 paths 后服务启动正常。
filebeat.yml filebeat.inputs: - type: filestream id: project-app1-message paths: - /root/temp/project-app1/messages.log fields: project: project-app1 log_type: system-message fields_under_root: true - type: filestream id: project-app1-web paths: - /root/temp/project-app1/web.log fields: project: project-app1 log_type: web fields_under_root: true - type: filestream id: project-app2-message pathes: - /root/temp/project-app2/messages.log fields: project: project-app2 log_type: system-message fields_under_root: true - type: filestream id: project-app2-app paths: - /root/temp/project-app2/app.log fields: project: project-appa log_type: app fields_under_root: true
Elasticsearch is too old Filebeat 启动后未上传数据到 Elasticsearch,检查 filebeat 服务日志如下
# systemctl status filebeat -l
Aug 01 13:43:54 fm-k8s-c1-worker2 filebeat[30739]: {"log.level":"error","@timestamp":"2023-08-01T13:43:54.731+0800","log.logger":"publisher_pipeline_output","log.origin":{"file.name":"pipeline/client_worker.go","file.line":148},"message":"Failed to connect to backoff(elasticsearch(http://172.31.21.3:9200)): Connection marked as failed because the onConnect callback failed: Elasticsearch is too old. Please upgrade the instance. If you would like to connect to older instances set output.elasticsearch.allow_older_versions to true. ES=8.8.2, Beat=8.9.0","service.name":"filebeat","ecs.version":"1.6.0"}
根据报错信息可知,Elasticsearch 版本太旧。检查环境信息,其中 elasticsearch 版本为 8.8.2,filebeat 版本为 8.9,版本不一致。重新安装 filebeat 版本到 8.8.2
参考链接 Filebeat 官网
脚注