环境信息
部署配置 AlertManager
AlertManager 是一个专门用于实现告警的工具,可以实现接收 Prometheus 或其它应用发出的告警信息,并对这些告警信息进行 分组、抑制 以及 静默 等操作,然后通过 路由 的方式,根据不同的告警规则配置,分发到不同的告警路由策略中。 [1]
AlertManager 常用的功能主要有:
- 抑制 - 抑制是一种机制,指的是当某一告警信息发送后,可以停止由此告警引发的其它告警,避免相同的告警信息重复发送。
- 静默 - 静默也是一种机制,指的是依据设置的标签,对告警行为进行静默处理。如果 AlertManager 接收到的告警符合静默配置,则 Alertmanager 就不会发送该告警通知。
- 发送告警 - 支持配置多种告警规则,可以根据不同的路由配置,采用不同的告警方式发送告警通知。
- 告警分组 - 分组机制可以将详细的告警信息合并成一个通知。在某些情况下,如系统宕机导致大量的告警被同时触发,在这种情况下分组机制可以将这些被触发的告警信息合并为一个告警通知,从而避免一次性发送大量且属于相同问题的告警,导致无法对问题进行快速定位。
部署 AlertManager
本文部署配置基于 K8S 上安装 Prometheus 并监控 K8S 集群
在名为 prometheus-server-conf 的 ConfigMap 中为 AlertManager 创建配置文件 alertmanager.yml,并将其挂载到 AlertManager 容器中
alertmanager.ymlglobal:
resolve_timeout: 5m
route:
group_by: ['alertname']
group_wait: 10s
group_interval: 10s
repeat_interval: 5m
receiver: 'web.hook'
receivers:
- name: 'web.hook'
webhook_configs:
- url: 'http://localhost:8080/alert_manager_webhook'
send_resolved: true
inhibit_rules:
- source_match:
severity: 'critical'
target_match:
severity: 'warning'
equal: ['alertname', 'dev', 'instance']
|
使用为 Prometheus 创建的 PVC 作为 AlertManager 的持久存储,参考以下配置部署 AlertManager
apiVersion: apps/v1
kind: Deployment
metadata:
  name: prometheus-pod
  namespace: prometheus
  labels:
    app: prometheus-server
spec:
  replicas: 1
  selector:
    matchLabels:
      app: prometheus-server
  template:
    metadata:
      labels:
        app: prometheus-server
    spec:
      containers:
        - name: prometheus
          image: prom/prometheus
          args:
            - "--storage.tsdb.retention.time=12h"
            - "--config.file=/etc/prometheus/prometheus.yml"
            - "--storage.tsdb.path=/prometheus/"
          ports:
            - containerPort: 9090
          resources:
            requests:
              cpu: 500m
              memory: 500M
            limits:
              cpu: 1
              memory: 1Gi
          volumeMounts:
            - name: prometheus-config-volume
              mountPath: /etc/prometheus/
            - name: prometheus-storage-volume
              mountPath: /prometheus/
              subPath: prometheus
        - name: grafana
          image: grafana/grafana
          ports:
            - containerPort: 3000
          volumeMounts:
            - name: prometheus-storage-volume
              mountPath: /var/lib/grafana
              subPath: grafana
        - image: prom/alertmanager:v0.24.0
          name: alert-manager
          ports:
            - containerPort: 9093
          args:
            - "--config.file=/etc/alertmanager/alertmanager.yml"
            - "--web.external-url=http://alert-manager.example.com/"
            - '--cluster.advertise-address=0.0.0.0:9093'
            - "--storage.path=/alertmanager"
          resources:
            limits:
              cpu: 1000m
              memory: 512Mi
            requests:
              cpu: 1000m
              memory: 512Mi
          readinessProbe:
            httpGet:
              path: /-/ready
              port: 9093
            initialDelaySeconds: 5
            timeoutSeconds: 10
          livenessProbe:
            httpGet:
              path: /-/healthy
              port: 9093
            initialDelaySeconds: 30
            timeoutSeconds: 30
          volumeMounts:
          - name: prometheus-storage-volume
            mountPath: /alertmanager
            subPath: alertmanager
          - name: prometheus-config-volume
            mountPath: /etc/alertmanager
      volumes:
        - name: prometheus-config-volume
          configMap:
            defaultMode: 420
            name: prometheus-server-conf

        - name: prometheus-storage-volume
          persistentVolumeClaim:
            claimName: prometheus-pvc
---
apiVersion: v1
kind: Service
metadata:
  name: prometheus-service
  namespace: prometheus
spec:
  ports:
    - name: prometheus-port
      port: 8090
      protocol: TCP
      targetPort: 9090
    - name: grafana-port
      port: 3000
      targetPort: 3000
    - name: alert-manager-port
      port: 9093
      targetPort: 9093
  selector:
    app: prometheus-server

---
apiVersion: networking.k8s.io/v1
kind: Ingress
metadata:
  name: prometheus-ui
  namespace: prometheus

spec:
  ingressClassName: nginx
  rules:
  - host: prometheus.example.com
    http:
      paths:
      - backend:
          service:
            name: prometheus-service
            port:
              number: 8090
        path: /
        pathType: Prefix
  - host: grafana.example.com
    http:
      paths:
      - backend:
          service:
            name: prometheus-service
            port:
              number: 3000
        path: /
        pathType: Prefix
  - host: alert-manager.example.com
    http:
      paths:
      - backend:
          service:
            name: prometheus-service
            port:
              number: 9093
        path: /
        pathType: Prefix
|
部署成功后,从 AlertManager 的域名访问,可以看到 AlertManager 的 web UI

配置 Prometheus 关联 AlertManager
要使 Prometheus 能够通过 AlertManager 发送告警信息,需要在 Prometheus 中配置 AlertManager 相关的配置信息,Prometheus 涉及 AlertManager 的主要配置如下
prometheus.ymlalerting:
alertmanagers:
- static_configs:
- targets: ['localhost:9093']
|
配置后,重启 Prometheus 使配置生效。可以从 AlertManager 的 UI 中查看到 Prometheus 中的告警信息

AlertManager 配置概述
Alertmanager 主要负责对 Prometheus 产生的告警进行统一处理,因此在 Alertmanager 配置中一般会包含以下几个主要部分: [2]
- 全局配置(
global) - 用于定义一些全局的公共参数,如全局的 SMTP 配置,Slack 配置等内容;
- 模板(
templates) - 用于定义告警通知时的模板,如 HTML 模板,邮件模板等;
- 告警路由(
route) - 根据标签匹配,确定当前告警应该如何处理;
- 接收人(
receivers) - 接收人是一个抽象的概念,它可以是一个邮箱也可以是微信,Slack 或者 Webhook 等,接收人一般配合告警路由使用;
- 抑制规则(
inhibit_rules) - 合理设置抑制规则可以减少垃圾告警的产生
其完整配置格式如下
alertmanager.ymlglobal:
[ resolve_timeout: <duration> | default = 5m ]
[ smtp_from: <tmpl_string> ]
[ smtp_smarthost: <string> ]
[ smtp_hello: <string> | default = "localhost" ]
[ smtp_auth_username: <string> ]
[ smtp_auth_password: <secret> ]
[ smtp_auth_identity: <string> ]
[ smtp_auth_secret: <secret> ]
[ smtp_require_tls: <bool> | default = true ]
[ slack_api_url: <secret> ]
[ victorops_api_key: <secret> ]
[ victorops_api_url: <string> | default = "https://alert.victorops.com/integrations/generic/20131114/alert/" ]
[ pagerduty_url: <string> | default = "https://events.pagerduty.com/v2/enqueue" ]
[ opsgenie_api_key: <secret> ]
[ opsgenie_api_url: <string> | default = "https://api.opsgenie.com/" ]
[ hipchat_api_url: <string> | default = "https://api.hipchat.com/" ]
[ hipchat_auth_token: <secret> ]
[ wechat_api_url: <string> | default = "https://qyapi.weixin.qq.com/cgi-bin/" ]
[ wechat_api_secret: <secret> ]
[ wechat_api_corp_id: <string> ]
[ http_config: <http_config> ]
templates:
[ - <filepath> ... ]
route: <route>
receivers:
- <receiver> ...
inhibit_rules:
[ - <inhibit_rule> ... ]
|
global 常用参数说明
| 参数 |
说明 |
示例 |
resolve_timeout |
当 AlertManager 持续多久未接收到告警后就标记告警状态为 resolved
默认为 5m |
|
route 常用参数说明
route:
      group_by: ['alertname', 'cluster']
      group_wait: 30s

      group_interval: 30s

      repeat_interval: 1h

      receiver: default

      routes:
      - receiver: email
        group_wait: 10s
        match:
          team: node
|
| 参数 |
说明 |
示例 |
group_by |
接收到报警信息后按照标签重新分组的标签 |
|
repeat_interval: 1h |
发送一个告警后多久再继续发送告警消息,默认 4h |
|
group_wait: 30s |
当一个新的报警分组被创建后,需要等待至少 group_wait 时间来初始化通知,这种方式可以确保有足够的时间为同一分组获取多个警报,然后一起触发这个报警信息 |
|
group_interval: 30s |
相同的 group 之间发送告警通知的时间间隔 |
|
receiver: default |
默认的receiver:如果一个报警没有被一个route匹配,则发送给默认的接收器 |
|
routes |
配置子路由,子路由会继承所有 route 中的配置 ,并且可以在每个子路由上进行覆盖。
告警的路由选择由 match 指令计算 |
|
receivers 常用参数说明
receivers:
- name: 'web.hook'
  webhook_configs:
  - url: 'http://172.31.2.6:65535/alert_manager_webhook'
    send_resolved: true
|
| 参数 |
说明 |
示例 |
send_resolved: true |
接受告警恢复的通知 |
|
AlertManager 配置示例
本示例使用以下 配置
alertmanager.ymlglobal:
resolve_timeout: 5m
route:
group_by: ['alertname']
group_wait: 10s
group_interval: 10s
repeat_interval: 5m
receiver: 'web.hook'
receivers:
- name: 'web.hook'
webhook_configs:
- url: 'http://localhost:8080/alert_manager_webhook'
send_resolved: true
inhibit_rules:
- source_match:
severity: 'critical'
target_match:
severity: 'warning'
equal: ['alertname', 'dev', 'instance']
|
webhook 代码使用 Django 视图函数实现转发告警到 Telegram ,主体代码如下
from django.http import HttpResponse
import telegram
import asyncio
alert_message_template = '''
报警项目: %s
报警摘要:%s
报警状态:%s
报警内容:%s
触发时间:%s
'''
tg_chatgroup_id = -992711111
tg_bot_token = 'yEXcs2I'
def alert_manager_webhook(request):
''' 从 AlertManager 接收回调告警数据,并将其转发到第三方
'''
post_data = eval(request.body)
print(post_data)
status = post_data['status']
for alert in post_data['alerts']:
alert_labels = alert['labels']
alert_name = alert_labels['alertname']
alert_job = alert_labels['job']
alert_instance = alert_labels['instance']
alert_status = alert['status']
alert_startAs = alert['startsAt']
alert_annotations = alert['annotations']
alert_summary = alert_annotations['summary']
alert_description = alert_annotations['description']
alert_project = '%s-%s-%s' %(alert_job, alert_name, alert_instance)
send_message_to_tg(chat_id=tg_chatgroup_id, text=alert_message_template %(alert_project, alert_summary, alert_status, alert_description, alert_startAs))
return HttpResponse('ok')
def send_message_to_tg(chat_id: int, text: str):
''' 发送消息到 tg'''
bot = telegram.Bot(token=tg_bot_token)
async def send_telegram_message():
response = await bot.send_message(chat_id=chat_id, text=text)
print(response)
asyncio.run(send_telegram_message())
|
常用配置示例
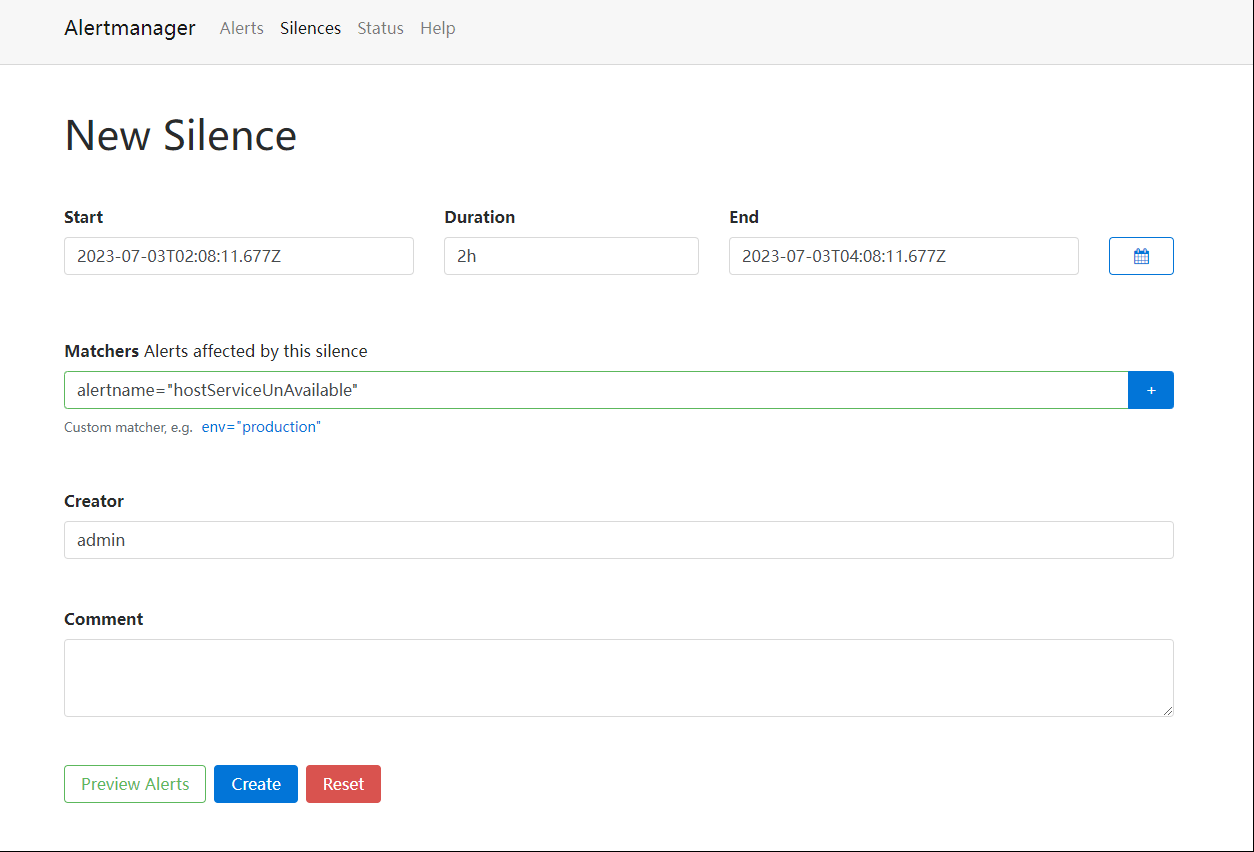
配置告警静默
有时候不需要发送告警消息,比如已经知道出现问题,正在解决过程中,此时不需要重复不断的发送告警消息,此时就可以使用 Alertmanager 的 告警静默(Silence) 功能暂时不发送告警消息
- 在 Alertmanager 的 UI 界面中,选择
Silences 页面,点击 New Silence,并根据标签选择要配置 静默(Silence) 的告警

- 配置告警静默的时常、标签选择要静默的告警,填写完必要信息后点击
Create,即可创建一条静默规则,在此静默规则配置的时间周期内,符合标签选择器的告警将不会再发送告警信息,直到过了静默期。
除了上述自定义标签选择器的方法外,还可以针对特定的告警(实例)内容配置静默,而不是向上面的示例中针对整个告警名称配置静默,要静默特定的告警,可以在 Alertmanager 的 Alerts 页面中特定告警的旁边点击 Silence,会自动跳转到 Silences 页面,针对此条告警的标签配置一条静默规则。

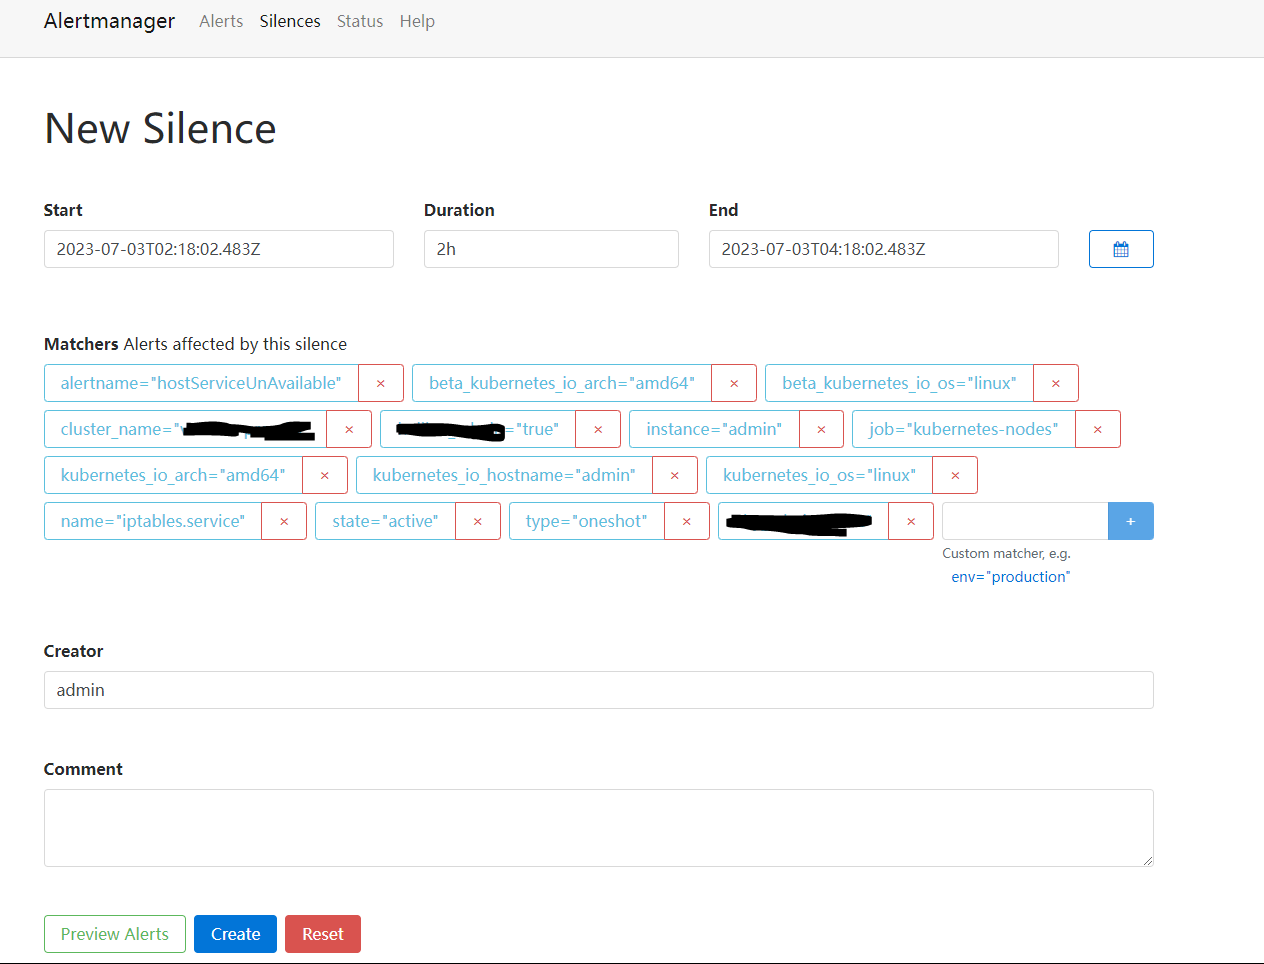
按照上述方法针对特定的告警(实例)配置静默规则后,此静默规则只会对此特点的告警(实例)生效,不会影响告警下面其他实例的告警。
脚注