Kubernetes Pod
Pod 是由一个或多个容器构成的集合,被 Kubernetes 作为一个整体进行部署和调度,是 Kubernetes 调度的最小单元。同一个 Pod 内的容器共享 network namespace、UTS nanespace
环境信息
- Centos7
- Kubernetes v1.24.7
Pod 创建过程
当用户在 Kubernetes 中创建了一个 Pod 后,CRI 和 CNI 协同创建 Pod 所属容器,并为 Pod 中的容器初始化网络协议栈的具体过程如下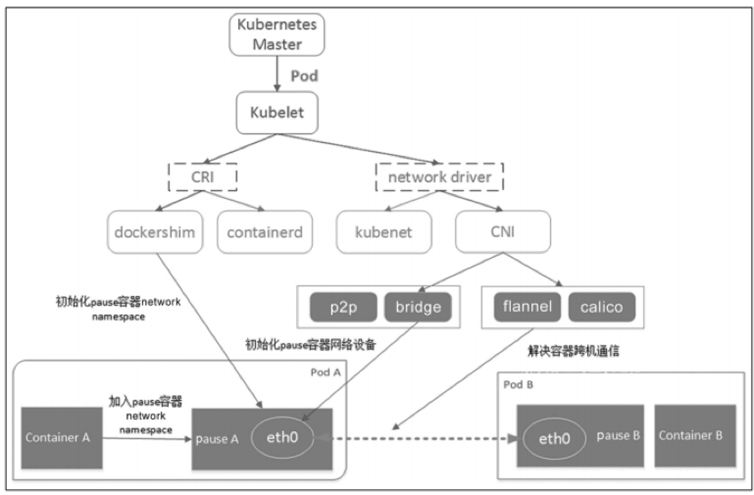
用户在 Kubernetes 中创建了一个 Pod 后,Kubelet 接收到创建新 Pod 的任务,首先调用 CRI 创建 Pod 内的容器
Pod 中第一个被创建的容器是
pause容器。pause容器中运行着一个功能非常简单的 C 程序,具体逻辑是把自己永远阻塞,没有实际的业务逻辑,主要功能是用来占用一个 network namespace。创建
pause容器,使用 docker none 网络模式,创建出来的容器除了 lo 回环网卡外没有其他网络设备。Pod 内的其他用户容器通过加入
pause容器已占用的 network namespace 的方式共享同一个 network namespace。对应于 docker 的 Container 模式其他用户容器都使用
pause容器的主机名,但并不使用同一个 UTS namespace。CNI 负责 Pod 中容器的网络初始化工作。主要为 Pod 内的
pause容器添加eth0网卡、分配 IP、配置网关等。
pause 容器
pause 容器是 Pod 中被创建的第一个容器,Pod 中的其他容器通过使用 pause 容器的 network namespace 共享网络协议栈和主机名。它是 Pod 中其他容器的父容器。
1.8 以后版本默认不启用 PID namespace 共享。每个容器拥有独立的 PID namespace。
以下步骤通过 docker 演示 Pod 容器创建的整个过程。首先,创建 pause 容器
docker run --name=test-pause \ |
然后在 Pod 中运行其他容器,本示例启动 2 个应用容器,一个 nginx 容器,里面启动了 nginx 服务,一个自定义的容器,里面包含常用工具
docker run --name=pod_nginx_test \ |
进入 pod_centos_test 容器,查看网络、端口、主机名信息
hostname |
- Pod 中的容器主机名相同,都使用
pause容器的主机名,但实际并未共享 UTS namespace。可以通过找到对应 docker 容器的进程 PID,找到对应进程的 namespace 信息对比确认
ps -elf | grep ping
4 S root 35333 35311 0 80 0 - 6218 skb_wa 01:01 ? 00:00:00 ping 127.1
ls -l /proc/35333/ns/
total 0
lrwxrwxrwx 1 root root 0 Apr 8 01:13 cgroup -> cgroup:[4026531835]
lrwxrwxrwx 1 root root 0 Apr 8 01:02 ipc -> ipc:[4026532664]
lrwxrwxrwx 1 root root 0 Apr 8 01:02 mnt -> mnt:[4026532662]
lrwxrwxrwx 1 root root 0 Apr 8 01:02 net -> net:[4026532588]
lrwxrwxrwx 1 root root 0 Apr 8 01:02 pid -> pid:[4026532665]
lrwxrwxrwx 1 root root 0 Apr 8 01:13 pid_for_children -> pid:[4026532665]
lrwxrwxrwx 1 root root 0 Apr 8 01:13 user -> user:[4026531837]
lrwxrwxrwx 1 root root 0 Apr 8 01:02 uts -> uts:[4026532663]
ps -elf | grep nginx
4 S root 34909 34887 0 80 0 - 2233 sigsus 00:59 ? 00:00:00 nginx: master process nginx -g daemon off;
ls -l /proc/34909/ns/
total 0
lrwxrwxrwx 1 root root 0 Apr 8 01:14 cgroup -> cgroup:[4026531835]
lrwxrwxrwx 1 root root 0 Apr 8 01:00 ipc -> ipc:[4026532660]
lrwxrwxrwx 1 root root 0 Apr 8 01:00 mnt -> mnt:[4026532658]
lrwxrwxrwx 1 root root 0 Apr 8 01:00 net -> net:[4026532588]
lrwxrwxrwx 1 root root 0 Apr 8 01:00 pid -> pid:[4026532661]
lrwxrwxrwx 1 root root 0 Apr 8 01:14 pid_for_children -> pid:[4026532661]
lrwxrwxrwx 1 root root 0 Apr 8 01:14 user -> user:[4026531837]
lrwxrwxrwx 1 root root 0 Apr 8 01:00 uts -> uts:[4026532659]
ps -elf | grep pause
4 S root 34239 34221 0 80 0 - 241 ia32_s 00:51 ? 00:00:00 /pause
ls -l /proc/34239/ns/
total 0
lrwxrwxrwx 1 root root 0 Apr 8 01:15 cgroup -> cgroup:[4026531835]
lrwxrwxrwx 1 root root 0 Apr 8 00:51 ipc -> ipc:[4026532585]
lrwxrwxrwx 1 root root 0 Apr 8 00:51 mnt -> mnt:[4026532583]
lrwxrwxrwx 1 root root 0 Apr 8 00:51 net -> net:[4026532588]
lrwxrwxrwx 1 root root 0 Apr 8 00:51 pid -> pid:[4026532586]
lrwxrwxrwx 1 root root 0 Apr 8 01:15 pid_for_children -> pid:[4026532586]
lrwxrwxrwx 1 root root 0 Apr 8 01:15 user -> user:[4026531837]
lrwxrwxrwx 1 root root 0 Apr 8 00:51 uts -> uts:[4026532584]以上观察可以看到,Pod 中的容器共享了 network namespace,未共享 UTS namespace。Kubernetes 中 Pod 中的容器同理。
- Pod 中容器的 PID namespace 进行了隔离,各个容器的 PID 进行了隔离,PID namespace 不同。
- Pod 中的容器共享了 network namespace,具有相同的网络信息(网卡、IP、端口资源)
- Pod 中的容器直接可以通过
localhost互相访问
Pod 和 Kubernetes API 服务交互
downwardAPI 提供了一种简单的方式,可以将 Pod 的 Metadata 和状态数据通过环境变量或者 Volume 传递(挂载)到 Pod 中,允许内部进程使用。但这种方式仅仅可以暴露一个 Pod 自身的 Metadata ,而且只能暴露一部分数据,某些情况下,应用可能需要知道其他 Pod 的信息,甚至集群中其他资源的信息,这种情况下,downwardAPI 的方式就无能为力了。
Pod 启动时,系统会主动将部分信息以环境变量的形式注入到每个 Pod 中,比如自定义的 Service 的部分信息,Kubernetes API Service 的信息等,可以登陆 Pod,检查系统环境变量
printenv | grep "SERVICE" |
以上示例中的 Pod ,在启动时,系统主动注入了相同 namespace 中的 Service 的信息,包括 Service IP 地址、端口等信息,以及 Kubernetes API Service 的 IP 及端口信息。
Pod 中要使用 Service 的环境变量,要确保 Service 在 Pod 启动之前被创建,否则 Pod 中不存在相关环境变量。
Pod 启动时,系统除了主动注入环境变量,还通过创建 projected 的 Volume 的方式给每个 Pod 挂载了以下信息
- 所属 namespace 的默认 ServiceAccount 的 token(
serviceAccountToken) - 集群的 CA 证书(
configMap) - Pod 的所属 namespace 信息(
downwardAPI)
可以通过以下命令验证上述信息。其中的 Volume kube-api-access-8ch7r 为系统自动生成并挂载到了 Pod 中的容器的 /var/run/secrets/kubernetes.io/serviceaccount 目录
kubectl edit pod -n ops ops-centos7-bfc4d75b5-kjcfs |
卷 kube-api-access-8ch7r 主要包含 3 部分内容
serviceAccountToken每个 namespace 都有个默认的 ServiceAccount,在没有为 Pod 配置 ServiceAccount 的情况下,系统会自动将默认的 ServiceAccount 挂载到 Pod 中的每个容器,作为运行在 Pod 中的进程和 API Server 交互时认证授权的身份(主体)。ServiceAccount 使用说明参考configMap- 以configMap的方式为 Pod 中的容器挂载了集群的 CA 证书downwardAPI- 以downwardAPI的方式,让 Pod 中的容器可以获取到 Pod 所在的 namespace 信息。
以上内容被挂载到了容器的 /var/run/secrets/kubernetes.io/serviceaccount 目录中,可以在容器中检查此目录
ls /var/run/secrets/kubernetes.io/serviceaccount/ |
在 Pod 中通过 curl 命令请求 Kubernetes API
默认情况下,Kubernetes API Service 的 Service 名称为 kubernetes,因此在集群内部,可以通过 FQDN kubernetes.default.svc.cluster.local 访问 Kubernetes API Service
kubectl get services |
在 Pod 中尝试访问 Kubernetes API Service,
curl https://kubernetes.default.svc.cluster.local |
以上报错,是因为通过 https 访问 Kubernetes API Service,但是无法验证证书。最简单的规避此问题的方法是使用 curl 命令的 -k, --insecure 选项忽略验证证书,但这是存在安全隐患的,不建议在生产环境使用。
Pod 启动时,系统已经将集群的 CA 证书注入到了每个容器,因此可以使用 CA 证书来验证服务器证书。执行以下命令,使用 CA 证书重新访问 Kubernetes API Service
curl --cacert /var/run/secrets/kubernetes.io/serviceaccount/ca.crt https://kubernetes.default.svc.cluster.local |
可以看到,使用 CA 证书后,HTTPS 连接成功,Kubernetes API 返回了响应。以上 Kubernetes API 输出中,表面此次请求使用的是匿名用户,不具有 API 服务器的授权,因此拒绝访问。
默认情况下,Pod 使用的是 namespace 中的默认的 ServiceAccount token,默认不具有任何权限。
参考 RBAC 配置认证鉴权使 Pod 的容器可以和 Kubernetes API Server 通信
Pod 计算资源限制
创建 Pod 时,可以指定容器对 CPU 和 Memory 的资源请求量(requests)和资源限制量(’limits`),他们不是针对 Pod,而是针对 Pod 中的容器。Pod 对资源的请求量和限制量是它所包含的所有容器的请求量和限制量之和。
apiVersion: v1 |
如果为容器的资源申请指定了
limits,但未指定requests,并且没有应用准入时机制为该资源设置默认请求, 然后 Kubernetes 将复制你所指定的限制值,将其用作资源的请求值。
资源类型
CPU 和 内存 都是 资源类型。每种资源类型具有其基本单位。 CPU 表达的是计算处理能力,其单位是 Kubernetes CPU。内存的单位是字节。[2]
CPU 资源单位
CPU 资源的限制和请求以 “cpu” 为单位。 在 Kubernetes 中,一个 CPU 等于 1 个物理 CPU 核 或者 1 个虚拟核, 取决于节点是一台物理主机还是运行在某物理主机上的虚拟机。
1 CPU = 1000m 的 CPU 资源
Memory 资源单位
memory 的限制和请求以字节为单位。 你可以使用普通的整数,或者带有以下 数量后缀 的定点数字来表示内存:E、P、T、G、M、k。 你也可以使用对应的 2 的幂数:Ei、Pi、Ti、Gi、Mi、Ki。
查看节点资源总量
通过以下命令输出,可以看到节点的资源总量和可分配资源量
kubectl get nodes |