Apollo 配置中心服务使用说明
环境信息
- Centos 7 kernel 5.4
- Apollo 2.0.1
- Mysql 5.7
- Java 1.8
安装部署
分布式部署
部署服务器信息说明
| 环境 | 服务器 | 服务 | 端口 |
|---|---|---|---|
pro |
172.31.88.1 | apollo-portal | 8070 |
pro |
172.31.88.1 | 数据库 ApolloPortalDB | 3306 |
pro |
172.31.88.1 | apollo-configservice | 8080 |
pro |
172.31.88.1 | apollo-adminservice | 8090 |
pro |
172.31.88.1 | 数据库ApolloConfigDB | 3306 |
pro |
172.31.82.2 | apollo-configservice | 8080 |
pro |
172.31.82.2 | apollo-adminservice | 8090 |
uat |
172.31.83.3 | apollo-configservice | 8080 |
uat |
172.31.83.3 | apollo-adminservice | 8090 |
uat |
172.31.83.3 | 数据库ApolloConfigDB | 3306 |
其中 172.31.88.1、172.31.82.2 为 pro 环境的高可用节点。172.31.83.3 为 uat 环境的单节点。
apollo-portal 和 ApolloPortalDB 部署在 pro 环境,uat 环境共用 apollo-portal 和 ApolloPortalDB。
安装 Java
在所有节点上安装 java-1.8.0
yum install -y java-1.8.0-openjdk |
验证 java 安装成功
java -version |
下载 Apollo 源码包
下载地址,apollo-portal 只需要在 portal 服务器下载,apollo-adminservice 和 apollo-configservice 需要在所有节点上下载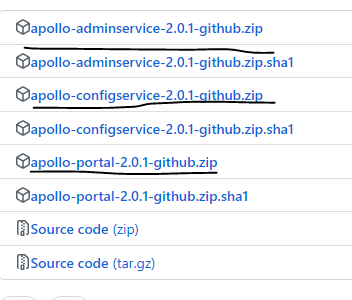
wget https://github.com/apolloconfig/apollo/releases/download/v2.0.1/apollo-adminservice-2.0.1-github.zip |
解压源码包
unzip apollo-adminservice-2.0.1-github.zip -d apollo-adminservice-2.0.1 |
准备数据库
Apollo 服务端共需要两个数据库:ApolloPortalDB 和 ApolloConfigDB [1]
需要注意的是 ApolloPortalDB 只需要在 pro 环境部署一个即可,而 ApolloConfigDB 需要在每个环境部署一套,如 fat、uat 和 pro 分别部署 3 套 ApolloConfigDB。
在 pro 环境的数据库服务器上下载 apolloportaldb.sql 并导入数据库
在 pro 环境的数据库服务器上下载 apolloconfigdb.sql 并导入数据库 [2]
在 uat 环境的数据库服务器上下载 apolloconfigdb.sql 并导入数据库
调整 ApolloPortalDB.ServerConfig 表的数据,portal 默认支持的环境是 DEV,若需要支持其它环境,需要修改 apollo.portal.envs 的值,默认值是 DEV,修改为以下值,表示支持 UAT、PRO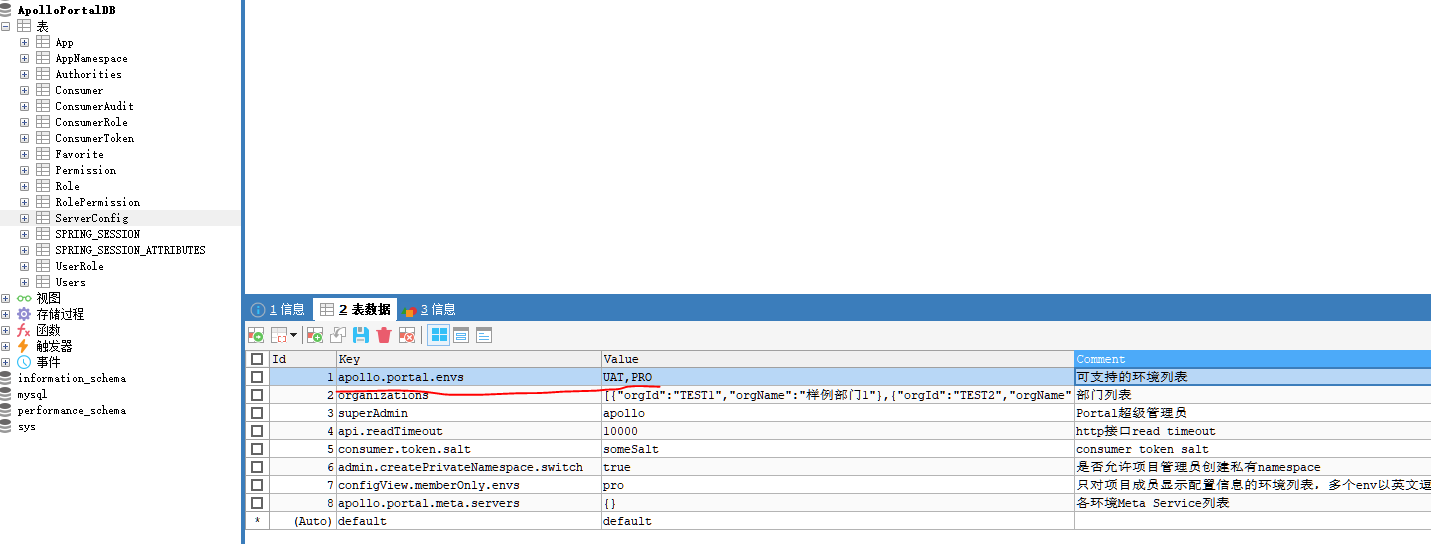
因为 PRO 环境有多个节点,需要调整 PRO 环境的数据库表 ApolloConfigDB.ServerConfig,修改 eureka.service.url 的值为当前 PRO 环境的 apollo-configservice 的地址和端口,注意多个地址之间用英文逗号隔开。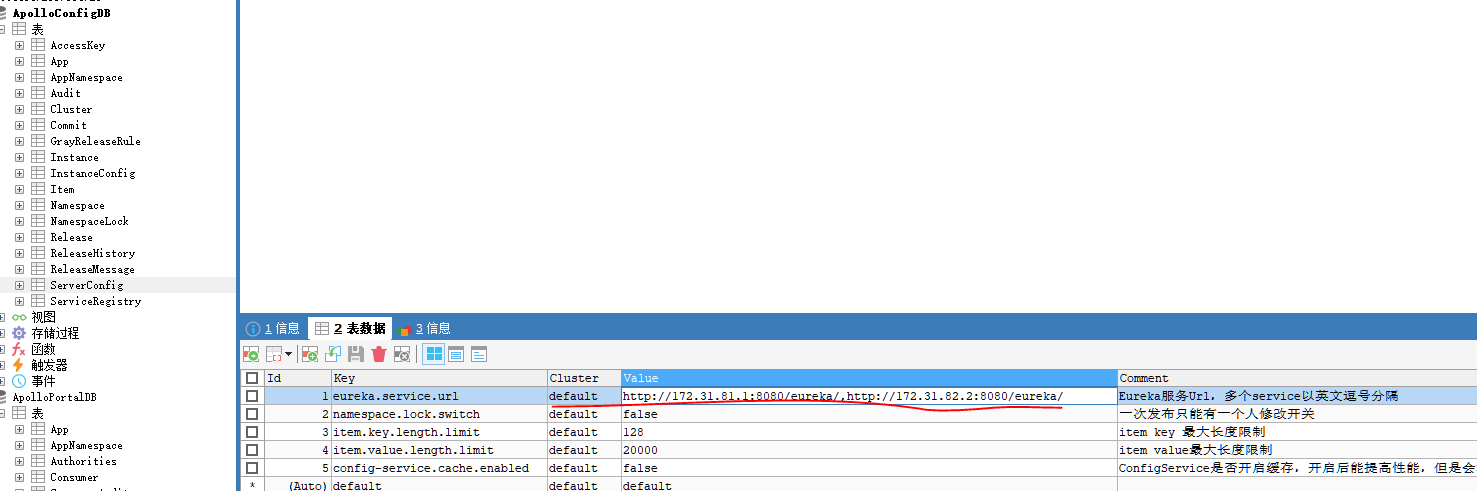
UAT 环境只有一个节点,eureka.service.url 使用默认的 localhost 即可。
部署 Apollo
部署 apollo-configservice
配置数据库连接
修改各节点上的 apollo-configservice-2.0.1/config/application-github.properties 文件,修改其中的数据库连接为当前环境的数据库信息。
spring.datasource.url = jdbc:mysql://apollo.mysql:3306/ApolloConfigDB?characterEncoding=utf8 |
启动 apollo-configservice
默认的启动端口是 8080,若要修改,则将 scripts/startup.sh 中的 SERVER_PORT=${SERVER_PORT:=8080} 的 8080 改成指定的端口即可。
执行 scripts/startup.sh 启动
./scripts/startup.sh |
启动之后检查端口 8080
netstat -anutp | grep LIST |
部署 apollo-adminservice
配置数据库连接
修改各节点上的 apollo-adminservice-2.0.1/config/application-github.properties,修改其中的数据库连接为当前环境的数据库信息。
spring.datasource.url = jdbc:mysql://apollo.mysql:3306/ApolloConfigDB?characterEncoding=utf8 |
启动 apollo-adminservice
默认的启动端口是 8090,若要修改,则将 scripts/startup.sh 中的 SERVER_PORT=${SERVER_PORT:=8090} 的 8090 改成指定的端口即可。
执行 scripts/startup.sh 启动
./scripts/startup.sh |
部署 apollo-portal
配置数据库连接
修改 apollo-portal 节点上的 apollo-portal-2.0.1/config/application-github.properties,修改其中的数据库连接为 ApolloPortalDB 的数据库信息。
DataSource |
配置 meta service 信息
meta service 的地址和端口,默认就是 apollo-configservice 的地址和端口。
修改 apollo-portal-2.0.1/config/apollo-env.properties,填写当前的 apollo-portal 要管理的环境的 apollo-configservice 的地址和端口,多个地址之间用英文逗号隔开
pro.meta=http://172.31.81.1:8080,http://172.31.82.2:8080 |
启动 apollo-portal
默认的启动端口是 8070 ,若要修改,则将 scripts/startup.sh 中的 SERVER_PORT=${SERVER_PORT:=8070} 的 8070 改成指定的端口即可。
./scripts/startup.sh |
部署后检查是否成功
apollo-configservice 和 apollo-adminservice 检查
在浏览器上登录当前环境的其中一个
apollo-configservice的http://ip:port查看该环境的
apollo-configservice和apollo-adminservice的节点数是否正常。
比如PRO环境有 2 个节点,输出中正常情况下会显示 2 个正常的节点

apollo-portal 检查
- 浏览器登录
apollo-portal的http://ip:port,默认账号apollo,密码admin。
常用操作
修改默认管理员 apollo 的密码
默认管理员 apollo 的密码为 admin,要修改此密码,在 管理员工具 -> 用户管理 中输入用户名和密码,如果用户已存在,更新用户信息,用户不存在,则创建新用户。
创建部门
只有管理员才能创建部门,在 管理员工具 -> 系统参数 中查询 organizations,会输出当前的部门信息
修改此参数并保存,即可更新部门信息。