Nginx 服务配置 全局通用配置 nginx.conf user nginx nginx; # 建议设置为 cpu 核心数或者 cpu 核心数的 2 倍,进程会包含一个 `master process`,多个 `worker process` # master process 负责绑定端口、调度进程等,不负责业务的处理 # worker process 是业务进程,负责业务的处理 worker_processes auto; # 一个 worker 进程可以打开的最大的 fd 个数,受 Linux 内核限制 # 理论值应该是系统最多打开文件数(ulimit -n)与 nginx 进程数相除 # 可通过 ulimit 设置或修改系统文件:`/etc/securit/limits.conf` worker_rlimit_nofile 1024; # cpu 亲和性设置 worker_cpu_affinity 0001 0010 0100 1000; # 工作进程调度优先级,-20 到 19 之间的值,值越小越优先调用。 # 如果系统同时运行多个任务,你可能需要提高 nginx 的工作进程的优先级 worker_priority 0; # ssl 硬件加速服务器,需要硬件支持 # ssl_engine ssl_engine device; # nginx 是否以守护进程运行,是否让 nignx 运行于后台;调试时可为 off,使得所有信息直接输出在控制台 daemon on | off; # events 模块中包含 nginx 中所有处理连接的设置。 events { # 每个 worker 进程允许的最多连接数, # nginx 服务最大连接数:worker_processes * worker_connections (受 worker_rlimit_nofile 限制) worker_connections 1024; use epoll; # 是否允许一次性地响应多个用户请求 multi_accept on; # 是否打开 nginx 的 accept 锁;此锁能够让多个 worker 进行轮流地、序列化地与新的客户端建立连接; # 而通常当一个 worker 进程的负载达到其上限的 7/8,master 就尽可能不将请求调度至 worker. accept_mutex on | off; } # HTTP 模块控制着 nginx http 处理的所有核心特性 http { include mime.types; default_type application/octet-stream; # 是否在错误页面中显示和响应头字段中发出 nginx 版本号。 # 安全考虑建议关闭 server_tokens on | off | string; # 是否启用 sendfile 内核复制模式功能。作为静态服务器可以提供最大的 IO 访问速度。 sendfile on | off; # 尽快发送数据,否则会在数据包达到一定大小后再发送数据。这样会减少网络通信次数,降低阻塞概率,但也会影响响应及时性。 # 比较适合于文件下载这类的大数据通信场景。 tcp_nodelay on|off; # 单位s,适当降低此值可以提高响应连接数量 keepalive_timeout 65; # 一次长连接上允许的最大请求数 keepalive_requests 100; # 禁止指定浏览器使用 keepalive keepalive_disable msie6|none; # 读取 http 请求首部的超时时长。如果客户端在此时间内未传输整个头,则会向客户端返回 408(请求超时)错误 client_header_timeout 1; # 读取 http 请求包体的超时时间。 client_body_timeout 2; # 发送响应的超时时长。超时后连接将关闭。 send_timeout 5; # http 请求包体的最大值,常用于限定客户端所能够请求的最大包体,根据请求首部中的 Content-Length 来检查,以避免无用的传输。 client_max_body_size 1m; # 限制客户端每秒传输的字节数,默认为0,表示没有限制。单位 Byte/s limit_rate 0; # nginx 向客户端发送响应报文时,如果大小超过了此处指定的值,则后续的发送过程开始限速,单位 Byte limit_rate_after 0; # 是否忽略不合法的 http 首部,默认为 on,off 意味着请求首部中出现不合规的首部将拒绝响应。 ignore_invalid_headers on|off; # 用户访问的文件不存在时,是否将其记录到错误日志中。 log_not_found on|off; # nginx 使用的 dns 地址,及缓存解析结果的时间 resolver 8.8.8.8 [valid=time] [ipv6=on|off]; # dns 解析超时时间 resolver_timeout 2; # 是否打开文件缓存功能,max:用于缓存条目的最大值, # inactive:某缓存条目在指定时长内没有被访问过时,将自动被删除,即缓存有效期,通常默认为 60s。 open_file_cache off; open_file_cache max=N [inactive=time]; # 是否缓存文件找不到或没有权限访问等相关信息。 open_file_cache_errors on | off; # 多长时间检查一次缓存中的条目是否超出非活动时长。 # 建议值:小于等于 open_file_cache inactive open_file_cache_valid 60; # 在 open_file_cache inactive指 定的时长内被访问超过此处指定的次数时,才不会被删除(删除低命中率的缓存)。 open_file_cache_min_uses 2; # 开启内容压缩,可以有效降低客户端的访问流量和网络带宽 gzip on | off; # 内容超过最少长度后才开启压缩,太短的内容压缩效果不佳,且会浪费系统资源。 # 压缩长度会作为 http 响应头 Content-Length 字段返回给客户端。 建议值:64 gzip_min_length length; # 压缩级别,默认值为 1。范围为1~9级,压缩级别越高压缩率越高,但对系统性能要求越高。建议值:4 gzip_comp_level 1~9; # 压缩内容类型,默认为 text/html;。只压缩 html 文本,一般我们都会压缩 js、css、json 之类的,可以把这些常见的文本数据都配上。 如:text/plain text/css application/json application/x-javascript text/xml application/xml application/xml+rss text/javascript; gzip_types mime-type …; # 自动显示目录 autoindex on; # off : 以人类易读的方式显示文件大小,on:以 bytes 显示文件大小 autoindex_exact_size off; # 定义限制区域,imit_req_zone 只能放在 http {} 内,使用此限制可以在 http {} (对服务器内所有的网站生效)、server {} (对具体的一个网站生效)或 location {} (对具体的一个网址生效) # 此区域名称为 test,可根据需求自定义; 10m 表示此区域存储 key($binary_remote_addr)使用的大小 # 存储大小,一般 1m 空间大约能保存 1.6 万条 IP 地址,空间满了新数据会覆盖旧数据 # rate=1r/m ,限制访问请求频率为每分钟 1 次,可根据需要自行设置,1r/s 是 1 秒 1 次,时间单位只能选择 s (秒)或 m (分),最低频率限制是每分钟 1 次访问请求 # rate=10r/m,1分钟最多访问 10 次,同时不能超过 1r/6s,即 6s 内最多访问 1 次。超过 1r/6s 返回 503 limit_req_zone $binary_remote_addr zone=test:10m rate=1r/m; # 定义日志格式 log_format main '{ time: $time_iso8601|' 'http_host:$http_host|' 'cdn_ip:$remote_addr|' 'request:$request|' 'request_method:$request_method|' 'http_user_agent:$http_user_agent|' 'size:$body_bytes_sent|' 'responsetime:$request_time|' 'upstreamtime:$upstream_response_time|' 'upstreamhost:$upstream_addr|' 'upstreamstatus:$upstream_status|' 'url:$http_host$uri|' 'http_x_forwarded_for:$clientRealIp|' 'status:$status}'; # server 负责具体的 http 服务器实现 server { listen 80 [default_server] [rcvbuf=SIZE] [sndbuf=SIZE] [ssl]; # 可使用通配符*或正则表达式(~开头),多个域名先精确匹配,再通配,再正则,'_'表示空主机头 server_name _ ; access_log logs/access.log main; error_log logs/access.err.log; # 跨域配置 add_header Access-Control-Allow-Origin *; add_header Access-Control-Allow-Headers 'Origin, No-Cache, X-Requested-With, If-Modified-Since, Pragma, Last-Modified, Cache-Control, Expires, Content-Type, X-E4M-With'; add_header Access-Control-Allow-Methods GET,POST,OPTIONS; add_header Access-Control-Allow-Credentials: true; location / { # web 资源路径 root html; # 定义默认页面,从左往右匹配 index index.html index.htm; # 自左向右读取指定路径,找到即停止,如果都不存在,返回一个错误码 try_files $uri $uri.html $uri/index.html =404; # 自左向右读取指定路径,找到即停止,如果都不存在,返回一个 uri try_files $uri $uri.html $uri/index.html /404.html; } location /i/ { # 路径别名,只能用于 location 中。 # 访问 http://a.com/i/a.html, 资源路径为:/data/www/html/a.html # 若是root指令,访问 http://a.com/i/a.html,资源路径为:/data/www/html/i/a.html alias /data/www/html/; } # 对于某个请求发生错误,如果匹配到错误码,重定向到新的 url error_page 404 /404.html; error_page 500 502 503 504 /50x.html; # 对于某个请求发生错误,如果匹配到错误码,重定向到新的 url,同时可以更改返回码 error_page 404 =200 /404.html; } # 包含其他配置文件 include vhosts/*.conf; }
Server 常用配置 nginx 代理 php vhosts/web.conf server { listen 80; server_name _ ; root html; location ~ \.php$ { fastcgi_pass 127.0.0.1:9000; fastcgi_index index.php; fastcgi_param SCRIPT_FILENAME $document_root$fastcgi_script_name; ###fastcgi程序的页面文件位置,$document_root = 之前配置的root html; ##include fastcgi_params; fastcgi_param QUERY_STRING $query_string; ###将请求中的参数透传 } }
nginx 状态监控 # 配置访问路径,即 uri location = /nginx_status{ # 开启该模块 stub_status on; # 关闭日志 access_log off; # 允许访问的 ip,即白名单 ip allow 101.106.102.129; allow 127.0.0.1; # 拒绝白名单 ip 以外的 ip 访问 deny all; }
ssl 配置 server { listen 443 ssl; server_name csms.tech; ssl_certificate /path/to/your_certificate.pem; ssl_certificate_key /path/to/your_key.key; } # 强制跳转 https server { listen 80; server_name csms.tech; rewrite ^(.*)$ https://$host$1 permanent; }
使用 pem 类型证书链:可将中间证书导入 pem 文件,再将私钥导入 pem 文件,ssl_certificate 和 ssl_certificate_key 都使用 pem 文件,可解决以下报错:
cat gd_bundle-g2-g1.crt >> f549150b196cd59e.pem
cat f549150b196cd59e.key >> f549150b196cd59e.pem
nginx.conf ssl_certificate f549150b196cd59e.pem; ssl_certificate_key f549150b196cd59e.pem;
配置 upstream 代理 upstream.conf upstream myserver { # 调度策略,默认为轮询 ip_hash | url_hash ... # 后端服务器列表 # backup: 其它所有的非 backup 机器 down 或者忙的时候,请求 backup 机器。所以这台机器压力会最轻。 # max_fails:允许请求失败的次数,默认为 1.当超过最大次数时,返回 proxy_next_upstream 模块定义的错误. # fail_timeout : max_fails 次失败后,暂停的时间。 server 10.0.0.1:8080 [weight=1] [backup] [down] [max_fails] [fail_timeout]; server 10.0.0.2:8080 [weight=1] [backup] [down] [max_fails] [fail_timeout]; keepalive 2000; # 后端健康检测,需要第三方插件 ngx_http_healthcheck_module # healthcheck_enabled; # healthcheck_delay 3000; # healthcheck_timeout 1000; # healthcheck_failcount 2; # healthcheck_send 'GET /healthcheck.html HTTP/1.0' 'Host: local.com' 'Connection: close'; } server { listen 80; server_name csms.tech; client_max_body_size 1024M; location / { # 指定协议、主机名、端口 proxy_pass http://myserver/uri; [proxy_set_header Host $host:$server_port;] [proxy_redirect off;] [proxy_set_header Host $host; ] [proxy_set_header Host $proxy_host] [proxy_set_header X-Real-IP $remote_addr;] [proxy_set_header X-Forwarded-For $proxy_add_x_forwarded_for;] [proxy_set_header X-Forwarded-Proto https;] [proxy_ignore_client_abort on;] } }
proxy_set_header Host $host 和 proxy_set_header Host $proxy_host 的区别
proxy_set_header Host $host : 将请求 Upstream 的 Host 头部设置为 客户端请求时使用的 Host ,会将客户端请求使用的域名传递给 Upstream.proxy_set_header Host $proxy_host : 将请求 Upstream 的 Host 头部设置为 proxy_pass 中的 Hostmyserver。(Client 请求域名和 Upstream 处理的域名不同)在 Upstream 只接受 Upstream 上配置的域名时,可以配置此头部。
ip 限制 server { listen 80; server_name csms.tech; root html; if ($http_x_forwarded_for !~ (1.1.1.1|1.1.1.2)) { return 403; } }
地区限制 依赖 nginx 的 http_geoip_module 模块,检查 GeoIP 是否安装:
输出结果中如果不包含:--with-http_geoip_module,说明未安装,重新编译安装 nginxhttp_geoip_module 模块后使用以下配置
nginx.conf http { geoip_country /usr/share/GeoIP/GeoIP.dat; server { listen 80; server_name csms.tech; location / { if ($geoip_country_code != CN) { root outChina; } root China; } } }
server 中 location 优先级 server { # 精确匹配,最高优先级 location = /url {} # 从前往后匹配,匹配到即停止继续匹配,不是正则匹配,第二优先级 location ^~ /uri {} # 正则匹配,~ 区分大小写, ~* 不区分大小写,第三优先级 location ~ ^/url$ {} location ~* ^/url$ {} # / 会匹配到所有未被匹配到的 url location /documents/ {} location / {} }
301 跳转配置 如下配置,使用 rewrite 或 return 指令,所有 csms.tech301 重定向到 www.csms.techuri
server {
    listen 80;
    server_name csms.tech;

    rewrite ^/(.*)$ https://www.csms.tech$1 permanent;

    # return 301 https://www.csms.tech$request_uri;
}
url 访问频率限制 要实现访问频率限制,需要先 定义好限制区域 ,如本文中在 http {} 中配置了以下限制区域
# 定义限制区域,imit_req_zone 只能放在 http {} 内,使用此限制可以在 http {} (对服务器内所有的网站生效)、server {} (对具体的一个网站生效)或 location {} (对具体的一个网址生效) # 此区域名称为 test ,可根据需求自定义; 10m 表示此区域存储 key($binary_remote_addr )使用的大小 # 存储大小,一般 1m 空间大约能保存 1.6 万条 IP 地址,空间满了新数据会覆盖旧数据 # rate=1r/m ,限制访问请求频率为每分钟 1 次,可根据需要自行设置,1r/s 是 1 秒 1 次,时间单位只能选择 s (秒)或 m (分),最低频率限制是每分钟 1 次访问请求 limit_req_zone $binary_remote_addr zone=test:10m rate=1r/m;
在 server {} 中可以使用以下方式使用频率限制
server {
        # ...
        # 对 /api/test/ 进行访问频率限制
        location =/api/test/ {
            # 如果同 IP 一分钟内发起 10 并发请求,第 1 个请求立即处理,其余 9 个直接返回 503 错误
            limit_req zone=test;

            # 如果同 IP 一分钟内发起 10 并发请求,第 1 个请求立即处理,第 2-6 个请求缓存后排队 1 分钟处理 1 个,第 7-10 个请求返回 503 错误
            limit_req zone=test burst=5;

            # 如果同 IP 一分钟内发起 10 并发请求,第 1-5 个请求立即处理,剩下的 5 个直接返回 503 错误
            # nodelay,如果不设置该选项,严格使用平均速率限制请求数
            # burst=5,则 1m 内最多可请求 5 次。
            # 假设 rate=10r/s,burst=5,只要第 1,2,3,4 秒都未超过 10 次,则第 5 秒可以最多请求 (50 减去第 1-4 秒请求次数的和)
            limit_req zone=test burst=5 nodelay;
        }
    }
log 中记录客户端传入的自定义头部 假如客户端请求 Nginx 服务器时,添加了自定义头部 name_id,如果要在日志中引用此自定义头部,需要使用格式 http_name_id,如果直接使用 name_id 会报错: unknown "name_id" variable
同时要在 nginx.conf 的 http 模块中配置 underscores_in_headers on; 允许处理带有下划线字符的头字段(如果设置为 off,Nginx 会拒绝包含下划线字符的头字段。日志中记录的字段值会为 -)
Nginx 使用 $http_ 前缀加上请求头部名称的小写 形式来引用请求头部。
Nginx 默认情况下只捕获小写的头部字段。如果客户端发送的是大写或大小写混合的头部字段,你需要使用 underscores_in_headers 指令来允许 Nginx 处理这类头部
stream 配置 nginx 通过 stream 模块实现了 tcp 代理功能,无需其他软件配合即可实现四层代理和七层代理,即:访问该服务器的指定端口,nginx 就可以充当端口转发的作用将流量导向另一个服务器,同时获取目标服务器的返回数据并返回给请求者。这是一个非常实用的功能。
yum 安装的 nginx ,使用以下命令安装 stream 模块 [3]
yum install -y nginx-mod-stream
请注意,stream 块和 http 块是两个不同的模块,stream 不属于 http 模块 ,即不能放到 /etc/nginx/conf.d/,stream 是通过 tcp 层转发,而不是 http 转发。
如配置在 http 内,启动 nginx 会报如下错误:nginx: [emerg] "server" directive is not allowed here
stream 需要配置在 nginx.conf 中和 http 命令同级的位置。
nginx.conf load_module /usr/lib64/nginx/modules/ngx_stream_module.so; user nginx nginx; worker_processes auto; worker_rlimit_nofile 65535; pid conf/nginx.pid; events { use epoll; worker_connections 309600; } http { include mime.types; default_type application/octet-stream; ... include vhosts.d/*.conf; } # stream config. stream { log_format proxy '{time: $time_local|' 'remote_addr: $remote_addr|' 'protocol: $protocol|' 'bytes_sent: $bytes_sent|' 'bytes_received: $bytes_received|' 'session_time: $session_time|' 'upstream_addr: $upstream_addr|' 'upstream_bytes_sent: $upstream_bytes_sent|' 'upstream_bytes_received: $upstream_bytes_received|' 'upstream_connect_time: $upstream_connect_time|' 'status: $status}'; # tcp/ip proxy include /etc/nginx/tcp.d/*.conf; }
安装了 nginx-mod-stream,nginx 启动报错:unknown directive "stream",需要在 nginx.conf 中手动加载模块:load_module /usr/lib64/nginx/modules/ngx_stream_module.so;
stream 模块和 http 模块使用独立的日志格式配置,日志格式通过命令 log_format 配置。
常见错误 worker_connections exceed open file resource limit 问题原因 : worker_rlimit_nofile 的值小于 worker_connections 的值,参数说明可参考 全局通用配置
CORS HTTP Preflight Request 说明 HTTP Preflight Request 是浏览器在发送跨域请求(Cross-Origin Request)时,出于安全考虑,先发送的一种特殊请求。它的目的是确保服务器允许实际的跨域请求。
Preflight Request 是一个 OPTIONS 请求,由浏览器自动发起,用于检查服务器是否允许实际的跨域请求。它通常在以下情况下触发:
请求方法不是 GET 、 POST 或 HEAD 。
请求包含自定义的 HTTP 头(如 Authorization 、 Content-Type 等)。
请求的 Content-Type 不是 application/x-www-form-urlencoded 、 multipart/form-data 或 text/plain 。
Preflight Request 的工作流程
浏览器发送 Preflight Request :
服务器响应 Preflight Request :
服务器需要返回以下头信息:
Access-Control-Allow-Origin : 允许的源(如 * 或 https://www.gfcat8.com )。Access-Control-Allow-Methods : 允许的 HTTP 方法(如 GET , POST , OPTIONS )。Access-Control-Allow-Headers : 允许的自定义头(如 Content-Type , d )。Access-Control-Max-Age : Preflight 响应的缓存时间(可选)。
浏览器检查响应 :
Preflight Request 配置示例如下:
nginx/1.24.0 location / { if ($request_method = OPTIONS) { add_header 'Access-Control-Allow-Origin' '*'; add_header 'Access-Control-Allow-Methods' 'GET, POST, OPTIONS'; add_header 'Access-Control-Allow-Headers' 'Content-Type, d'; return 204; } }
错误场景 :
浏览器访问报跨域错误,nginx 已配置了 add_header Access-Control-Allow-Origin *;,具体报错:Access to XMLHttpRequest at 'http://spin-gate.test.com/webhooks/preconfigured' from origin 'http://spinnaker.test.com' has been blocked by CORS policy: Response to preflight request doesn't pass access control check: The value of the 'Access-Control-Allow-Origin' header in the response must not be the wildcard '*' when the request's credentials mode is 'include'. The credentials mode of requests initiated by the XMLHttpRequest is controlled by the withCredentials attribute.问题原因及客户端解决方法
nginx 服务端解决方法 nginx 配置允许单个目标跨域 nginx 配置 add_header Access-Control-Allow-Origin 可以配置允许跨域,此参数只允许配置单个域名或者 *
# add_header Access-Control-Allow-Origin *;
add_header Access-Control-Allow-Origin http://127.0.0.1;
add_header Access-Control-Allow-Methods 'GET, POST, OPTIONS';
add_header Access-Control-Allow-Headers 'DNT,X-Mx-ReqToken,Keep-Alive,User-Agent,X-Requested-With,If-Modified-Since,Cache-Control,Content-Type,Authorization,lang,access-token';
nginx 配置允许多个目标跨域 nginx 配置 add_header Access-Control-Allow-Origin 只能配置一个目标,不能配置多个目标,要使用此指令配置多个目标允许跨域,可参考以下方法
通过设置变量值解决指定多个域名白名单跨域请求配置
通过在 nginx 配置中设置变量,来匹配允许跨域的目标,示例代码如下 [1]
server {
    set $cors_origin "";
    if ($http_origin ~* "^http://127.0.0.1$") {
            set $cors_origin $http_origin;
    }
    if ($http_origin ~* "^http://localhost$") {
            set $cors_origin $http_origin;
    }
    add_header Access-Control-Allow-Origin $cors_origin;
    add_header Access-Control-Allow-Methods GET,POST,PUT,DELETE,OPTIONS;
}
通过以上配置,可实现允许 http://127.0.0.1,http://localhost 跨域,如果需要允许其他目标跨域,以此添加配置即可。
使用 map 指令实现 Nginx 允许多个域名跨域
在 Nginx 中可以使用 map 指令得到一个自定义变量,可以对请求中的 origin 做一个过滤处理,把符合要求的请求域名放到一个变量中,在设置 Access-Control-Allow-Origin 时使用该变量就能实现一个动态的、多个的允许跨域域名,示例配置如下 [2]
map $http_origin $allow_origin {
    default "";
    "~^(https?://localhost(:[0-9]+)?)$" $1;
    "~^(https?://127.0.0.1(:[0-9]+)?)$" $1;
    "~^(https?://172.10(.[\d]+){2}(:[0-9]+)?)$" $1;
    "~^(https?://192.168(.[\d]+){2}(:[0-9]+)?)$" $1;

    "~http://www.123admin.com" http://www.123admin.com;
}

server {
    listen       11111;
    server_name  localhost;

    location ~ /xxx/xx {
        if ($request_method = 'OPTIONS') {
            return 204;
        }
        add_header Access-Control-Allow-Origin $allow_origin;
        add_header Access-Control-Allow-Methods 'GET, POST, OPTIONS';
        add_header Access-Control-Allow-Headers 'DNT,X-Mx-ReqToken,Keep-Alive,User-Agent,X-Requested-With,If-Modified-Since,Cache-Control,Content-Type,Authorization';
        add_header Access-Control-Allow-Credentials 'true';
        proxy_pass http://1.2.3.4:5678;
    }
}
解释说明:
$http_origin 是 Nginx 的内部变量,用于获取请求头中的 origin
$allow_origin 是可以自定义的变量名,用于接收 map 返回的值
$1 是 Nginx 对 PCRE 中关于后向引用和子组的兼容,用于获取匹配字符串的整个部分,并返回给 $allow_origin
Nginx 配置 ssl 时未指定 ssl nginx 如下的 server 配置:
server {
        listen 443;
        server_name test.com;

        ssl_certificate test.com.pem;
        ssl_certificate_key test.com.pem;
}
通过浏览器访问 https 协议,报错: This site can’t provide a secure connection ,ERR_SSL_PROTOCOL_ERROR
使用 curl 命令访问报错:
* NSS error -12263 (SSL_ERROR_RX_RECORD_TOO_LONG)
* SSL received a record that exceeded the maximum permissible length.
* Closing connection 0
curl: (35) SSL received a record that exceeded the maximum permissible length.
修改配置:
server {
        listen 443 ssl;
        server_name test.com;

        ssl_certificate test.com.pem;
        ssl_certificate_key test.com.pem;
}
nginx.service failed to run ‘start-pre’ task: Permission denied Nginx 服务启动失败,启动报错输出及服务日志如下,启动错误关键信息 because a configured resource limit was exceeded.,nginx.service failed to run 'start-pre' task: Permission denied
# systemctl start nginx
Job for nginx.service failed because a configured resource limit was exceeded. See "systemctl status nginx.service" and "journalctl -xe" for details.

# journalctl -xe -u nginx
-- Unit nginx.service has failed.
--
-- The result is failed.
systemd[1]: nginx.service failed.
systemd[1]: nginx.service failed to run 'start-pre' task: Permission denied
systemd[1]: Failed to start nginx - high performance web server.
-- Subject: Unit nginx.service has failed
-- Defined-By: systemd
-- Support: http://lists.freedesktop.org/mailman/listinfo/systemd-devel
--
-- Unit nginx.service has failed.
--
-- The result is failed.
根据日志信息显示,主要问题出在 Permission denied,为定位到具体的权限被拒绝的文件路径,检查 Nginx 日志
# cat nginx.confgoogle_perftools_profiles /tmp/tcmalloc; error_log /home/logs/nginx/error/error.log crit;
查看日志 /home/logs/nginx/error/error.log 输出内容,显示 /tmp/tcmalloc 权限被拒绝。
# tail /home/logs/nginx/error/error.log[crit] 12923#0: ProfilerStart(/tmp/tcmalloc.12923) failed (13: Permission denied) [crit] 12935#0: ProfilerStart(/tmp/tcmalloc.12935) failed (13: Permission denied) [crit] 12920#0: ProfilerStart(/tmp/tcmalloc.12920) failed (13: Permission denied) [crit] 12929#0: ProfilerStart(/tmp/tcmalloc.12929) failed (13: Permission denied) [crit] 12933#0: ProfilerStart(/tmp/tcmalloc.12933) failed (13: Permission denied) [crit] 12927#0: ProfilerStart(/tmp/tcmalloc.12927) failed (13: Permission denied) [crit] 12922#0: ProfilerStart(/tmp/tcmalloc.12922) failed (13: Permission denied) [crit] 12925#0: ProfilerStart(/tmp/tcmalloc.12925) failed (13: Permission denied) [crit] 12937#0: ProfilerStart(/tmp/tcmalloc.12937) failed (13: Permission denied) [crit] 12921#0: ProfilerStart(/tmp/tcmalloc.12921) failed (13: Permission denied)
检查 /tmp 路径权限,结果为 777,再检查特殊权限,看到 /tmp 目录被加了 i 权限(immutable),表示此目录不可更改
# ll /
...
drwxrwxrwt.  20 root root  4096 Feb  1 13:18 tmp

# lsattr /
...
----i----------- /tmp
---------------- /usr
删除 /tmp 目录的 i(immutable) 特殊权限后重启 Nginx 服务正常
# chattr -R -i /tmp/

# lsattr /
...
---------------- /var
---------------- /tmp

# systemctl start nginx
静态文件加载正常,web 页面未展示样式 使用 Nginx 服务器作为 Web 服务器,浏览器请求 Web 页面后,所有的资源请求都正常,但是 Web 页面上的样式并未渲染,检查静态文件(CSS,JS 等)都正常加载
在浏览器上单独请求静态文件(如 js 文件)会直接下载静态文件,而不是展示静态文件内容。正常请求静态文件是要展示静态文件的内容。至此可以确定是 因为 Nginx 响应中未包含文件解析类型导致浏览器不知道文件扩展名和相应的 MIME 类型之间的映射关系 mime.types.
检查 Nginx 配置文件,发现配置中未包含 mime.types 配置,因此在 Nginx 配置中添加以下配置来解决此问题
nginx.conf http { ... include mime.types; }
重启 Nginx 服务,清空缓存后,再次请求,页面展示正常。
nginx 反代 wordpress 使用 HTTPS 时一直重复重定向 循环重定向,应该是因为 Wordpress 认为这个请求是来自 HTTP 的,所以尝试重定向到 HTTPS,导致了循环 。在 CDN 使用 HTTPS 加速并且回源使用 HTTP 协议,而服务器配置了后台站点为 HTTPS,此时会出现此问题。可以采用以下解决方法之一
在 Nginx 反代服务器上添加配置 fastcgi_param HTTPS on; [5]
Wordpress 后台站点配置使用 HTTP 协议。
nginx 服务 reload 失败 执行 systemctl restart nginx 时执行成功,执行 systemctl reload nginx 报错:
# systemctl reload nginx Job for nginx.service failed because the control process exited with error code. See "systemctl status nginx.service" and "journalctl -xe" for details. # journalctl -u nginx Feb 12 13:18:12 nginx systemd[1]: Reloading nginx - high performance web server. Feb 12 13:18:12 nginx nginx[4677]: nginx: [alert] kill(13084, 1) failed (3: No such process) Feb 12 13:18:12 nginx systemd[1]: nginx.service: control process exited, code=exited status=1 Feb 12 13:18:12 nginx systemd[1]: Reload failed for nginx - high performance web server. # cat /usr/lib/systemd/system/nginx.service[Unit] Description=nginx - high performance web server After=network.target remote-fs.target nss-lookup.target [Service] Type=forking PIDFile=/usr/local/nginx-1.24.0/conf/nginx.pid ExecStartPre=/usr/local/nginx-1.24.0/sbin/nginx -t -c /usr/local/nginx-1.24.0/conf/nginx.conf ExecStart=/usr/local/nginx-1.24.0/sbin/nginx -c /usr/local/nginx-1.24.0/conf/nginx.conf ExecReload=/usr/local/nginx-1.24.0/sbin/nginx -s reload ExecStop=/usr/local/nginx-1.24.0/sbin/nginx -s stop ExecQuit=/usr/local/nginx-1.24.0/sbin/nginx -s quit PrivateTmp=true [Install] WantedBy=multi-user.target
根据报错日志信息: nginx: [alert] kill(13084, 1) failed (3: No such process) 可知,是由于 reload 时无法找到 pid 文件导致,需要检查 pid 文件是否存在
Nginx 常见用法配置示例 Nginx 反代 FTP 服务 Nginx 代理 TCP 端口需要使用 stream 模块 [4]
示例配置前提:
FTP 服务器使用 被动模式 (vsftpd 服务常用配置说明 )
FTP 命令传输端口为 21
FTP 数据传输端口范围为 11001 - 11004
nginx 配置文件 nginx.conf 中和 http 模块同级的位置添加 stream 配置
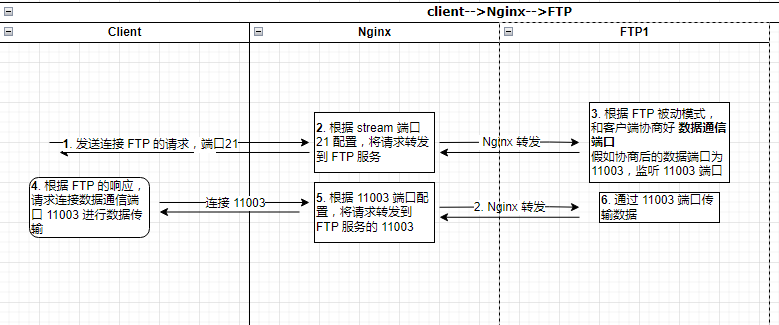
nginx.conf stream { # FTP 的命令端口(21)代理配置 server { listen 21 ; proxy_pass ftp_server; proxy_connect_timeout 60s; proxy_timeout 60m; } upstream ftp_server{ hash $remote_addr consistent; server 192.168.1.2:21; } # FTP 的数据传输端口(11001 - 11004 )代理配置 server { listen 11001; proxy_pass ftp_trans_data_port1; } upstream ftp_trans_data_port1 { hash $remote_addr consistent; server 192.168.1.2:11001; } server { listen 11002; proxy_pass ftp_trans_data_port2; } upstream ftp_trans_data_port2 { hash $remote_addr consistent; server 192.168.1.2:11002; } server { listen 11003; proxy_pass ftp_trans_data_port3; } upstream ftp_trans_data_port3 { hash $remote_addr consistent; server 192.168.1.2:11003; } server { listen 11004; proxy_pass ftp_trans_data_port4; } upstream ftp_trans_data_port4 { hash $remote_addr consistent; server 192.168.1.2:11004; }
整个工作流程大体如下:
特殊情况说明
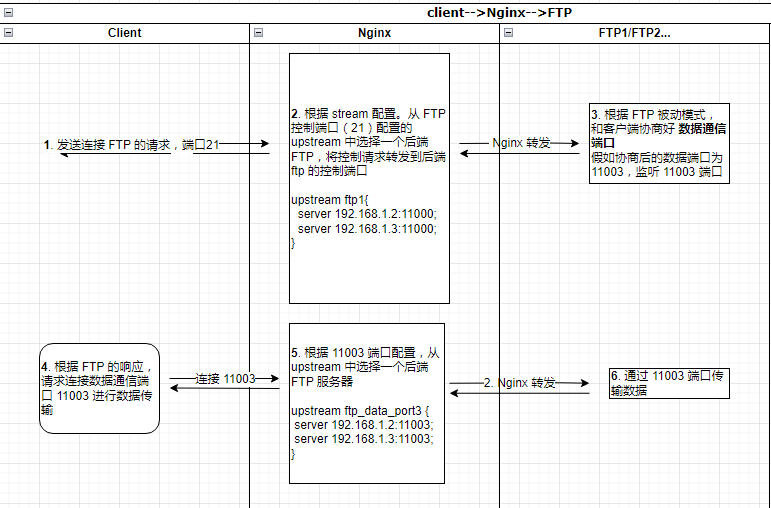
因为 FTP 协议的原因,如果在同一个 Nginx 中要反代多台 FTP 服务器,那么 FTP 服务使用的数据传输端口(被动模式下)不能相同,因为 Nginx 不能重复监听相同的端口。
此种情况下(同一个 Nginx 要反代多台有相同数据传输端口的 FTP 服务),可以将后端 FTP 服务加到同一个 upstream 中,然后 nginx 监听数据传输端口,此时存在的问题是 如果后端的 2 台或多台 FTP 同时使用了相同的数据传输端口,可能会导致客户端的数据连接被反代到错误的 FTP 服务器
此种特殊情况下的具体工作流程:
stream {

      # ftp 命令(控制)端口
      server {
          listen 21;
          proxy_pass ftp1;
      }
      upstream ftp1{
          hash $remote_addr consistent;
          server 192.168.1.2:11000;
          server 192.168.1.3:11000;
      }
      # ftp 数据传输端口,ftp 服务配置为被动模式,数据传输端口 11001-11003
      server {
          listen 11001;
          proxy_pass ftp_data_port1;

      }
      upstream ftp_data_port1 {
          hash $remote_addr consistent;
          server 192.168.1.2:11001;
          server 192.168.1.3:11001;
      }

	  server {
          listen 11002;
          proxy_pass ftp_data_port2;

      }
      upstream ftp_data_port2 {
          hash $remote_addr consistent;
          server 192.168.1.2:11002;
          server 192.168.1.3:11002;
      }
	  server {
          listen 11003;
          proxy_pass ftp_data_port3;

      }
      upstream ftp_data_port3 {
          hash $remote_addr consistent;
          server 192.168.1.2:11003;
          server 192.168.1.3:11003;
      }
}
此种配置下可能出现以下几种情况(假定后端 FTP 服务器分别为 A 和 B):
第 2 步中,假如 Nginx 选择了后端 FTP 服务器 A ,并将控制请求转发到了 A.,ftp A 和客户端协商使用 11003 端口进行数据传输。
客户端收到控制面的响应后,发起和 FTP 服务的 11003 的数据传输请求, 请求到了 Nginx 服务器,Nginx 通过 11003 端口的配置,在 upstream 中选择了后端的 A 服务器 ,并将请求转发到了服务器 A,A 已经监听了此端口,可以正常完成数据传输。
第 2 步中,假如 Nginx 选择了后端 FTP 服务器 A ,并将控制请求转发到了 A.,ftp A 和客户端协商使用 11003 端口进行数据传输。
客户端收到控制面的响应后,发起和 FTP 服务的 11003 的数据传输请求, 请求到了 Nginx 服务器,Nginx 通过 11003 端口的配置,在 upstream 中选择了后端的 B 服务器 ,并将请求转发到 B 服务器,假如 B 服务器未监听此端口(因为此次请求之前的控制面是由 A处理,B 并未参与),后端未响应 ,此时 Nginx 会将请求转发到 A 服务器,正常完成数据传输
第 2 步中,假如 Nginx 选择了后端 FTP 服务器 A ,并将控制请求转发到了 A,ftp A 和客户端协商使用 11003 端口进行数据传输。
客户端收到控制面的响应后,发起和 FTP 服务的 11003 的数据传输请求, 请求到了 Nginx 服务器,Nginx 通过 11003 端口的配置,在 upstream 中选择了后端的 B 服务器 ,并将请求转发到 B 服务器,假如 B 服务器也监听了此端口(例如代理到 B 服务器得 FTP 控制端响应中,也和客户端协商了使用 11003 端口进行数据传输),Nginx 和后端 FTP 的 11003 端口可以建立连接 ,但是因为鉴权等原因,FTP 服务器会返回传输失败信息给客户端.此时虽然完整的建立了整个流程中的连接,但是数据传输最终失败 .
Nginx 反代 Rancher Rancher 安装及使用
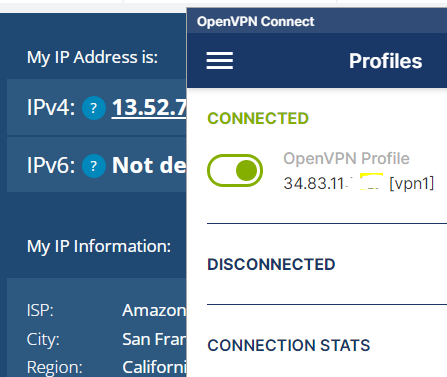
Nginx 反代 OpenVPN 服务 使用 Nginx stream 模块可以实现 Nginx 反代 OpenVPN 的流量,但是连接 VPN 之后,客户端显示的 IP 依然为 OpenVPN 服务端 IP。
nginx.conf stream { log_format proxy '{time: $time_local|' 'remote_addr: $remote_addr|' 'protocol: $protocol|' 'bytes_sent: $bytes_sent|' 'bytes_received: $bytes_received|' 'session_time: $session_time|' 'upstream_addr: $upstream_addr|' 'upstream_bytes_sent: $upstream_bytes_sent|' 'upstream_bytes_received: $upstream_bytes_received|' 'upstream_connect_time: $upstream_connect_time|' 'status: $status' ; access_log /home/logs/nginx/access/vpn_proxy.access proxy; server { listen 1194 ; proxy_pass 13.52 .72 .24 :1194 ; } }
Nginx if 实现与或操作 Nginx 不支持 if 语句中使用逻辑 && || 运算,而且不支持 if 的嵌套语法。要实现 if 中的 与 和 或 操作,可以使用下面的方法实现
server.conf set $flag 0; if ($host = "test.domain.com") { set $flag "${flag}1"; } if ($remote_addr = 1.1.1.1) { set $flag "${flag}1"; }
经过以上条件判断:
如果 既满足 第一个条件, 又满足 第二个条件,则 $flag = 011
如果 满足 第一个条件, 不满足 第二个条件,则 $flag = 01
如果 不满足 第一个条件, 满足 第二个条件,则 $flag = 01
如果 2 个条件都 不满足 ,则 $flag = 0
在此基础上,要实现 与或 操作,示例如下
server.conf # 与操作 if ($flag = "011") {return 200;} # 或操作 if ($flag = "01") {return 200;}
脚注